These gift card holders are approximately 3" x 4-1/2" and holds a standard sized gift card. The file comes with all the paper elements shown and is compatible with both the 8x12 and 12x12 mats. The bow and/or gift card holder can be used on its own.
Double Bow Gift Card Holder:
Double Bow Tutorial:
Tutorial:
1. Cut out the bow pieces.
2. Turn the main bow piece over and place adhesive on each of the four tabs. Adhere one of the tabs to the center, lining up the bow curve.
3-5. Continue adhering the tabs pieces to the center.
6. Adhere the bow base in place on the backside of the bow.
7. Form a loop and adhere the ends of the small piece as shown.
8. Turn your bow back over (right side up) and adhere the small loop in the center of the bow to finish!
This gift card wallet is approximately 4-1/4" x 3-1/2" when assembled and holds 4 standard sized gifts cards in their own space. Perfect for the upcoming Holidays and all those hard to buy for teenagers or to show appreciation for those amazing teachers out there! The file is compatible with the 12x12 or larger platforms.
Outside:
Inside:
Tutorial:
1. Cut out your pieces. Fold the base on the score lines so that the first score line folds down and accordion fold from here. Place your mat on the front facing side, lining up the holes as shown. Layer your bow pieces and adhere the long strip to the present under the "lid" area.
2. Flip your base over. Place adhesive on the top fold as shown, this will press down and hide the ribbon. Cut a 24" piece of ribbon and string through as shown.
3. Adhere the top part down to cover ribbon. This is the inside back of the wallet. Place 1/4" adhesive tape (or small bead of glue) down the next two areas that peak up (shown in image with white adhesive tape).
4. Adhere the middle section in to form the first "pocket". Adhere the second piece up to form the other "pocket" areas.
5. Flip the bottom up and place adhesive as shown. Adhere in place.
6. Insert gift cards and embellish as desired!
This Toolbox Gift Card Holders fits a standard gift card. The toolbox top pulls up to reveal the gift card. The finished project is approximately 4-3/4" x 4-1/4" and is compatible with both the 8x12 and 12x12 mats.
This one follows the same instructions for my present gift cards.
You can find the detail tutorial for this Gift Card Holder here:
Below are the images for this cards assembly:
This file comes with the card base, card base mat, wrap, sentiment, and the tape measure. The card is approximately 6-1/4" x 4" when folded and the inside has a flap to hold money, a couple gift cards (those would need to be taped in place), or even coupons/notes for Dad. The file is compatible with both the 8x12 and 12x12 mats. The sentiment is underlined to join the lettering making it easy to cut and adhere!
This divided box is approximately 3-3/8" x 1-3/4" x 2-1/2" (4-1/2" with handle) and comes with the one piece box base, the handle, and the mats shown. This little divided box is perfect for gifting nail polishes, small makeup items, candies, and homemade goodies! Each section is approximately 2" x 2" for storage.
Here is the tutorial:
1. Cut out your pieces and fold on the score lines. Place adhesive on the 8 tabs as well as the 2 large center sections as show with the white adhesive tape in the image. Adhere the angled mats in place as well as the mat for the handle.
2. Flip your main box over and add the long mats in place.
3. Adhere the tabs together as shown.
4. Repeat for the other side to form your box shape.
5. Do the same for the other side of the box. Your box should look like this now.
6. Flip your box over and remove the adhesive tape.
7. Press the two box shapes together to adhere.
8. Add your handle into the slots on each side of the box.
9. Adhere your remaining mats in place to cover the handles. Fill and embellish as desired!
This large divided box is approximately 4-1/2" x 2-1/2" x 3-1/2" and comes with a two-piece box base and the mats shown. This divided box is perfect for gifting candy, homemade goodies, and even for gifting to Dad or Grandpa's to store remotes! Each section is approximately 2-1/4" x 2-1/2" for storage.
Here is the tutorial:
1. Cut out all your pieces and fold on the score lines. Place adhesive on the 8 tabs as well as the one of the large sections as show with the white adhesive tape in the image. Adhere the angled mats in place as well as the smaller edge mat.
2. Flip your main box over and add the long mats in place.
3. Adhere the tabs together as shown.
4. Repeat for the other side to form your box shape. Do the same for the other box. Your boxes should look like this now.
5. Remove the adhesive tape.
6. Press the two boxes together to adhere. Fill and embellish as desired!
This Tri-Shutter card is approximately 3-3/4" x 6" and comes with the card base with score lines and the mats and paper embellishments shown. If you need a tutorial for the folding of the cards, you can find that HERE.
Mom Tri-Shutter Card:
Mum Tri-Shutter Card:
This Two-Toned Large Gift bag is approximately 3" x 2-1/2" x 6-1/4". The file comes with the one piece box base, a box bottom cover, and the decorative paper mat which folds over into the inside for a more professional look! This bag is perfect for gift giving and is compatible with both 8x12 and 12x12 mats!
Here is the tutorial:
1. Cut out all your pieces and fold on the score lines. Add adhesive to the long side tab of the box as well as the two small bottom tabs. Add adhesive to one side of the bottom cover then adhere your decorative paper piece in place, lining up the holes.
2. Adhere the side tab to the other side of the box to form the shape.
3. Push in the two small bottom tabs then adhere in one of the bottom flaps.
4. Adhere the remaining bottom flap in place to close the box.
5. Adhere the bottom cover in place then flip your box upright!
6. Fold down each panel of the decorative mat to finish the box. Fill and embellish as desired!
I use an 11" piece of ribbon for each side of the box. I double knot the inside for each hole then trim the end up with shorter than 11" but it is a lot easier to tie when you have more room to play with.
New Rolled Flowers!
These files comes with the rolled flower design shown in the image as well as the leaf set. The designs can be sized to fit your needs and are compatible with the 8x12 and 12x12 mats. These are perfect for adding to cards, layouts, bags, boxes, creating wreaths, and more! The leaf is sized at approximately 4-1/2" x 1" to give you an idea of the size. Be sure to check out the entire collection!
See more rolled flowers HERE!

Tips
For my flowers I am using a variety of cardstock weights, mostly 60# and 80# and I cut them at a slower speed (I am using 5 on my machine but if they aren't cutting well, slow it down more) as some of them are detailed in shape. Before you "unload" your mat, lift up the paper a bit to see if it has cut well...if not, push paper back down and cut again! Hot glue is my preference for flowers, it just seems to hold the best over time. I use a wide slot quilling tool, the slot is a bit wider than most which I think is easier to work with. Before I found this tool, I used tweezers to start my rolls and finished with my fingers - I often still use my fingers to roll after I get them started. Don't be afraid to roll tight and you can let loose before adhering together to achieve the look you want. And...make sure you curve the leaf pieces some too, I use a skewer to do mine but a pencil works great too!
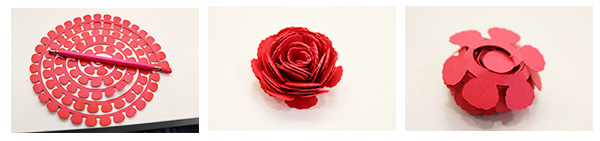
Rolled Flower 1

Here is the tutorial:
1. Cut out your form and using a quilling tool or tweezers (or fingers!), begin rolling the form from the outer edge as shown in the image.
2. Continue to roll until you reach the center. Add a strong adhesive (like hot glue or a quick drying liquid) and press the round center to the middle.
3. This image is just showing the bottom of the flower. Cut and adhere your leaf pieces together then add adhesive to the center of the leaf and press the flower to the center to attach!
* * * * *
Rolled Flower 2

1. Cut out your form and using a quilling tool or tweezers (or fingers!), begin rolling the form from the outer edge as shown in the image.
2. Continue to roll until you reach the center. Add a strong adhesive (like hot glue or a quick drying liquid) and press the round center to the middle.
3. This image is just showing the bottom of the flower. Cut and adhere your leaf pieces together then add adhesive to the center of the leaf and press the flower to the center to attach!
* * * * *
Rolled Flower 3
1. Cut out your form and using a quilling tool or tweezers (or fingers!), begin rolling the form from the outer edge as shown in the image.
2. Continue to roll until you reach the center. Add a strong adhesive (like hot glue or a quick drying liquid) and press the round center to the middle.
3. This image is just showing the bottom of the flower. Cut and adhere your leaf pieces together then add adhesive to the center of the leaf and press the flower to the center to attach!
* * * * *
Rolled Flower 4
1. Cut out your form and using a quilling tool or tweezers (or fingers!), begin rolling the form from the outer edge as shown in the image.
2. Continue to roll until you reach the center. Add a strong adhesive (like hot glue or a quick drying liquid) and press the round center to the middle.
3. This image is just showing the bottom of the flower. Cut and adhere your leaf pieces together then add adhesive to the center of the leaf and press the flower to the center to attach!
* * * * *
Rolled Flower 5
1. Cut out your form and using a quilling tool or tweezers (or fingers!), begin rolling the form from the outer edge as shown in the image.
2. Continue to roll until you reach the center. Add a strong adhesive (like hot glue or a quick drying liquid) and press the round center to the middle.
3. This image is just showing the bottom of the flower. Cut and adhere your leaf pieces together then add adhesive to the center of the leaf and press the flower to the center to attach!
* * * * *
Rolled Flower 6
1. Cut out your form and using a quilling tool or tweezers (or fingers!), begin rolling the form from the outer edge as shown in the image.
2. Continue to roll until you reach the center. Add a strong adhesive (like hot glue or a quick drying liquid) and press the round center to the middle.
3. This image is just showing the bottom of the flower. Cut and adhere your leaf pieces together then add adhesive to the center of the leaf and press the flower to the center to attach!
* * * * *
Rolled Flower 7
1. Cut out your form and using a quilling tool or tweezers (or fingers!), begin rolling the form from the outer edge as shown in the image.
2. Continue to roll until you reach the center. Add a strong adhesive (like hot glue or a quick drying liquid) and press the round center to the middle.
3. This image is just showing the bottom of the flower. Cut and adhere your leaf pieces together then add adhesive to the center of the leaf and press the flower to the center to attach!
* * * * *
Rolled Flower 8
1. Cut out your form and using a quilling tool or tweezers (or fingers!), begin rolling the form from the outer edge as shown in the image.
2. Continue to roll until you reach the center. Add a strong adhesive (like hot glue or a quick drying liquid) and press the round center to the middle.
3. This image is just showing the bottom of the flower. Cut and adhere your leaf pieces together then add adhesive to the center of the leaf and press the flower to the center to attach!
* * * * *
Rolled Flower 9


1. Cut out your form and using a quilling tool or tweezers (or fingers!), begin rolling the form from the outer edge as shown in the image.
2. Continue to roll until you reach the center. Add a strong adhesive (like hot glue or a quick drying liquid) and press the round center to the middle.
3. This image is just showing the bottom of the flower. Cut and adhere your leaf pieces together then add adhesive to the center of the leaf and press the flower to the center to attach!
* * * * *
Rolled Flower 10


1. Cut out your form and using a quilling tool or tweezers (or fingers!), begin rolling the form from the outer edge as shown in the image.
2. Continue to roll until you reach the center. Add a strong adhesive (like hot glue or a quick drying liquid) and press the round center to the middle.
3. This image is just showing the bottom of the flower. Cut and adhere your leaf pieces together then add adhesive to the center of the leaf and press the flower to the center to attach!
* * * * *
Rolled Flower 11


1. Cut out your form and using a quilling tool or tweezers (or fingers!), begin rolling the form from the outer edge as shown in the image.
2. Continue to roll until you reach the center. Add a strong adhesive (like hot glue or a quick drying liquid) and press the round center to the middle.
3. This image is just showing the bottom of the flower. Cut and adhere your leaf pieces together then add adhesive to the center of the leaf and press the flower to the center to attach!
* * * * *
Rolled Flower 12


1. Cut out your form and using a quilling tool or tweezers (or fingers!), begin rolling the form from the outer edge as shown in the image.
2. Continue to roll until you reach the center. Add a strong adhesive (like hot glue or a quick drying liquid) and press the round center to the middle.
3. This image is just showing the bottom of the flower. Cut and adhere your leaf pieces together then add adhesive to the center of the leaf and press the flower to the center to attach!
* * * * *
Rolled Flower 13
1. Cut out your form and using a quilling tool or tweezers (or fingers!), begin rolling the form from the outer edge as shown in the image.
2. Continue to roll until you reach the center. Add a strong adhesive (like hot glue or a quick drying liquid) and press the round center to the middle.
3. This image is just showing the bottom of the flower. Cut and adhere your leaf pieces together then add adhesive to the center of the leaf and press the flower to the center to attach!
* * * * *
Rolled Flower 14


1. Cut out your form and using a quilling tool or tweezers (or fingers!), begin rolling the form from the outer edge as shown in the image.
2. Continue to roll until you reach the center. Add a strong adhesive (like hot glue or a quick drying liquid) and press the round center to the middle.
3. This image is just showing the bottom of the flower. Cut and adhere your leaf pieces together then add adhesive to the center of the leaf and press the flower to the center to attach!
Rolled Flower 17
1. Cut out your form and the layering piece. Adhere the layer to the form, matching up the end of the spirals. Using a quilling tool or tweezers (or fingers!), begin rolling the form from the outer edge as shown in the image.
2. Continue to roll until you reach the center. Add a strong adhesive (like hot glue or a quick drying liquid) and press the round center to the middle.
3. This image is just showing the bottom of the flower. Cut and adhere your leaf pieces together then add adhesive to the center of the leaf and press the flower to the center to attach!
* * * * *
-or-
in Cricut Design Space Friendly files on