This file comes with four cuts, the one cut sentiment shown on top, then the three pieces shown at the bottom allowing you to layer colors to customize your look! This file perfect for using on layouts, boxes, or cards and can be sized to fit your needs. Both sentiments are compatible with both the 8x12 and 12x12 mats.
You can find this file in my stores soon!
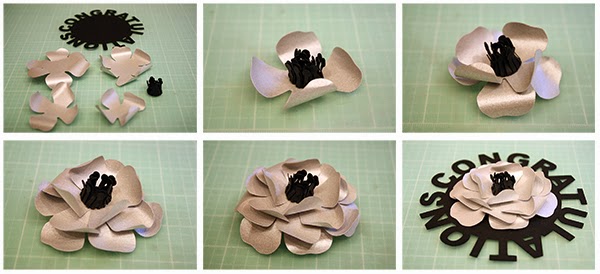
These sentiment flowers are perfect for gift bags and wrapped gifts, you could even use them for tags or cards! The files come with the sentiment backing and all the pieces you need to build the flowers. You can use the pieces on their own or together as shown.
Here's the tutorial:
1. Cut out all your pieces. Adhere the centers together and pull up the points toward the center.
2. Curl the petals with your skewer/pencil.
3. Adhere the center to the middle of the smallest flower form.
4-7. Continue adhering the flower forms on, staggering the petals until all flowers pieces are in place.
8. Adhere your flower on to the sentiment circle with a foam adhesive and manipulate the petals to get your desired shape.
Here's the tutorial:
1. Cut out all your pieces. Adhere the centers together and pull up the points toward the center. Curl the petals with your skewer/pencil.
2. Adhere the center to the middle of the smallest flower form.
3-5. Continue adhering the flower forms on, staggering the petals until all flowers pieces are in place.
6. Adhere your flower on to the sentiment circle with a foam adhesive and manipulate the petals to get your desired shape.
Here's the tutorial:
1. Cut out all your pieces. Curl the petals with your skewer/pencil. Roll the smallest petal and then bend at the bottom as shown. This will be your center.
2. Adhere the center to the middle of the smallest flower form.
3-7. Continue adhering the flower forms on, staggering the petals until all flowers pieces are in place.
8. Adhere your flower on to the sentiment circle with a foam adhesive and manipulate the petals to get your desired shape.
Here's the tutorial:
1. Cut out all your pieces. Adhere the centers together and pull up the points toward the center. Curl the petals with your skewer/pencil.
2. Adhere the center to the middle of the smallest flower form.
3-8. Continue adhering the flower forms on, staggering the petals until all flowers pieces are in place.
9. Adhere your flower on to the sentiment circle with a foam adhesive and manipulate the petals to get your desired shape.
Here's the tutorial:
1. Cut out all your pieces. Adhere the centers together and pull up the points toward the center. Curl the petals with your skewer/pencil.
2. Adhere the center to the middle of the smallest flower form.
3-5. Continue adhering the flower forms on, staggering the petals until all flowers pieces are in place.
6. Adhere your flower on to the sentiment circle with a foam adhesive and manipulate the petals to get your desired shape.
Today I am introducing three new A2 (4-1/4" x 5-1/2") cards that have fold back sentiments! Each card comes with the card base (which includes the sentiment in the cut) and a mat to add a decorative paper behind the sentiment! These cards are compatible with both the 8x12 and 12x12 mats.
I also have two new decorative elements releasing this week which
happen to be perfect for these cards!
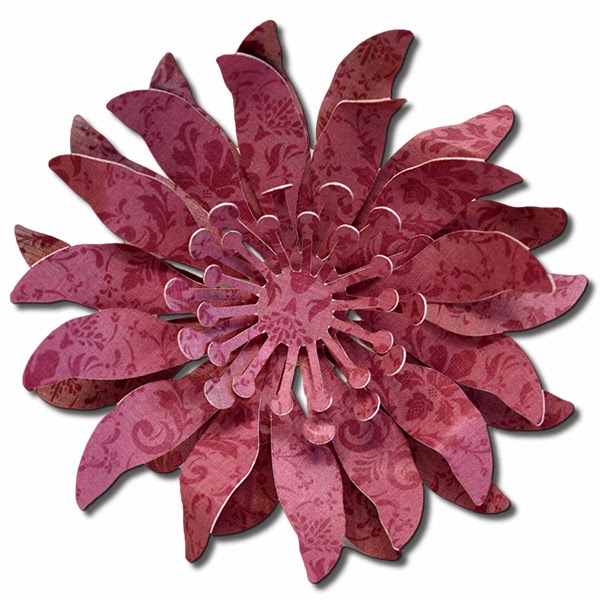
This flower can be sized to fit your needs and is compatible with both the 8x12 and 12x12 mats. The file comes four cuts; two petal sizes and two center pieces.
This file can be sized to fit your needs and is compatible with both the 8x12 and 12x12 mats. The file comes seven cuts; one ruffled heart shape and six heart cuts with built in score lines.
Here is a tutorial for recreating this card:
1. Cut out the Love card and the 3D Ruffled Heart. Fold on all the score lines.
2. Adhere the mat on the Love card and place adhesive on the small tab and on the letters.
3. Fold the letters back on to the mat and adhere in place.
4. Your card should look similar to this now.
5. Gather your heart pieces.
6-8. Adhere the hearts together using just one side of the heart. Continue until you have them all in place.
9. Adhere the heart to the ruffled heart backing.
10. Tie a ribbon around the card as shown.
11. Adhere the heart on the card, fluff out the pieces of the heart to make it full.
Happy 4th of July!
(Can you tell it is one of my favorites yet!?)
Supplies:
Pattern Paper: Little Black Dress (Basic Grey)
Sticker: Sticker Sentiment #51003, Happy Birthday (SRM)
Twine: Charcoal (The Twinery)
To create the image for the card, select the pirate below
and add him to the mat by clicking the '+' sign then click 'Next'.
On the Project Preview screen, touch the pirate image
and then click on the pencil icon to edit.
Change the size to 3.5" and then click on the
'Layers' tab to separate the images. Click Apply.
Back on the Project Preview page, click 'Next'.
Follow the instructions on the screen to print and cut.
Peel off your pieces and layer with foam adhesive.
The pirate fits perfectly on a 4" x 5-1/2" card.
I hope you enjoy your Fourth of July Weekend, be safe!