This Fancy Fold Scallop Heart Card is A2 (4-1/4" x 5-1/2") in size and comes with the card base, a rectangle mat (you can cut two if you want inside and back of card), two decorative mats for inside and the decorative mats for the outside. The main card base is all one piece and the sides fold over to the center. The file is compatible with the 8x12 and 12x12 mats.
Mat Placements:
This card is 5" x 7" and comes with the card base, three floral layer frames, the sentiment and sentiment mat. Be sure to ungroup the file before cutting! You can see the tutorial for this card on my blog.
Happy Anniversary
Here is the tutorial:
1. Make sure to ungroup and separate the file before cutting! You will have the card base, three frames, the sentiment cut and sentiment mat. Cut out all your pieces! Also make sure to KEEP the letter insides, we use them in step #5. Some of these pieces have small cuts. If you are having issues cutting, remember to slow your cutter down.2. Adhere the darker (less detailed) mat in place, centering.
3. Adhere the medium mat in place using the original frame as a guideline.
4. Adhere the most detailed mat in place (lightest shade) again using the previous frames to guide.
5. Adhere the sentiment to the sentiment mat, centering. Use a thin glue pen or liquid glue to adhere the centers of the letters in place. Then embellish and fill as desired!
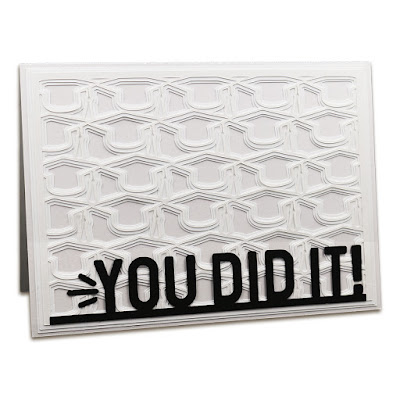
You Did It!
This layered card is 5" x 7" and comes with the card base, three graduation cap layers, and the sentiment. Be sure to ungroup the file before cutting! You can see the tutorial for this card on my blog.
Congratulations
This layered card is 5" x 7" and comes with the card base, main card mat, three star layers, and the sentiment. Be sure to ungroup the file before cutting! You can see the tutorial for this card on my blog.
Card ungrouped and cut:
I am finishing up this week with my new decorative cards. Each card comes with the paper elements shown and they are all compatible with the 8x12 and 12x12 mats.
Well hello again! I am back with another favor box, this one a little more elegant than the rest.
Supplies used:
This is my Elegant Favor box and it is perfect for Weddings, Anniversary Parties, Graduation Parties, or even to give as a gift. There are four pieces to this cut file: the box, two large designer pieces (one for the bottom and one to help shape the top), and one center piece. The center piece would be perfect for personalizing!
This file works with both the Cameo and Portrait mats.
Tutorial:
2. Fold on all the score lines of the box then add adhesive to the four tabs shown.
3. Adhere the tabs to the sides of the box.
4. Fold the top of the box down and tuck the tab into the slot.
5. Apply adhesive to the top of the box.
6. Adhere one of the two large designer pieces to the top of the box.
7. Turn the box over and apply adhesive to the bottom of the box, then adhere the second designer piece.
8. Turn your box back over and it should look like this!
9. Place foam adhesive on the back of the smaller designer piece.
10. Adhere the smaller piece to the center of the top of the box.
Have you seen the big news over at The Twinery this morning!?
They have released
Ahhh....love!
I used the Strawberry, Seaweed, and Ocean on my card below!
Supplies:
Cardstock: White (The Paper Studio)
Patterned Paper: Hello Luscious 6x6 (Basic Grey)
Dies: Lacey Ovals (Spellbinders)
Sticker: Sticker Sentiments #51004 Love (SRM)
Punch: Border (EK Success)
Adhesive: Adhesive Runner and Zapdots (Helmar)
Ribbon: Cream Crinkley (May Arts)


