Converting Clipart in Inkscape by Grays
Converting Drawings/Clipart By Tracing with Grays
(drawing by Linda (3birdmom))
(drawing by Linda (3birdmom))

Once you have your photo that you want to work with, open Inkscape.
Choose File/Open (Ctrl+O) and select your file and press enter
Next, choose Path/Trace Bitmap (Shift+Alt+B). This will bring up a separate box with options. This is where you have to play and determine what will work best with the photo you are using. I tend to trace by color or gray. For this example, I am going to choose Grays for this image. I will hit Update and then press OK. Note: If when you press update, the image doesn’t appear in the box, you need to go back to the original image you imported and click on it, then try again.

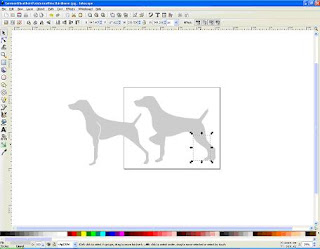
You will have to hit the red X to make this box go away. In most cases, your traced image will be stacked on top of your old image. You can click on the image and drag it to the side.

The traced image is cleaner in lines. Click on the original image and press delete.
I have moved my traced item back to the small square (you can work with it anywhere, I just like it in the square!). Click on the image to select it and then choose Path/Break Apart (Shift+Ctrl+K).

Once the image is broken apart, you will have layers of stacked images on top of each other. Click on a layer and drag it apart. Separate them out so that you can see all the layers. Note: You can do Shift and the – key to zoom out and Shift and the + key to zoom in.

As you can see there are eight layers (one is blank/white). I choose the images I want to work with and then delete the rest at this point. I the image on the bottom row, the one to the far left. I will click on the other images and press delete to remove them.

As you can see in the above photo (in the TOP circle), there is some shadowing/image bits toward the bottom. You can click on each individual piece and press delete or move your other objects and then with your mouse, click and drag around the area to highlight all the little pieces (this is typically faster and more clean). Once they are selected, then press delete.

You should now have one image. Click on the image to select it and then choose Path/Break Apart (Shift+Ctrl+K) again. Your image should display as below:

You will have to spread apart the layers, but be cautious of the cut spaces that will be needed (like the two open areas for his legs (one in front and one behind). We will want to leave those in the main cut.
I clicked off the photo and then back on and pulled the top layer off. If you grab a section you don’t want, just do CTRL+Z to undo. I then clicked on the image in the box and found that there is another section that I want to remove (you can see this highlighted in the box above). You can pull the image out to the side to see what it is and determine if you want it. I have pressed delete on this to remove it from the cut.
After clicking around in the image, I found one additional cut that I don’t want. I highlighted it and pressed delete to remove as I did with the other above.
After clicking around in the image, I found one additional cut that I don’t want. I highlighted it and pressed delete to remove as I did with the other above.

There is one more area that I need to move out, which is his ear.

Now, the only two areas in the main image (the one in the box) are the cuts for the legs. I will leave those as they are. Next step is to save them. Choose File/Save As… and save the file. Note, mine comes up with the .jpg still on it so I manually remove it before saving.

Once you have the .svg file saved, you can open SCAL and import it in by choosing File/Import SVG (Ctrl+Shift+I).
The images come in really big sometimes and other times small. I haven’t figured out why/how to change it, but to work with it, simply check the Keep Proportions box in the Properties window and then you can use the Width/Height buttons to make it larger or smaller. I changed mine to W: 10.00 and H: set itself to 4.78

If you need to move them around on the page, highlight the area and then choose Object/Beak Apart (Ctrl+Alt+G). This will separate the images.
Note: The ear will need a manual cut.


