Candy Egg Basket

This Candy Egg Basket is approximately 4-1/2" x 3" x 3" (6-1/2" with handle) and comes with an inside tray with three holes that are 1-1/4" each making it perfect for holding chocolate egg candies such as the Cadbury Creme Eggs (1.2 oz/34g) or Reese's 3D Eggs (1.2oz/34g). You can also use this box without the tray insert to gift all kinds of goodies! This file is compatible with both the 8x12 and 12x12 mats.
Here is the tutorial:

1. Cut out all your pieces and fold on the score lines. Adhere mats on pieces leaving the rounded mats for the edges off for now. Add adhesive to the two side tabs of the one box piece as shown with the white adhesive tape in the image above.
2. One of the side tabs has a long dash/cut and the other has a score line. The dash cut is where the two pieces line up and adhere together. Adhere those together now.
3. Fold over the other side tab and adhere it in place.
4. Flip the box over to the bottom. Fold in the bottom flap then tuck the two side edges in/under the bottom flap as shown.
5. Fold down the top tab flap and tuck in. Set your box upright and to the side for now.
6. Next grab the tray insert and places adhesive on the four side tabs then the tray edges as shown.
7. Adhere the side tabs to the tray to form its shape.
8. Adhere the tray in the box, pushing all the way to the bottom. There is about a 3/4" edge when it is sitting at the bottom. Tuck your handle into the side slots then adhere the final two rounded mats in place.
9-11. Decorate and fill as desired!


This Round Candy Egg Basket is approximately 5-1/4" x 5-1/4" x 1-1/2" (6" with handle) and comes with an inside tray with five holes that are 1-1/4" each making it perfect for holding chocolate egg candies such as the Cadbury Creme Eggs (1.2 oz/34g) or Reese's 3D Eggs (1.2oz/34g). The file also comes with coordinating mats and a 3D Paper Bow (which can be used separately). You can also use this basket without the tray insert to gift all kinds of goodies! This basket would also be great without the insert for a gift for Mother's Day or to deliver May Day flowers! This file is compatible with both the 8x12 and 12x12 mats.

Here is the tutorial:

1. Cut out all your pieces and fold on the score lines. I am starting with the bow as I use a liquid adhesive and want to give it dry time. Adhere the mat onto the bow then flip the bow over then bring in and adhere two opposing sides, matching up the curves in the center.
2. Adhere the other two end pieces in place and place a clip or weight on them to dry then set aside with the other bow pieces.
3. Next we will form the basket sides. Grab your two large basket side pieces. On the short one, adhere the shorter mat, lining up the ends. (Leave the longer one for later!). Place a strong adhesive tape on the end with the half scallop. These will adhere just under a 1/2" overlap.
4. Adhere together then grab the other mat and begin at one edge and adhere in place all the way around. The mats will overlap on the other edge area.
5. Place the adhesive on the other end of the basket side at the tab.
6. Join together to form the circle shape.
7. Push down the tabs, toward the center.
8. Grab a solid circle and place adhesive around the outer edge (only the edge area!). I just use a regular adhesive tape runner to go around.
9. Flip your basket side over so the tabs are against your desk then insert the circle with the adhesive side down. Press firmly around the edges to secure in place.
10. Flip your box over and grab the remaining solid circle. Place adhesive ALL over the circle.
11. Adhere on the bottom of the basket to cover all the tabs. Flip over and press firmly inside to make sure the two circles are adhered together well! Set aside.
12. Grab your two smaller scallop cut edges (these are the insert edge) and the circles with the holes. Adhere the mat to one of the circles. This will now be our top piece. Add adhesive to the side tabs of the scallop pieces like we did above.
13. Adhere the two ends of the scallop pieces together to form the circle shape.
14. Place adhesive around the edge of the circle piece without the mat.
15. Flip your scallop edges over so they are against your desk and adhere the circle in place (adhesive down toward scallops).
16. Flip over the matted circle and place adhesive ALL over the back side.
17. Flip the insert over and adhere the circle in place, mat side up. Make sure to press firmly so circles adhere together.
18. Grab your basket and place the insert inside! It stays really well without adhesive, but you can adhere the insert edge to the basket if you wish. Curve your handle piece against the edge of your desk then insert the handle into the slots. I like to add adhesive to the rounded end of the handle before inserting just to keep the handle where I want it.
19. Grab your bow and use foam adhesive to attach center and another foam adhesive to attach bow to the tail. Adhere to the edge of the basket handle.
20. Fill and embellish as desired!

This Candy Carrot Basket is approximately 4-1/4" x 1-1/2" x 2-1/2" (7" with handle) and comes with an inside tray with four holes that are perfect for holding chocolate carrot candies such as the Lindt Chocolate Carrots. The file also comes with coordinating mats and a "Happy Easter" sentiment (which can be used separately). You can also use this basket without the tray insert to gift all kinds of goodies! This basket would also be great without the insert for a gift for Mother's Day!
This file is compatible with both the 8x12 and 12x12 mats.

Here is the tutorial:
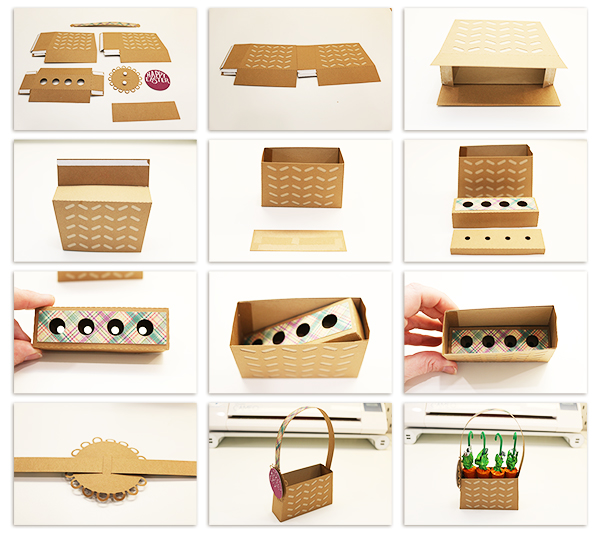
1. Cut out all your pieces. When cutting the sentiment, be sure to hang on to the insides of the letters as they are glued on! Add adhesive on the side tabs of each basket base as well as on the small bottom tabs on each. Add adhesive on the small tabs of the pieces with holes. Adhere your mats in place and assemble your sentiment piece. I use foam adhesive to adhere the sentiment pieces to the scallop. Make sure to leave the slots open for the basket handle!
2. Join the two basket bases together with one of the side tabs.
3. Adhere the remaining side tab to form the basket shape. Push in the two small bottom tabs.
4. Fold the bottom flap up and adhere to the small bottom tabs. Place adhesive on remaining tab (underneath).
5. Adhere the remaining tab to finish the basket base! Gather the small rectangle piece and place adhesive all over one side.
6. Insert the rectangle, adhesive down, to finish the bottom of the basket.
7. Adhere the side tabs of the two inserts (if using them) to the sidewalls to form their shapes.
8. Place the larger hole piece over the top of the smaller holes and press down. They both will sit flat at the bottoms.
9. You are probably thinking this piece doesn't fit right about now :)! Place one end of the insert at the bottom of the basket then push down on the higher end. Your paper will move a little, but it will go down!
10. It should look like this now.
11. Thread the handle through the back slot on the scallop piece.
12. Insert the handle into the slits on the sides of the basket.
13. Fill and embellish as desired!
Tags:
3D Paper Easter Baskets
Bag
Basket
box
Cadbury
Easter
Easter Baskets
Eggs
Happy Easter
Lindt
Carrot
Reeses


 and comes with an inside tray with three ho...)
0 comments