New Easter Baskets!
This Bunny Basket is approximately 3-1/2" (at widest) x 3-1/2" x 2-1/2" (6-1/2" with handle). The box bottom is 2-1/2" x 2-1/2". The file comes with the basket base, four basket mats, the handle and handle mat, and the pieces to build the bunny. The file is compatible with both the 8x12 and 12x12 mats.

Here is the tutorial:


 Here is the tutorial:

* * * * *

This Basket With Stitched Bunny is approximately 3" x 2-3/4" x 3" (6" with handle). The file comes with the basket base, four basket mats, the handle and handle mat and the stitched bunny. The file is compatible with both the 8x12 and 12x12 mats.
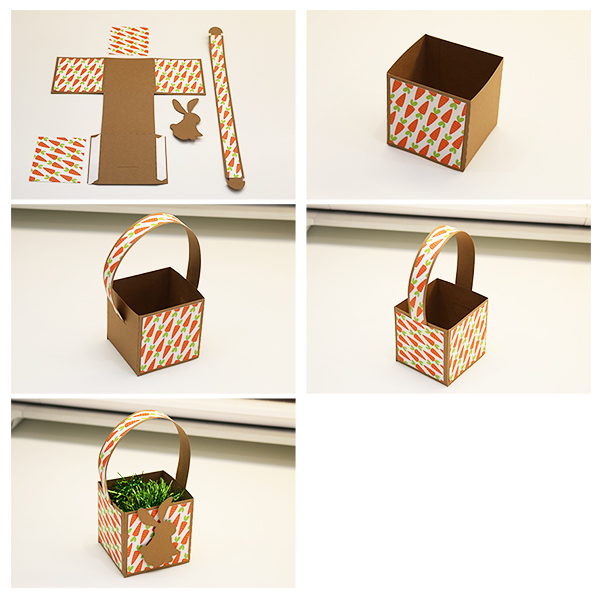


1. Cut out all your pieces and fold the basket base on the score lines. Adhere the handle mat to the handle, centering. Adhere the two basket mats to the areas without the slit. Add adhesive to the side tab and the three bottom tabs.
2. Fold the base over to adhere the side tab.
3. Flip the box over (upside down) and push in the three bottom tabs.
4. Adhere the bottom flap in place, making sure to square up the box!
5. Flip your base over and insert the handles into the slits of the base. I use the edge of my desk to slide the handle over to give it a nice curve!
6. Adhere the remaining basket base mats in place.
7. Assemble your bunny! I glue the ear insert in place then use a foam adhesive to adhere the head to the body. Adhere the black eye pieces to the whites and then adhere the eyes to the head. Adhere the nose/whiskers in place and then use a foam adhesive to adhere the nose piece to the whisker piece. Place adhesive along the front bottom of the bunny body. This will be glued inside the basket base.
8. Adhere the bunny to the basket then place foam adhesive to the arm pieces.
9. Adhere the arm pieces to the basket and adhere in place (following the shape of the face for alignment). Embellish and fill as desired!
* * * * *
This Basket With Bow is approximately 5-1/2" (at widest) x 2" x 3-1/2" (6-1/2" with handle). The box bottom is 5-1/2" x 1-3/4". The file comes with a two piece basket base, basket bottom cover (to hide bottom tabs from inside), two basket handle pieces, four basket mats, the bow and the stitched bow center. The file is compatible with both the 8x12 and 12x12 mats. This basket would be perfect for Easter, Mother's Day, Birthday's, and general gift giving!
1. Cut out all your pieces and fold the basket base on the score lines. Adhere the handle mats to the handle pieces and the side mats to the basket base. Add adhesive to each side tab of the basket base as well as the small bottom tab. Place a strong adhesive on the basket base wide panel (where handle will attach). Add Adhesive to the back of the rectangle piece (this will attach to the bottom of basket to hide inside flaps). Note: Adhesive shown in image with white adhesive tape. Assemble the bow by adhering each bow side tab to the center, lining up the curves then wrapping and adhering the stitched center to the middle of the bow.
2. Set other pieces aside and just grab your two basket base pieces. Join the two pieces together by adhering one side tab to the edge of the other base as shown
3. Adhere the remaining side tab to for the basket base shape.
4. Flip the basket base upside down and push in the two small bottom tabs. Add adhesive to the front top edge of the large flap and the bottom top edge of the other large flap as shown with the white adhesive tape in the image.
5. Push the top flap down and adhere to the two small bottom tabs.
6. Adhere remaining tab down to finish the bottom.
7. Flip your basket base right side up and adhere your front handle piece to the front of the base.
8. Adhere your back handle piece to the back of the base then grab your rectangle piece.
9. Adhere the rectangle piece to the inside bottom of the basket to hide the bottom tabs.
10. Adhere your bow to your basket! I have mind on the front center adhered in place with a foam adhesive circle in the center of the bow. Embellish and fill as desired!
Here is the tutorial:
1. Cut out all your pieces and fold the basket base on the score lines. Adhere your handle mat to the center of the handle piece and the two larger mats to the basket base as shown (do not place the other mats on the slotted cut areas yet!). Add adhesive to your two side tabs as shown with the white adhesive tape in image.
2. Fold the basket base up to form shape and then adhere the two side tabs to the edges. Your basket base should look like this now.
3. Place your handle in the slots on each side. Note: I use the edge of my desk to rub the handle piece on to give it a nice curve.
4. Adhere your side panels on, covering the handle slots.
5. Adhere your stitched bunny on with foam adhesive and embellish/fill as desired!
* * * * *
This Scallop Edge Basket is approximately 6-3/4" (at widest) x 2-1/4" x 4-1/2" (7-1/2" with handle). The box bottom is 6-3/4" x 2". The file comes with a two piece basket base, basket bottom cover (to hide bottom tabs from inside), a basket handle and handle mat, and four scallop mats. The file is compatible with both the 8x12 and 12x12 mats. This basket would be perfect for Easter, Mother's Day, Birthday's, and general gift giving! This basket fits the 4 Pack of the Cadbury Creme Eggs box and the 4 Pack Reese's Peanut Butter Egg box!
Here is the tutorial:
1. Cut out all your pieces and fold the basket base on the score lines. Adhere the handle mats to the handle pieces and the long scallop mats to the basket base. Add adhesive to each side tab of the basket base as well as the small bottom tab. Add Adhesive to the back of the rectangle piece (this will attach to the bottom of basket to hide inside flaps). Note: Adhesive shown in image with white adhesive tape.
2. Set other pieces aside and just grab your two basket base pieces. Join the two pieces together by adhering one side tab to the edge of the other base as shown
3. Adhere the remaining side tab to for the basket base shape then push in the two small bottom tabs.
4. Add adhesive to the front top edge of the large flap and the bottom top edge of the other large flap as shown with the white adhesive tape in the image. Push the bottom flap up and adhere to the two small bottom tabs.
5. Adhere remaining tab down to finish the bottom. Your basket bottom should look like this now!
6. Flip your basket base right side up and grab your rectangle piece.
7. Adhere the rectangle piece to the inside bottom of the basket to hide the bottom tabs.
8. Insert the handle into the slots on each side.
9. Adhere your two side scallop pieces on to hide the handle slits. Embellish and fill as desired!
This Bunny Egg Basket is approximately 2-1/2" x 2-3/4" x 2-1/2" (5" with handle). The file comes with the basket base, four basket mats, the handle and handle mat, and the pieces to build the bunny egg on the grass and scallop. The file is compatible with both the 8x12 and 12x12 mats.

Here is the tutorial:

1. Cut out your pieces and fold on the score lines. Adhere the mats in place as shown. Place adhesive on the two smaller tabs as shown with the white adhesive in the photo.
2. Slide your handle through on of the slots.
3. Starting with that side, tuck the handle slotted tab in first, then adhere the smaller side tab then next the full side.
4. Your side should look like this now.
5. Repeat for the other side. Slide handle in first!.
6. Your box is complete!
7. Add the Bunny Egg and scene to the front. I use foam adhesive between the layers after I adhere the bunny together. Fill and embellish as desired!
You can find these files on my Silhouette store
-or-


0 comments