3D Paper Coffee Mugs!
Good Morning and Happy St. Patrick's Day!
Today starts a new round of digital cutting files and I am going to start this week off with my new 3D Coffee Cups! I think these are a lot of fun and there are so many ways to use them!
- Place gift cards inside
- Fill with candies
- Fill with small coffee bags
- Fill with hot cocoa packets and marshmallows
- Place small gifts inside
...really anything except actual drinks! :)
This mug is approximately 5" x 3-3/4" (widest area) and comes with the cup base, two trim pieces for the top and bottom of the cup, the bottom base, the lid pieces and a wrap.
Here is the tutorial:
1. Cut the pieces for the main cup.
2. Place adhesive on the tab (do not fold on the score line, this is just to show you where the glue goes). Fold up the tabs on the bottom base piece as shown.
3. Adhere the tab to the other side of the paper so your cup base looks like this now.
4. Place adhesive on the tabs of the bottom piece and insert it into the bottom (small end) of the cup. Adhere the tabs to the cup sides.
5. Adhere your trim pieces to the top and bottom edge of the cup.
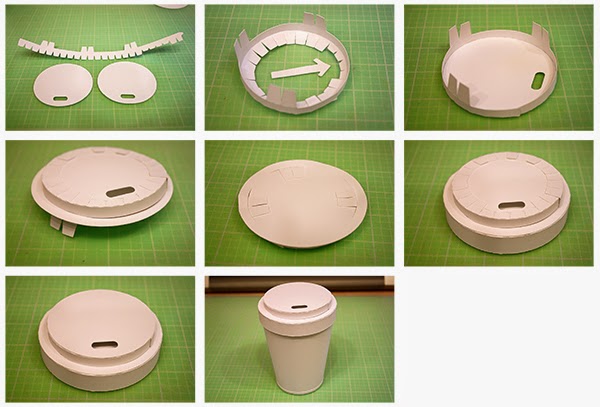
6. Next cut out your lid pieces.
7. Place adhesive on the tab and adhere to the other side of the paper to form a circle. Fold tabs in as shown.
8. Place adhesive around the edge of your solid circle piece and insert it inside the circle form. Press the circle down to adhere it to the tabs.
9. You should have pieces that look like this now.
10. Next cut your smaller lid pieces.
11. Place adhesive on the tab and join the pieces together to form the circle. Bend the row of tabs under and leave the top pieces up as shown. There are smaller tabs where the mouth piece of the cup will go (shown by the arrow).
12. Place adhesive around the edge of one of the circle pieces and adhere it inside the circle form. Make sure to line up the mouth piece with the smaller tabs.
13. Next grab the large lid piece from step 9 that has the slots in it. Insert the tabs from the mouth piece lid in the slots so it looks like this now.
14. Flip the piece over and add adhesive under the tabs and fold them down to adhere.
15. Place adhesive all over the bottom of this piece then adhere it to the actual lid so it looks like this now.
16. Adhere the final mouth piece on lining up the hole.
17. Place your lid on the cup.
18. For the wrap, place adhesive on the tab piece and adhere the sides together. Slide the wrap on to the cup. You can use adhesive to hold it on the cup if you desire.
This mug is approximately 5" x 3-3/4" (widest area) and comes with the cup base, two trim pieces for the top and bottom of the cup, the bottom base, the lid pieces. layered wrap pieces which include the "luck" sentiment, and a 3 leaf clover.
This mug is approximately 5" x 3-3/4" (widest area) and comes with the cup base, two trim pieces for the top and bottom of the cup, the bottom base, the lid pieces. layered wrap pieces, the Get Well Soon sentiment (separate from the wrap so you can eliminate it if you wish or use it alone), and a 3D flower.
Here is the tutorial:
1. Cut the pieces for the main cup.
2. Place adhesive on the tab (do not fold on the score line, this is just to show you where the glue goes). Fold up the tabs on the bottom base piece as shown.
3. Adhere the tab to the other side of the paper so your cup base looks like this now.
4. Place adhesive on the tabs of the bottom piece and insert it into the bottom (small end) of the cup. Adhere the tabs to the cup sides.
5. Adhere your trim pieces to the top and bottom edge of the cup.
6. Next cut out your lid pieces. Place adhesive on the tab and adhere to the other side of the paper to form a circle. Fold tabs in as shown.
7. Place adhesive around the edge of your solid circle piece and insert it inside the circle form. Press the circle down to adhere it to the tabs. Adhere the second circle to cover the tabs.
8. Adhere your wrap pieces together, centering and lining up the score marks.
9. Place adhesive on the tab and adhere to the other side so it looks like this now.
10. Adhere the Get Well Soon sentiment on the wrap (if desired).
11. Slide the wrap on the cup. Use adhesive to hold in place if desired.
12. Cut out your flower pieces and place in size order.
13. Use a skewer (or pencil) to curve the petals and combine the small center pieces tighter, lifting the ends up.
14. Adhere the flowers together in size order (largest to smallest), staggering the petals. Adhere the center piece in. Fluff the flower to get your desired look.
15. Adhere the flow on top of the cup lid in the center!
Here's a look at what is releasing this week in my Silhouette Store!
Tags:
3D Flower
3D Paper Coffee Cup
3D Tutorial
Bits of Paper
box
Coffee
Disposable Coffee Cup
Get Well
Jamie Cripps
Jamie Lane Designs
Silhouette
St. Patrick's Day
Tutorial


11 comments