Samantha Walker August Creative Team Blog Hop!
You should have arrived here from Samantha Walker's blog...
If this is your first stop, be sure to head over to Samantha Walker's blog to start at the beginning!
AND be sure to look extra closely at Step #4 to learn how you can get this FREE SVG and Silhouette Studio file:

The winner will be announced on Samantha's Facebook page on Monday, August 13th.
For additional entries:
1. Receive an additional entry for commenting on each of the other blogs in the blog hop.
4. Sign up for an e-mail subscription to Samantha's blog and you will automatically receive a link to a free SVG cutting file that you can download and use on your personal electronic cutter. If you are already a subscriber, just enter in your information in the secure form on Samantha's blog! The free files will be e-mailed early next week!
To receive the additional entries and get the the free files, mention in your comment on Samantha's blog that you have done so!
WOW, that is 12 chances to win! How awesome is that!?
*******
For this month's the Blog Hop the Creative Team has
been working with a Back To School theme!
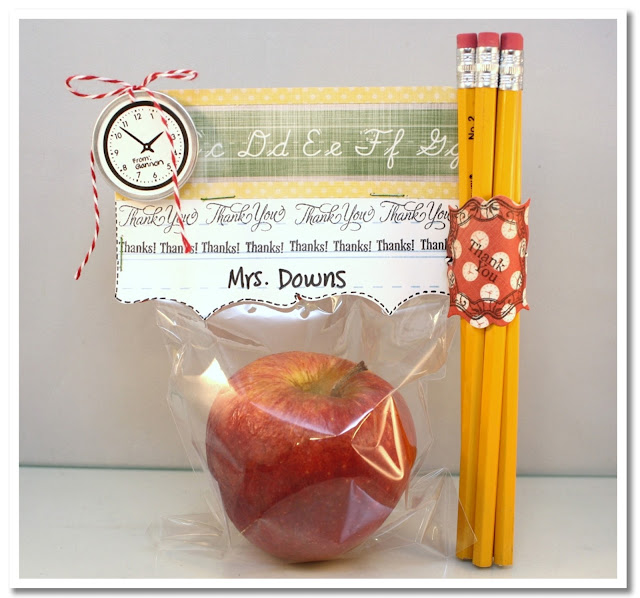
Today I am sharing a gift for Gannon to take to his 5th grade teacher. I used the AtoZ Collection by Samantha Walker for Creative Imaginations as well as her new stamp sets with JustRite Stamps and new Spellbinder Dies!
Pattern Paper & Stickers: AtoZ Collection by Samantha Walker for Creative Imaginations
Dies: Botanical Swirls and Accents Spellbinder Die set by Samantha Walker for Spellbinders
Stamps: Ooh La La French Frills Stamp Set and Botanical Swirl Labels by Samantha Walker for JustRite
Pen: Black (Tombow)
Ink: Tuxedo Black (Momento)
Twine: Maraschino and Charcoal (The Twinery)
Other: Metal Tag (Avery)
Click on the photos below for more details around each:
To create the bag topper, I cut a 12"x3" strip of paper and folded it in half, then I used the Botanical Swirls and Accents Spellbinder Die set to create the edge.
1. Starting with the folded edge of your paper, place the die slightly off the edge so it does not cut through then run it through Grand Calibur.
2. Line the die up with the edge of the original placement.
4. Your paper should look like this. Trim off the straight edge of the paper to fit your length of your bag.
5. Using the cursive "Thank You" from the Ooh La La French Frills Stamp Set, stamp the top writing line.
6. Using the "Thanks" from the Ooh La La French Frills Stamp Set, stamp the next line then staple the bag topper in place.


23 comments