Valentine Gift Boxes
This hinged Love box is approximately 6-1/2" x 2-1/2" x 1" in size. It is perfect for holding small gifts, baked goods, candies, shorter pens/pencils, and more! The file is compatible with both the 8x12 and 12x12 mats. The box can be used without the LOVE and the LOVE cuts shown can be used separatley as well!

Here is the tutorial:

1. Cut all pieces and fold on score lines (NOTE: save the center of the O's). Adhere coordinating mats in place. Add a strong adhesive to the tabs.
2. Adhere the top tabs to the box side and the very bottom tabs to the box sides to begin to for its shape.
3. Adhere the middle tabs to the bottom of the box. Your box should look like this now.
4. This is an image of the box when closed.
5. Adhere the letter layers together. I have the E turned over so you can see the assembly. I place adhesive on the back of the larger cut outs (with the hearts) then adhere the smaller (pink) cuts to the back of those.
6. Adhere the letters on the top, centering. I adhere mine with foam squares. Fill and embellish as desired!
* * * * *
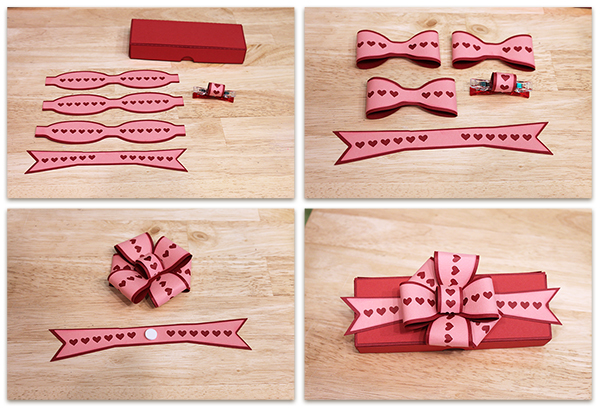
This hinged heart bow box is approximately 6-1/2" x 2-1/2" x 1" in size. It is perfect for holding small gifts, baked goods, candies, shorter pens/pencils, and more! The file is compatible with both the 8x12 and 12x12 mats. The box can be used without the heart bow and the heart bow can be used separatley as well!

Here is the tutorial for the bow. The box assembles like the LOVE box above.
* * * * *

This divider tray is approximately 6-1/4" x 4-3/4" x 1" in size. With the dividers, there are twelve sections. You can use this file without the dividers to have two large compartments, cut two more trays to stack on top of the divided trays, have all four with dividers...just mix and match to fit your needs! The file is compatible with both the 8x12 and 12x12 mats.


1. Cut all pieces and fold on score lines. Add a strong adhesive to the tabs (please note - the divider pieces you recieve will look different from this photo!).
2. Adhere the tabs to the sides of the boxes to for their shape. Adhere the dividers in place.
3. Insert the trays into the storage box.
4. If you want additional trays, cut two more and adhere the tabs as you did previously.
5. Here is another view. You can add more dividers if you'd like more sections too!
* * * * *
This heart box is approximately 4" x 2" x 1-3/4" in size and is compatible with both the 8x12 and 12x12 mats. The file comes with the one piece box base and the coordinating mats with hearts. The box is top opening making it easy to fill and easy to open/close! This is a great box for making in bulk!

Here is the tutorial:

Tags:
Bits of Paper
Divider Box
Jamie Cripps
Jamie Lane Designs
Organization
Silhouette America
Storage
SVG
Valentine


0 comments