Just look at all its cuteness!
Supplies:
Patterned Paper: Creep Face Craft Paper Pad (Martha Stewart)
Cardstock: Black (The Paper Studio)
Ribbon: Orange/Black (May Arts)
Other: Red Marker and Googly Eyes
Tutorial:
1. To create the bottom of the box, take an 8x8" piece of paper and score at 2" and 6", turn and score at 2" and 6" again. Cut one slice on each of the score marks then adhere the sides together with 1/2" Scrappy Tape.
2. For the top of the box, take a second piece of 8x8" piece of paper and score at 2" and 6-1/8", turn and score at 2" and 6-1/8" again. Make four slices as you did in step #1 then adhere the sides together with 1/2" Scrappy Tape.
3. Place the top of the box over the bottom of the box.
4. Using the two large dies from the Picot Edge Circles die, cut two shapes in black cardstock. Cover both pieces with the Distress Crackle Paint and let dry. Adhere the smaller shape in the center of the larger with foam squares. Take Charcoal twine and weave in and out of the circles as shown.
5. The piece should look like this.
6. Add a spider to the center of the shape then adhere to the center of the box. Add ribbon to decorate!
I am excited to share with you a card that I decided to take a more vintage'y approach with on this week's distress theme.
Just have a look...
Supplies:
Ink: Tuxedo Black (Momento), Antique Linen & Spun Sugar
Distress Inks by Tim Holtz (Ranger)
Jewels: Pink (Want 2 Scrap)
Tutorial:
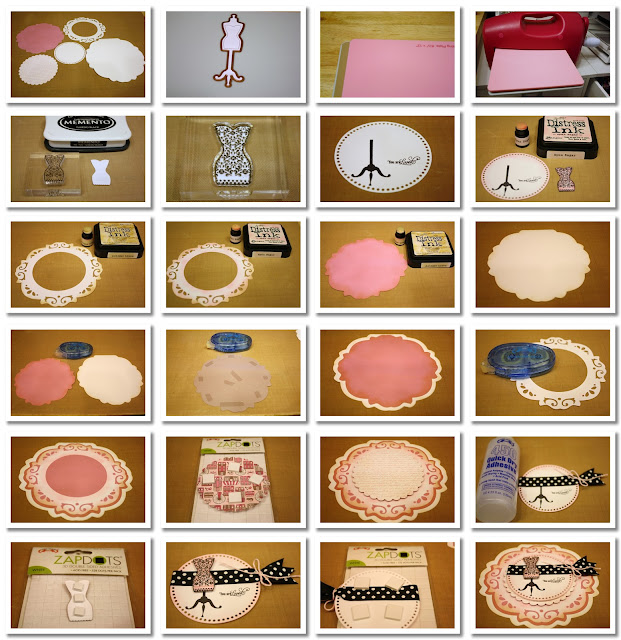
- Cut out the pieces to the Ornate Card.
- With white cardstock, cut out the dress form.
- With the dress form still in the die, create the sandwich to emboss.
- Then run the sandwich through the Grand Caliber.
- Choose a dress form stamp to match the die.
- Center the stamp on top of the cardstock then stamp.
- With the circle cut, stamp the dress form stand and sentiment.
- Ink around the edges of the circle cut as well as the entire dress with a light pink shade.
- With the detail cut, ink around the edges with Antique Linen.
- Then go back through with Spun Sugar.
- Ink the edges of the solid pink paper with Antique Linen.
- Then ink around the edges of the white cardbase with Antique Linen, pressing lightly.
- Gather the cardbase, the pink cut, and your Adhesive Runner.
- Apply Adhesive to the back of the pink cut.
- Adhere in the center of the cardbase.
- Apply Adhesive to the back of the detail cut.
- Adhere in the center of the pink cut.
- Place 1/2" Scrapdots adhesive on the back of the scallop circle.
- Peel the paper backing from the foam adhesive and then adhere to the center of the card.
- Tie a piece of black and white polka dot ribbon around the circle cut then use Helmar 450 Quick Dry adhesive to hold the ribbon in place.
- Use 1/4" Scrapdots on the back of the dress form.
- Peel the paper backing from the foam adhesive and then adhere on top of the dress form stand.
- Place 1/2" Scrapdots adhesive on the back of the circle cut.
- Peel the paper backing from the foam adhesive and then adhere to the center of the card.
Add a metal flower to the left bottom edge of the dress form and add pink jewels in the circle pieces of the detail cut.
Thanks so much for stopping by today!
Be sure to check back in tomorrow for more projects!


