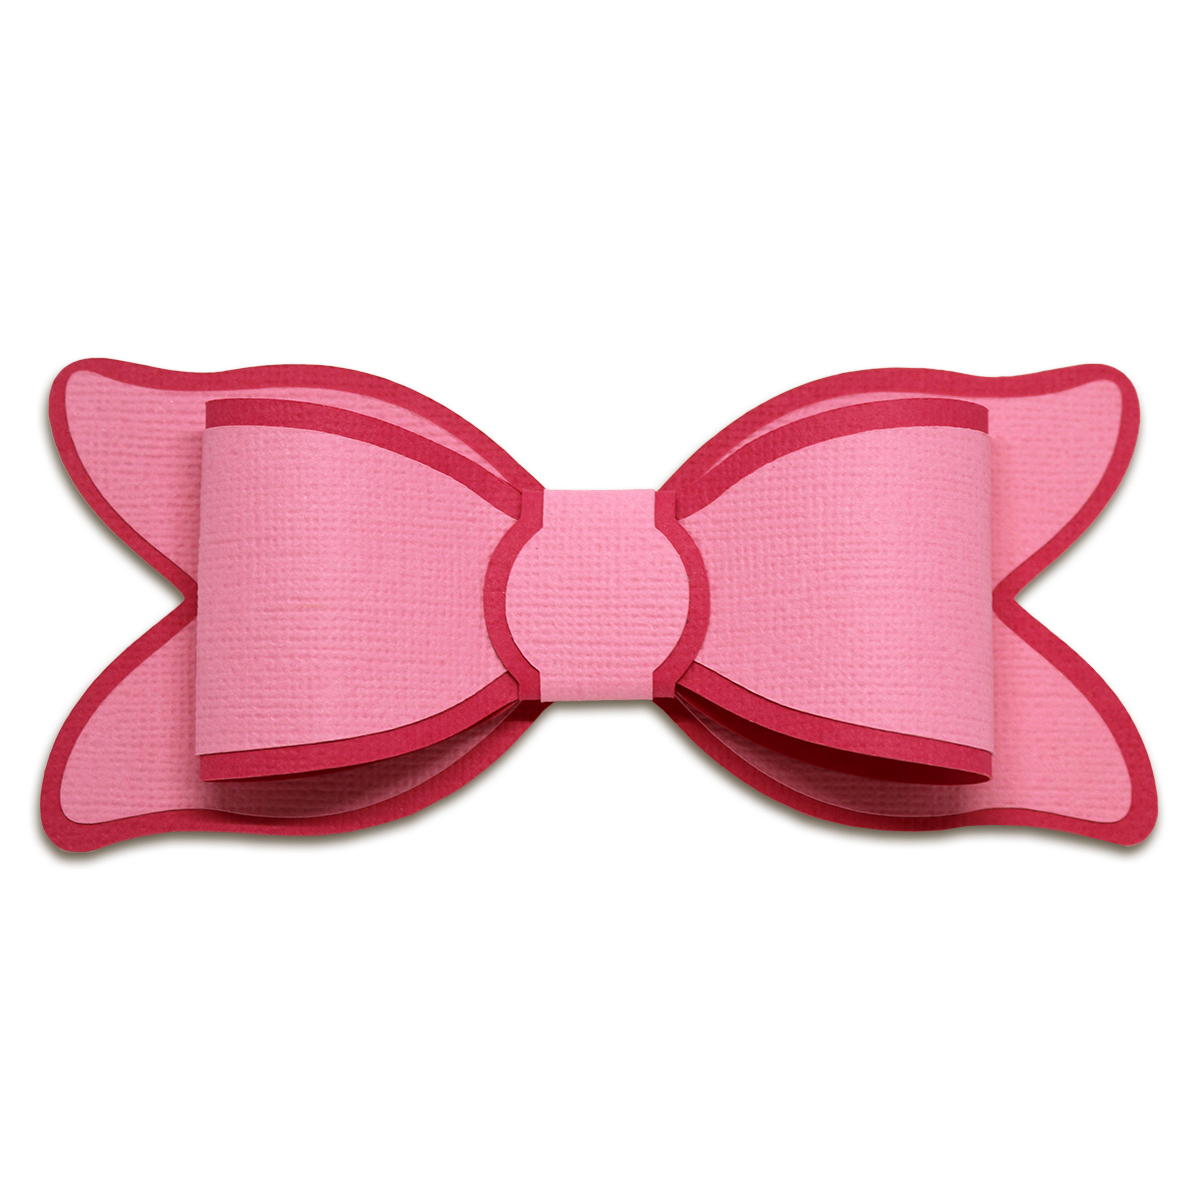
This bow is perfect for gift wrapping, placing on vases, or even for the front of a card! It comes with an alternative center which you can see in the additional images. The bow can be sized to fit your needs and is compatible with both the 8x12 and 12x12 mats! See my blog for a tutorial!
Here is the tutorial:
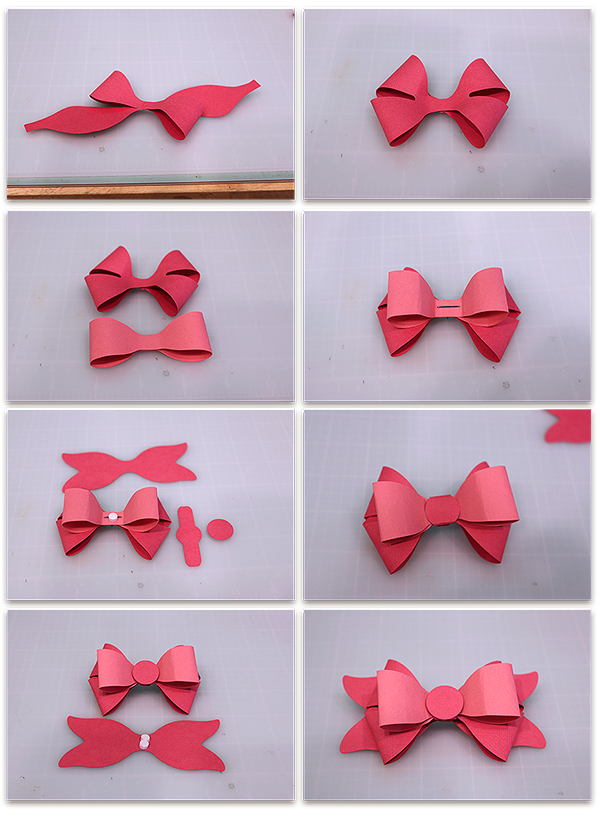
1. Cut out the pieces. Adhere the coordinating pieces togeter.
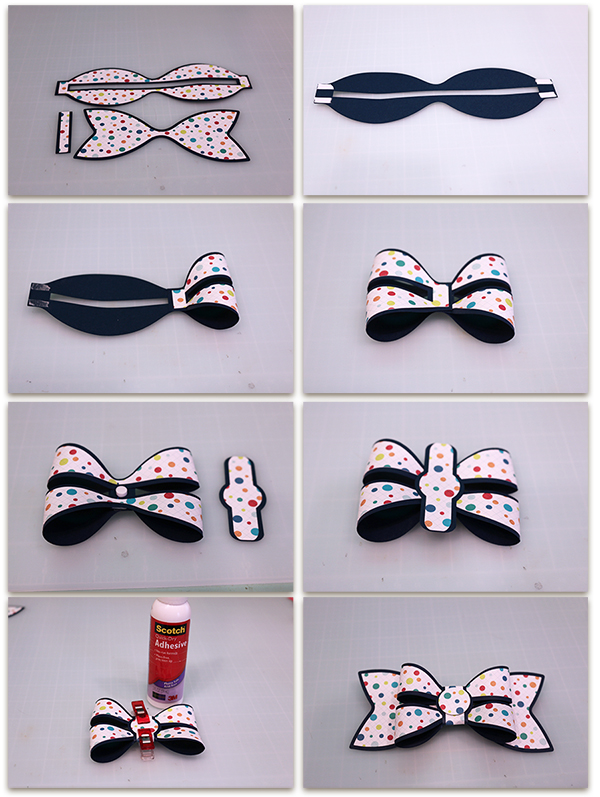
2. Starting with the large bow piece, adhere the tabs to the back of the bow with a strong adhesive (double-sided tape or hot glue). You can staple the center as well, it will be covered. Place the round center piece in the center of the bow and fold the edges over. Adhere in place. I use Scotch Quick-Dry Adhesive and these amazing little clips to hold it while it dries!
3. Adhere the bow to the tails with a foam adhesive. You can use the bow like this or you can cut the small circle center and tie a ribbon bow on top as shown below!
* * * * * * * *
Puckered Layered Bow with two center options!
* * * * * * * *
Double Layered Bow
This bow only comes with the solid center.
You can use it with or without the extra circle piece.
* * * * * * * *
This bow is perfect for gift wrapping, placing on vases, or even for the front of a card! The bow can be sized to fit your needs and is compatible with both the 8x12 and 12x12 mats!
Double Split Bow with Two Colors
* * * * * * * *
Double Split Bow
* * * * * * * *
Split Bow
* * * * * * * *
Double Bow with Two Color Base
This bow has two different mat pieces for the base. As shown in the photo, the left side is a solid blue to match the lower bow piece and the right side is shiney to match the upper bow piece. This bow can be layered on top of itself as well as the bow pieces are different in size.
This image shows the contrast better for the color layers:
* * * * * * * *
These bows are perfect for cards, boxes, and gifts! They are all compatible with the 8x12 and 12x12 mats and can be sized to fit your needs! Each bow comes with the bow pieces as well as the pieces needed to create the unique paper flowers for their centers!
Here's the tutorial:
1. Cut out all your pieces.
2. Beginning with the largest bow piece, place adhesive in the center then fold over one side of the bow matching up the curves. Repeat for the other side. Repeat steps for the smaller bow. Adhere the large bow to the top center of the tails. Adhere the smaller bow in the center of the larger bow. Your piece should look like this now.
3. Curl your flower petals then adhere the center in the middle of one of the flowers.
4. Adhere the flowers togethers. Bend some of the petals down/back a little.
5. Adhere the flower to the center of the bow to finish.
Here's the tutorial:
1. Cut out all your pieces.
2. With the bow piece, place adhesive in the center then fold over one side of the bow matching up the curves. Repeat for the other sides.
3. Your bow should look like this now.
4. Place a foam adhesive in the middle.
5. Adhere the bow to the center top of the tails.
6. Curl your flower petals with your skewer/pencil.
7-12. Take the smallest flower form and bend the petals up to the center. Adhere that into the next sized flower, staggering the petals. Continue bending the petals up and then adding flowers until all pieces are in place.
13. Your pieces should look like this now.
14. Adhere the flower to the center of the bow to finish.
Here's the tutorial:
1. Cut out all your pieces.
2. Beginning with the largest bow piece, place adhesive in the center then fold over one side of the bow matching up the curves. Repeat for the other side. Repeat steps for the smaller bow. Adhere the large bow to the top center of the bow base. Adhere the smaller bow in the center of the smaller bow base then adhere those to the center of the larger bow. Your piece should look like this now.
3. Curl your flower petals and adhere your center together, pulling the points up.
4. Adhere the center in the middle of one of the smallest flower.
5. Adhere the flowers togethers, smallest to largest until all are in place. Stagger the petals as you go. Bend some of the petals down/back a little.
6. Adhere the flower to the center of the bow to finish.
Here's the tutorial:
1. Cut out all your pieces.
2. Beginning with the largest bow piece, place adhesive in the center then fold over one side of the bow matching up the curves. Repeat for the other sides. Repeat steps for the smaller bow.
3. Adhere the large bow to the top center of the tails. Adhere the smaller bow in the center of the larger bow. Your piece should look like this now.
4. Curl your flower petals. Adhere your center pieces together and pull the points up. Adhere the center in the middle of one of the smallest flower.
5. Adhere the flowers togethers, smallest to largest. Bend some of the petals down/back a little.
6. Adhere the flower to the center of the bow to finish.
Here's the tutorial:
1. Cut out all your pieces.
2. Beginning with the largest bow piece, place adhesive in the center then fold over one side of the bow matching up the curves. Repeat for the other side. Repeat steps for the other bows.
3. Adhere the large bow to the top center of the bow base. Adhere the middle sized bow in the center of the larger bow and the smallest on top of all that! Your piece should look like this now. Add a foam adhesive to the center of the bow.
4. Adhere your centers together and pull up the points. Adhere the center to the smallest flower form.
5. Pull up the petals of the flower toward the center. Add on the next layer and pull those petals up. Repeat for the third flower form, bending those just slightly up.
6. Adhere the flower to the center of the bow to finish.
This
layered bow is perfect for cards, boxes, and gifts! It compatible with the 8x12
and 12x12 mats and can be sized to fit your needs!
Here is the tutorial:
1. Cut out all the pieces.
2. Adhere your smaller bow pieces in the center of the larger.
3. For the bows, turn the piece over and apply adhesive to the center and each of the tabs.
4. Bring the tabs into the center, line up the bow edges and adhere each in place.
5. Adhere the bows on the center of the mats.
6. Adhere the smaller bow grouping in the center of the larger.
7. Fold the center cover on the score lines and then place adhesive on the back side.
8. Wrap the center cover around all of the bows and adhere in place.
Today I am sharing my new Top Locking Bow Boxes. I have three variations of this box each approximately 6" x 3-1/2" x 3-1/2" with the box height just over 3". These boxes come with the box base, the bow base, and the bow detail piece (each piece needs to cut twice).
Here is the tutorial:
1. Cut two of the box base pieces. Place adhesive on each tab as shown.
2. Adhere the two boxes together using one tab.
3. Then used the remaining tab to adhere the boxes together.
4. Pop the box up to form. Tuck the two bottom tabs in and then place adhesive on the bottom flaps.
5. Adhere the bottom of the box shut.
6. Stand the box up and bend the bow top down on the score line. Fill your box with your goodies.
7. Bend the top pieces and slide the bows on each side of the other, locking the top closed with the notch.
8. Adhere the bow base in place on each side.
9. Your foam adhesive to adhere the detail bow in place.
10. Your box should look like this.
11. This is a side view.
12. I place a little bit of removable adhesive in between the bows to keep them together. The removable adhesive is easy to pull apart to get the gift in and out of and allows the recipient to close them again as well.
Here are the other two versions of this box:
Today I am sharing more bows! These have decorative layers built in with the files. If you do not like the leaf or snowflakes within the layers, you can use the "releases compound path" within the software to remove them. These bows can be sized to fit your needs and they are all compatible with the 8x12 and 12x12 mats.
Here is the tutorial:
1. Cut out the bow pieces. Adhere the mat pieces in the center of the larger bow pieces as shown. (Do not place adhesive on the bottoms of the bow pieces, make sure you have enough to curl up).
2. Turn the main bow piece over and place adhesive on each of the four tabs. Adhere one of the tabs to the center, lining up the bow curve. Continue adhering the tabs pieces to the center.
3. Turn the box back over, it will look like this now.
4. Create a bow shape using the smaller bow piece.
5. Turn it over and it will look like this now.
6. Adhere the smaller bow to the center of the larger bow.
7. Adhere the bow base to the back of the bows.
8. Turn the bow over (right side up). Curl your center piece to form a loop and adhere the ends to secure in place and adhere the loop to the center of the bow. Curl the ends of the bow base up slightly to finish.
Here is the tutorial:
1. Cut out the bow pieces. Adhere the mat pieces in the center of the larger bow pieces as shown. (Do not place adhesive on the bottoms of the bow pieces, make sure you have enough to curl up).
2. Turn the main bow piece over and place adhesive on each of the four tabs. Adhere one of the tabs to the center, lining up the bow curve. Continue adhering the tabs pieces to the center.
3. Turn the box back over, it will look like this now.
4. Curl your center piece and adhere the ends to secure in place.
5. Adhere the small loop in the center of the bow
6. Adhere the bow base in place on the backside of the bow.
7. Curl the ends of the bow base up slightly to finish.
Today is part two of my large bows! You can find the other bows in the posts below.
These next two bows are made for packages, bags, or even wreaths as they are bulkier than my other bows. Both of these bows can be sized to
fit your needs and is compatible with both the 8x12 and 12x12 mats!
Tutorial:
1. Cut out the bow pieces. Starting with the largest, turn the piece over and place adhesive on each tab.
2. Adhere one of the tabs to the center, lining up the bow curve the adhere the opposite side.
3-5. Continue adhering the tabs pieces to the center until all are in.
6. Repeat steps 1-5 for the remaining two bow pieces.
7. Adhere the middle bow on top of the largest bow.
8. Then adhere the smallest bow in the center of the middle bow.
9. Bend all the little pieces of the circle center up and adhere it to the center of the bows as shown.
10. Place a small foam square on the bottom center of the largest bow.
11. Adhere the bow base in place on the backside of the bow.
12. Turn your bow back over (right side up) and place a twine bow in the center to embellish!
Tutorial:
1. Cut out the bow pieces.
2. For each bow piece, turn the piece over and place adhesive on each tab. Adhere the tabs in toward the center. With the small center piece, form a loop and place adhesive to hold its shape.
3. Starting with the large pieces, adhere two in a cross form as shown.
4. Adhere a third on staggering.
5. Then add the fourth as shown to complete.
6-8. Do the smaller pieces as you did the larger.
9. Place a small foam square in the center of the larger bow
10. Then attach the smaller bow to the center of the larger.
11. Adhere the loop in the center of the bows.
12. Attach the bow base to the back of the bow as shown.
13. Your bow will look like this now!