Good morning! I am back with you today to
share a fun tutorial to create this card!
What I love most about this card is that you can use small pieces of paper which allows you to use your scraps (or save bigger pieces of paper for more projects)!
Tutorial:
1. Cut 1-1/4" x 3" strips of coordinating papers then cut triangle shapes out of the bottom of each. They do not have to be perfectly centered, in fact off setting some of the cuts adds to the cuteness!
2. Adhere two of the banner shapes to a white cardstock base as shown.
3. Adhere a third banner to overlap one of the already placed banners.
4. Place the last banner over the other three banners as shown.
5. Trim the white cardstock down leaving a small white border on three sides.
Next you will want to create a white cardbase and adhere a piece of ribbon in the center lining up the left edge. Attach your banner pieced card using foam adhesives and tie a coordinating ribbon in a bow and add in a piece of white twine to tie around the center of the other bow. Finish the card by adding in the 'friends' fabric button!
Today you will find lots of projects from Dr. Phil and of course his fabulous design team :) and there will be a live UStream Class, Challenges, and even prizes! So grab a beverage and join us!
Today I am sharing a fun and fast Graduation party favor that I created with my digital die cutting machine and some fabulous CTMH products!
Supplies:
Tutorial:
1. Cut out the graduation hat pieces in black cardstock.
2. Assemble the two circle pieces by wrapping the long strips around two of the circular pieces as shown.
3. Place adhesive on the shorter circular piece and adhere to the square piece. This will be the top of the hat.
4. You can use the ribbon to keep the hat as part of the base if you'd like but I am only placing the ribbon through the top of the hat. Cut a piece of ribbon to the size you'd like then tie a knot underneath the cap piece. Adhere the third circle to the bottom of the large circular piece to cover the triangle pieces.
5. Place the hat top over the base.
6. Cut a 1" x 10" piece of the Silver Glitter cardstock and adhere around the bottom of the base.
7. Stamp the "Congratulations" stamp on to cardstock that coordinates with your ribbon. Trim the cardstock to 1" in width.
8. Adhere the sentiment piece in the center of the Silver Glittered cardstock as shown.
9. Your Graduation Hat should look like this!
These go together super quick and they would look fabulous all together as party favors, used as table placements (you could put their names instead of the sentiment), or you could even use these as gifts!
Be sure to check back throughout the day to see more projects and tutorials and also be sure to check out Dr. Phil's Facebook page to
keep up on all of today's events!
Good morning! Would you believe that I am still creating with the
My kids love making clay art, it is something they have always enjoyed doing at home and once a year in school they create a project as well! I have been storing their creations for years behind a glass so that they would be preserved, but my cabinet is full (to say the least!).
Tutorial: 
2. Place adhesive on the small angled tabs and adhere them to the straight tabs as shown.
3. Continue adhering the tabs until your box looks like this.
4. Repeat steps 2-3 for the lid.
5. Place your lid on top of the box bottom.
7. Stamp the to/from square on to the center of the round tag.
8. Next, stamp the "love" stamp in the square as shown.
Now all you have to do is add the tag to the back of the box and place your special something inside the box. I am adding in the date that the clay creation was made to mine...but these would be fabulous boxes for gifts too!
Supplies:
Ribbon: White Organza
Tutorial:
1. Cut out the Scallop Favor Box using your digital die cutting machine and fold on all the provided score lines.
2. Apply adhesive to the side tabs and fold up to adhere to the box sides.
3. Your box should look like this now.
4. Each side has a small indent. Pinch this indent pushing it inward as shown.
5. Cut a piece of ribbon and slide it through the bottom hole of both sides.
6. Pull the ribbon up through the top hole as shown.
7. Tie the ribbon in a bow on the front of the box then embellish as desired.
I cut a piece of the same double sided cardstock, using the opposite side, and trimmed a triangle shape out of one edge then adhered the piece in the center of the front of the box. I then stamped the Butterfly stamp and sentiment to a square piece of cream cardstock and used foam adhesive to adhere it to the center of the box. I stamped the butterfly on a scrap piece of the cardstock (with the pattern that matched the box front) and fussy cut the wings. Fold the wing up on both sides of the body and adhere to the center of the butterfly on the box!
Thanks so much for stopping by today!
Tutorial:
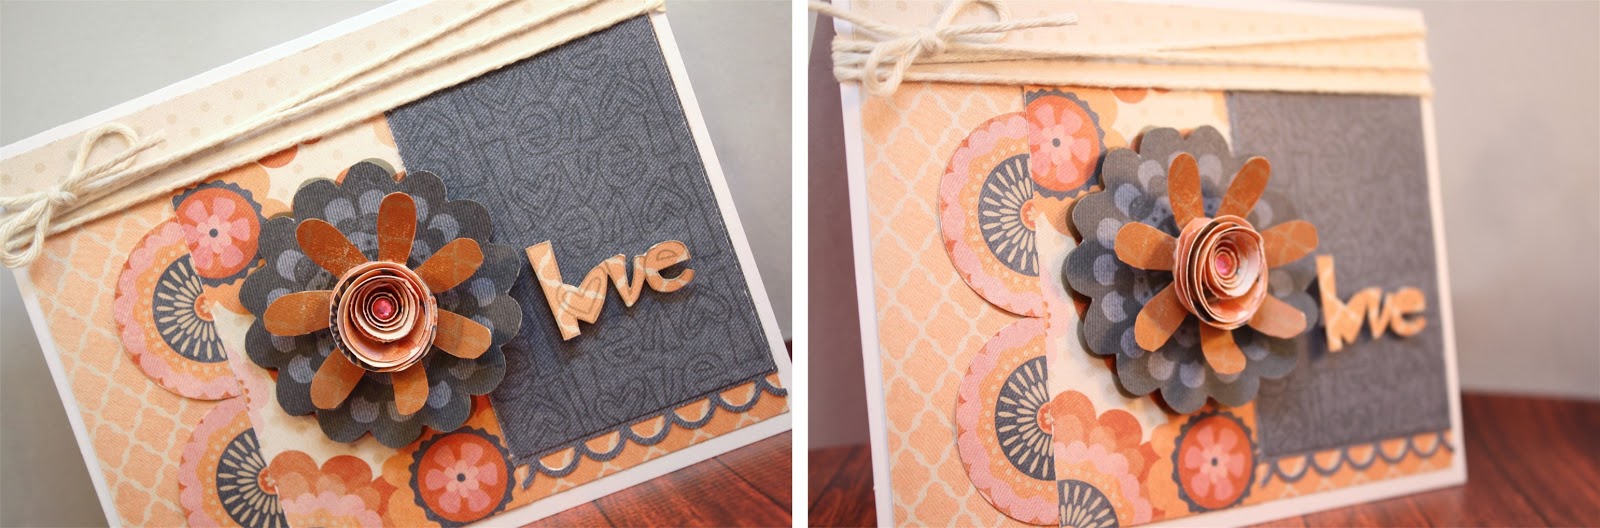
1. Using the Girls Rock stamp set, stamp the large flower with Slate ink on the denim paper from the Claire paper packet.
2. Fussy cut the large flower.
3. Punch a circle in the flower pattern paper and then cut into a spiral.
4. Wrap the spiral cut to form a flower.
5. Next, stamp the other flower shape with Saddle ink.
6. Fussy cut the flower shape as shown.
7. Cut a mat for the cardbase and then a rectangle piece from the floral patterned paper then adhere as shown. Add the denim flower with adhesive foam.
8. Adhere the second flower in the center of the first with foam.
9. Then add your spiral flower to the center of the flower as shown.
10. Cut a piece of the cream/spotted paper and adhere along the folded edge of the card as shown.
11. Cut out two circles from the floral paper and a cut with a straight edge. Adhere these along the side of the rectangle paper. Cut a piece of the denim paper and punch a decorative edge along the bottom side. Adhere to the card as shown.
12. Using the 'love' stamp from the Girls Rock stamp set, stamp a second piece of the denim paper in multiple directions to cover the piece as shown.
13. Stamp the love sentiment on a piece of patterned paper then fussy cut out then adhere as shown using a foam adhesive. Tie a piece of twine across the top and a gem to the center of the flower to finish!
Here is another look at the finished card:
Thanks so much for stopping by today!
Oh how I needed this card! I am over here in Michigan still seeing the snow and I am finding that many of my projects are starting to take on a warm summer theme! It has been a long winter :)
Tutorial:
1. Use inks to create the sky/clouds then stamp the sun as shown. Using the Just Chillin stamp set, stamp the sun on white cardstock with yellow ink then punch out the center circle and adhere it on top of the stamped sun on the card with foam adhesive. Cut three layers with curves for the 'sand' using the Surf's Up Paper Packet and adhere the back layer as shown on the card.
2. Here are my other two layers.
3. Adhere the second 'sand' layer as shown.
4. Adhere the third 'sand' layer as shown.
5. Stamp the umbrella stamp on the card as shown in this image.
6. Using a red ink, stamp the umbrella top on white cardstock then fussy cut the umbrella top, removing the pole completely.
7. Use foam adhesive to adhere the umbrella top.
8. Use scissors to remove the overhang from the umbrella as shown.
9. Stamp the "Just Chillin" sentiment on the bottom right corner of the card.
10. Stamp the lawn chair on the card as well as on the blue patterned paper as shown.
11. Fussy cut the lawn chair, making it four pieces as pictured. Make sure to keep the top and bottom slat pieces connected. Fold those pieces where the patterned paper shows so the bottoms angle up.
12. Adhere the lawn chair bottom on to the card as shown.
13. Next adhere the three back pieces only gluing down the flat backs, leave the bottom "sitting area" folded out.
14. This is what your card should look like now.
15. Add in twine to the sun and then tie a twine bow for the umbrella top.
Thanks so much for stopping by today!
Good Morning! Today I am sharing a fun little project I created using my Silhouette and the Close To My Heart Surf's Up Collection! This is a Notecard Set which contains four notecards and a folder to hold them in!
Have a look...
Outside front
Outside back view
This project goes together really quickly!
The .svg file comes spaced so you can easily cut different papers for the notecard and the folder. I am using the X7168B Surf's Up paper for my folder and scallops. After I cut those pieces, I slid the notecards over to the active mat window then cut those with white cardstock.
Adhere the scallop pieces to your notecards.
Next grab the folder piece and fold on the score marks as shown.
Then with the side folded in, fold the folder in half on
the provided score mark.
Grab your notecards next so that we can add some stamps!
I am using the Bugs & Hugs stamp set with the Whisper ink, adding the long border stamp to two of my notecards and the placing the "life's sweet" sentiment above the border. On the next two cards, I places the scallop border to the side and stamped "life's sweet" at the top and used the bee stamp in the right bottom corner.
Place the notecards in the folder, placing two on each side.
Then close the folder tucking the circle shape into the slot.
You can find this .svg file in my Meylah store as an
instant download by clicking HERE!
Now, how about a special promotion?
today through the end of the month
-or-
If you already own a Silhouette you can buy the
Don’t forget to use the code SAMANTHA to snag these fabulous deals!
Offers expire 03/31/2013, Hurry!
Good Morning and Happy Tuesday!
There are several to choose from but my most favorite is the
Each kit comes with instructions for creating projects and always leaves you enough left over to create more!
And of course, if you create a project using any of the Workshops, we'd love to see them! Just link us up in the comments section on any of the current posts or upload a photo to Dr. Phil's Facebook Page!
So now back to my project!
Today I have a quick and easy card with lots of fabulous layers!
I think that what I love most about the Close To My Heart papers is that everything is coordinated for you - it really takes all the color matching stress away and makes creating fast and fun again...and of course the paper weights are fabulous to work with in both my Silhouette and Cricut (we all love that, right!?)!
Here is an inside view of my card:
Shopping List: