Good morning! Did you see? The Twinery is now holding monthly themed challenges and this months theme is Chevron and Green! You can see all the details over on The Twinery Blog!
Supplies:
Cardstock: White (Recollections)
Patterned Papers: Lost & Found Sunshine 6x6 (My Mind's Eye)
The Good Life 6x6 (Fancy Pants)
Misc: Green Sequins
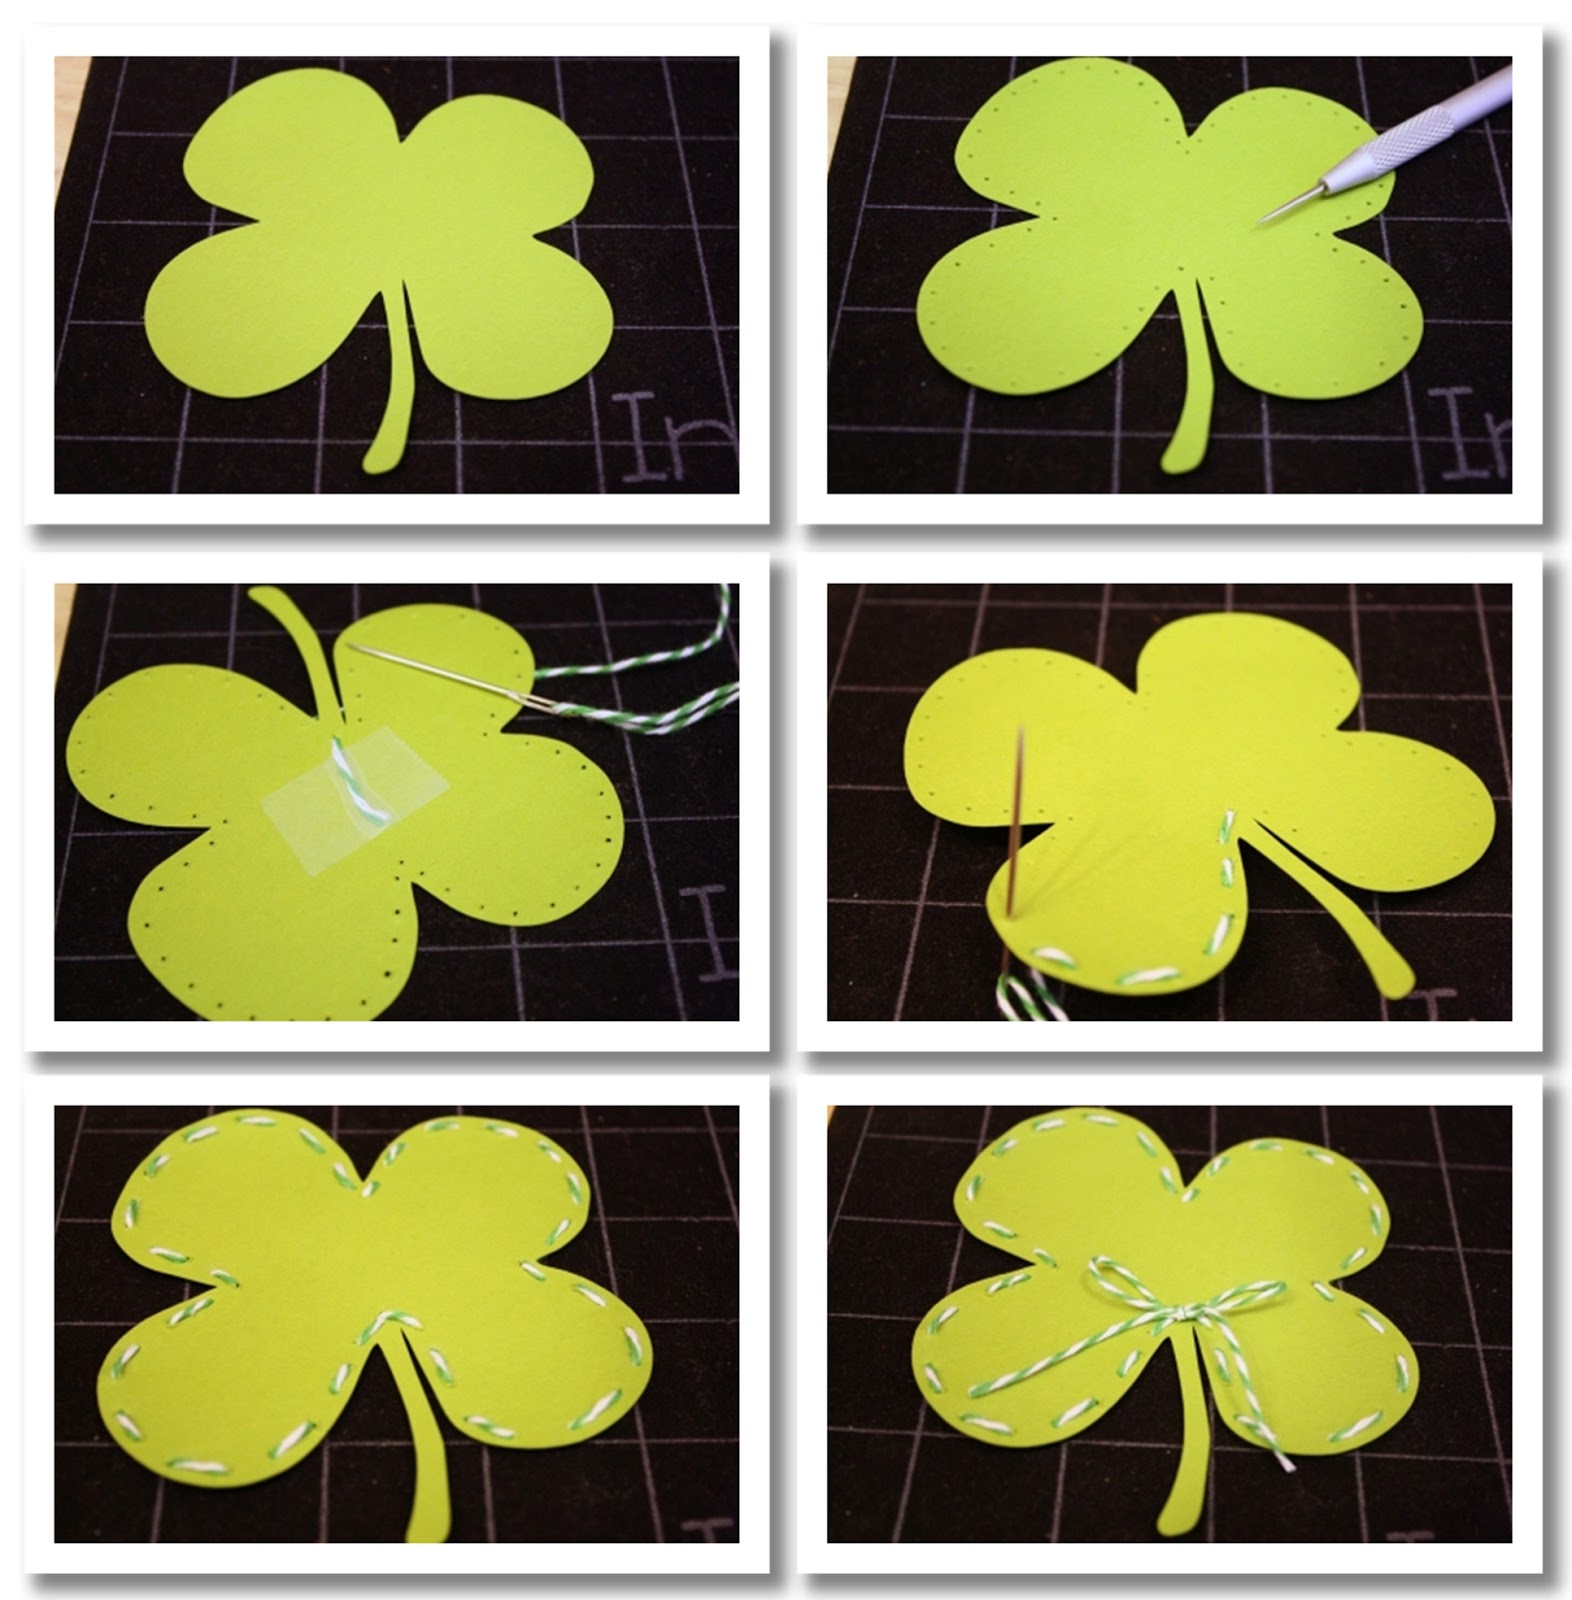
Clover Tutorial:
2. Using a paper piercer or needle, punch holes along the edges as shown.
3. Thread a needle with the Peapod Twine and push it through the back near the stem of the clover. Place a piece of tape on the backside to hold the twine.
4. Continue threading, going in and out of the holes as shown.
5. Your stitched clover should look like this.
6. With a separate piece of twine, tie a bow then adhere it to the center above the stem.
the design team and learn how you can enter yours!
Tutorial:
1. Punch a circle with cream paper then stamp the "xo" circle stamp in the center with Slate ink.
2. Cut a piece of the patterned paper to fit the front of cream card base as shown.
3. Use the denim paper and the pink colored cardstock to cut the 3x4 die cut.
4. Adhere the stamped circle behind the die cut as shown in the photo.
5. Place foam adhesive on the back of the die cut.
6. Then adhere the die cut to the front of the card in the center.
7. Cut the zipper to 4" then adhere across the front of the die cut.
8. Add two blue fabric flowers and one pink acrylic flower to the bottom left.
9. Cut a 1/2" piece of the chevron print paper and adhere it under the die cut, lining up the right edges as shown.
Shopping List:
 Thanks so much for stopping by!
Welcome to the Samantha Walker Creative Crafters Team Blog Hop!
To enter, just leave a comment on my blog during April 11th and April 15th. Winner will be announced on Samantha's Facebook page on Monday April 16th.
For additional entries:
1. Receive an additional entry for commenting on each of the other blogs in the blog hop.
4. Sign up for an e-mail subscription to Samantha's blog and you will automatically receive a link to a
free SVG &/or Silhouette Studio cutting file that you can download and use on your personal electronic cutter. Link will be e-mailed early next week!
To receive the additional entries, and get the link to the free file, mention in your comment on Samantha's blog (www.samanthaleewalker.blogspot.com) that you have done so!
WOW, that is 13 chances to win! How awesome is that!?
Now on with my project!
Supplies:
Burger Box Tutorial:
 |
1. Cut out the Burger Box using your Silhouette.
2. Fold the box on all the score lines.
3. Tuck in the four tabs on the top portion of the Burger Box as shown.
4. Tuck in the bottom four tabs, creasing the back score marks sharply.
5. Fold out the small flap along the bottom edge and bring down the top portion of the box, tucking the rounded edge in and leaving the front pieces under the small flap.
6. This is the finished box! |
Supplies:
Thanks so much for stopping by!
Click on the image below to head over to Karen's Blog!
Happy Hopping!
Hi guys! I am so excited to share my card with you today!
Do you see that background and the popped-up embellishment!? I made those and I am just in love with them! I will say that the background is very delicate and though it cuts perfectly with my Silhouette Cameo, I do not think Cricut will be able to handle the delicate areas. You also have to use great care when removing it from the Cameo mat.
Here are my designs:
I sized the Circle and frame to 2" to work perfectly with the PSA Stamps :)
You can get the Circle Label the background design HERE
I used my Xyron 2" Cheetah Runner to place adhesive on my background. This adhesive goes on in small dots and since it rolls so smoothly, it is perfect for delicate cuts! I use the adhesive runner on my Ranger craft mat so I can easily remove any excess glue.
Once I have my background covered, I simply add it to a 5-1/2" x 5-1/2" card base.
To adhere my ribbon, I used my 1.5" Xyron Create-a-Sticker "X" machine!
I love how easy this machine makes adhering my ribbons...I just pull it off the sticker sheet and apply!
Supplies:
Cardstock/Patterned Paper: Afternoon Tea Collection (Scrap Within Reach)
Punch: Border (EK Success) and 1/4" Corner Rounds (Zutter)
Ribbon: Afternoon Tea Collection (Scrap Within Reach)
Stamp: Dare to Dream (PSA Essentials)
Ink: Sweet Plum (Momento)
If you create a project using my designs, I would love to see them, so link me up in the comments section or send me an email with a link!