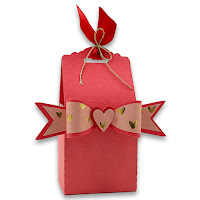
This Medium Kiss Bag is approximately 2-1/4" x 2-1/4" x 4-1/2" and is perfect for holding the 1.45 oz. (41g) boxed Kiss! You can adhere the top together or attach a ribbon through the slots. These are perfect for office gifts, teacher gifts, and they are great for Ring Pops, Rice Krispie Treats (2 of the .78 oz. bars fit), Tic-Tac boxes, and more! These go together really quickly making them ideal for bulk creation. The file is compatible with both the 8x12 and 12x12 mats.
Here is the tutorial:
1. Cut your pieces and fold on the score lines. Place adhesive on the tab of the wrap as shown. Adhere your mats on your bow pieces. I use a foam adhesive piece to layer the hearts.
2. Place adhesive above each of the score lines on the front of the main box as shown with the white adhesive in the photo.
3. Flip the mat piece over and add adhesive on the backside of the tab, then across the tops of the other two sections, skipping every other one as shown. NOTE: Do not put adhesive on the other two parts, these are the "sides" of the box and you don't want those sticky!
4. Adhere the wrap part to the box as shown making sure that your adhesive is along the top so the mat will have adhesive holding it at the top and bottom.
5. Wrap the mat around and adhere the tab in place. Make sure you keep the "box" shape, do not let it bend in when placing the mat around.
6. Finish wrapping the mat around, making sure to keep it level and keep the shape of the box. Your box should look like this now.
7. For your bow pieces, wrap each end to the center of the bow, lining up the shapes so they form your "bow loops". Use a strong adhesive to secure in place. Adhere your bow to the tails then use a foam adhesive to attach the heart.
8. Use foam adhesive to adhere the bow to the front of the box! Fill with candy/goodies and embellish as desired!
This Heart Wrap Box is perfect for treats, small toys, as well as homemade goods! The finished project is approximately 4-3/4" x 3" x 3" and comes with all the paper elements shown. The file is compatible with both the 8x12 and 12x12 mats.
You can find the tutorial and other versions of this box here:
This Pretzel Rod Box has a little window so you can see inside and fits 8" pretzel rods or this box also holds #2 pencils! The box is approximately 8-1/4" x 1-1/2" x 3/4" and it is compatible with both the 8x12 and 12x12 mats.

Here is the tutorial:
1. Cut out the pieces. Fold the box on the score lines then adhere the mats in place. Place adhesive on the long side tab, the two smaller tabs on each side and then one of the large tabs on each side (as shown with white adhesive tape in image). 2. Fold the box in half, remove the adhesive along the long tab.
3. Then pull the remaining box up and adhere in place. Pop the box up so it is in the box form.
4. Push the two small tabs in and adhere together. Then adhere the two larger tabs together to close. Fill with your goodies and repeat for the other side!
5. Your box should look like this! Embellish as desired.
This hinged box is approximately 4-1/4" x 4-3/8" x 1" and is compatible with both the 8x12 and 12x12 mats. The files come with the one piece hinged box and the coordinating mats. This is perfect for holding small gifts or baked goods!
Here's the tutorial:
1. Cut out the base box and fold on the score lines. Place adhesive on the six small tabs.
2. Adhere the tabs to the bottom sides to form the box bottom.
3. Adhere the two top tabs to the top side (with half circle cut) to form the lid.
4. This is what your box will look like closed.
5. Adhere your mats in place.
6. Embellish and fill as desired!
You can find this file in my stores soon!
This gift set is approximately 7" x 5-3/4" x 1-3/4" and come with the box base, divided area lid, and the coordinating mats shown. This box holds a cake mix, frosting tub, and two toppings (such as sprinkles). The file is compatible with both the 8x12 and 12x12 mats.
Here is the tutorial:
1. Cut out your pieces and fold on the score lines. Starting with the box base, place adhesive on the four tabs.
2. Adhere the tabs to the box sides to form the shape.
3. Grab your lid and place adhesive on the four tabs.
4. Adhere the tabs to the box sides to form the lid.
5. Place the lid on top of the box.
6-7. You can use the box like this...
8. Or adhere in the coordinating mats to the box base and lid.
For these boxes, I use a heavier card stock, such as 80# Basis, to help support the contents as they become heavy when grouped together!
This gift set is approximately 7" x 5-3/4" x 1-3/4" and come with the box base, divided area lid, and the coordinating mats shown. This box holds a cake mix, frosting tub, and cupcake wrappers. The file is compatible with both the 8x12 and 12x12 mats.
This gift set is approximately 7" x 5-3/4" x 1-3/4" and come with the box base, divided area lid, and the coordinating mats shown. This box holds a cookie mix (or cookie/cake box), cookie icing, and two toppings (shown are sprinkles and color mist). The file is compatible with both the 8x12 and 12x12 mats.
Today I am sharing my new Fold and Tuck Box. This box is perfect for holding homemade baked goods, leftovers for your guests to take home, or even for using as a gift box!
The box comes sized at approximately 2-1/2" x 7-1/4" x 4"
and it easily opens and closes. It is also compatible with both the 8x12 and 12x12 mats!
This box also folds flat which allows you to make several
ahead of time and store them for later use!
For more information about this homemade bow, click HERE!
Here is the tutorial:
1. Cut out the pieces and fold on the score lines.
2. Place adhesive on the side tabs. Adhere the two pieces together in the center as shown.
3. Adhere the remaining tabs to the other side.
4. Pop the box open to form its shape.
5. Place adhesive on the triangle shapes and adhere those down.
6. Lock the two bottom tab pieces together as shown.
7. For the top, push the two sides down together (the ends will point out).
8. Tuck the ends into the slots on the sides.
9. Your finished box will look like this image.
You can easily fold these boxes flat for storage by releasing the bottom tabs (leaving the triangle shapes glued). When you are ready to use them simply lock the tabs on the bottom again then fill them and close the top!