Good Morning! Today I am sharing four new cards. These cards are approximately 3-1/4" x 7-1/4" and have a pocket to hold money, checks, or even folded letters! The cards come with the card base (which include the pocket folds), the card mat, the sentiment pieces shown, and an envelope. All pieces are compatible with both the 8x12 and 12x12 mats. The main sentiment pieces layer on each other.
Here's the tutorial:
1. Cut out all the pieces. Fold the card base on the score lines. Note: The pocket can go on either side of the card depending on how you place the paper on the mat. If you want the card pocket to face this way, place your paper you want down on your mat. If you want the pocket on the left, place your paper you want up on your mat.
2. Place adhesive on the two tabs. Adhere the long tab on top of the short tab.
3. Adhere the pocket to the bottom of the card as shown.
4. Insert your money, check, or letter.
5. Your card should look similar to this now.
6. Adhere your last letter on the card mat.
7-9. Continue adhering the letters until all pieces are on. Adhere the side sentiment.
10. Place foam adhesive on the back of the mat and adhere to the card base.
Here is the tutorial for the envelope:
 1. Cut out the envelope piece. Fold on the score lines. Place adhesive on the long tab and the shorter bottom tab.
2. Adhere the tabs to the envelope side.
3. Insert your card and adhere the last envelope flap to close.
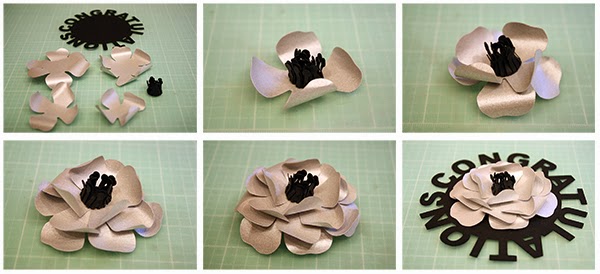
These sentiment flowers are perfect for gift bags and wrapped gifts, you could even use them for tags or cards! The files come with the sentiment backing and all the pieces you need to build the flowers. You can use the pieces on their own or together as shown.
Here's the tutorial:
1. Cut out all your pieces. Adhere the centers together and pull up the points toward the center.
2. Curl the petals with your skewer/pencil.
3. Adhere the center to the middle of the smallest flower form.
4-7. Continue adhering the flower forms on, staggering the petals until all flowers pieces are in place.
8. Adhere your flower on to the sentiment circle with a foam adhesive and manipulate the petals to get your desired shape.
Here's the tutorial:
1. Cut out all your pieces. Adhere the centers together and pull up the points toward the center. Curl the petals with your skewer/pencil.
2. Adhere the center to the middle of the smallest flower form.
3-5. Continue adhering the flower forms on, staggering the petals until all flowers pieces are in place.
6. Adhere your flower on to the sentiment circle with a foam adhesive and manipulate the petals to get your desired shape.
Here's the tutorial:
1. Cut out all your pieces. Curl the petals with your skewer/pencil. Roll the smallest petal and then bend at the bottom as shown. This will be your center.
2. Adhere the center to the middle of the smallest flower form.
3-7. Continue adhering the flower forms on, staggering the petals until all flowers pieces are in place.
8. Adhere your flower on to the sentiment circle with a foam adhesive and manipulate the petals to get your desired shape.
Here's the tutorial:
1. Cut out all your pieces. Adhere the centers together and pull up the points toward the center. Curl the petals with your skewer/pencil.
2. Adhere the center to the middle of the smallest flower form.
3-8. Continue adhering the flower forms on, staggering the petals until all flowers pieces are in place.
9. Adhere your flower on to the sentiment circle with a foam adhesive and manipulate the petals to get your desired shape.
Here's the tutorial:
1. Cut out all your pieces. Adhere the centers together and pull up the points toward the center. Curl the petals with your skewer/pencil.
2. Adhere the center to the middle of the smallest flower form.
3-5. Continue adhering the flower forms on, staggering the petals until all flowers pieces are in place.
6. Adhere your flower on to the sentiment circle with a foam adhesive and manipulate the petals to get your desired shape.
Today I am sharing my new 4x9 cards and coordinating envelope. These cards come with the card base, a sentiment mat, the sentiment(s) shown in the image, an inside mat, and two inserts (one to hold a gift card and one to hold money). All of these files are compatible with the 8x12 and 12x12 mats.
Here is the tutorial:
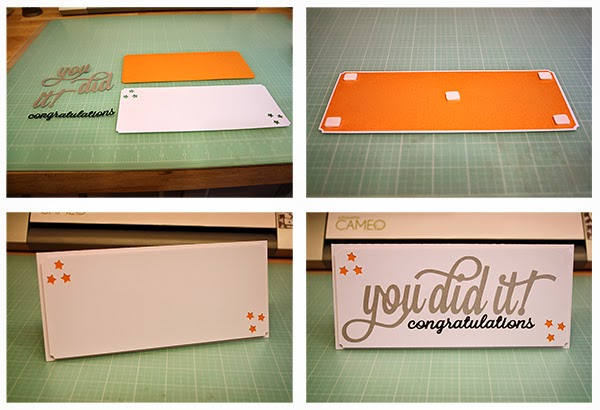
1. Cut out your pieces.
2. Adhere the backing on to the sentiment mat. Place foam adhesive on the back as shown.
3. Adhere the mats to the card front.
4. Adhere your sentiments on to the front. Adhere your chosen insert piece inside on the top portion and the bottom message insert on the bottom portion of the card (if needed).
This file comes with two different cut files, one-piece for the Cameo
and a two-piece cut for the Portrait.
Here is the tutorial:
1. Cut out your pieces. If you have a Cameo, you will only have one piece.
2. Place adhesive on the long tab as shown.
3. Adhere the two pieces together.
4. Place adhesive as shown.
5. Adhere the sides together.
6. Insert your card and adhere the envelope shut.
Good morning and happy graduation season! We are still finishing up school here in Michigan, but the Seniors graduated last weekend which means there are A LOT of open houses and celebrations all around us! I have been working with a dear friend to assist with her daughter's party and created these little center pieces to sit on the tables outside!
I love that the new Solid Denim twine from The Twinery matches our high school colors just perfectly! Just look at how cute the little tassels are on the die cut graduation cap!
The Twinery Supplies:
more Graduation and Father's Day ideas!