Spring Flowers
This flower is quick and easy to cut and assemble! The files are compatible with both the 8x12 and 12x12 mats.


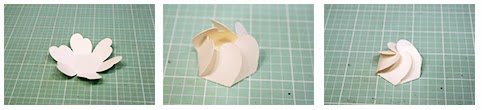
1. Fold on on the score lines.
2. Push each swirl in toward the center. When you reach the last one, pull up the first swirl (the one you started with) and tuck the small bubble piece under it.
3. You will have to push the pieces down and the base will bend out slightly to form the "puff".

4. After you have your center completed, curl the remaining petals with a skewer or pencil.
5. Start with the smallest petal form and adhere the center in.
6-10. Continue adhering the next size petal under each so the largest is on the very bottom. Stager the petals as you adhere them. Manually "fluff" the flower by pulling petals down and up randomly to get your desired look!

I lost the tutorial photos for the above flower :(
This one comes with two rectangle cuts. They will follow the same tutorial as the flower below for those cuts.


1. Cut out all the pieces. Use a skewer or pencil to curl the flower petals. Flip the rectangle cuts over and add a strong adhesive along the bottom edge. I am using Scrappy Tape from ScrapbookPal.com.
2. Starting with your smallest rectangle, fold the piece in half (long ways) so that your strip cuts are folded in half. Place strong adhesive along the bottom edge.
3. Begin rolling the piece inwards.
4. Your piece should look similar to this when rolled.
5. Repeat step 2 for both your remaining strips. Grab the next size in length and adhere it to your existing roll. The photos above make this difficult to see as they look very similar in color (sorry!). Once that strip is adhered, begin rolling it around the original one.
6. Your roll should look like this now.
7. Do the same with your final strip, adhering it in place and rolling.
8. Your rolled pieces should now look like this!
9. Use a strong adhesive (like hot glue or Zip Dry Paper Glue) to adhere the rolled center to the smallest flower form. Adhere the other two flower forms together with foam adhesive.
10. Adhere the pieces together and "fluff" as needed!


1. Cut out all your pieces. Beginning with the triangle cuts, place adhesive along the bottom edge. I am using Scrappy Tape from ScrapbookPal.com.
2. Stagger the triangles and adhere the two together, lining up the bottom edges so they are even.
3. Place another strip of adhesive along the bottom edge.
4. Roll the triangles inward and then spread out the 'spikes'.
5. Adhere the smallest flower form around the center.
6. Continue adhering the flower forms in place going smallest to largest.


3 comments