3d Paper Unicorn Bow

This bow is perfect for gift wrapping, cutting with felt for a hairbow, or even for the front of a card! The bow can be sized to fit your needs and is compatible with both the 8x12 and 12x12 mats! See my blog for a photo tutorial! As sized, this bow is approximately 5" wide.
Here is the tutorial:
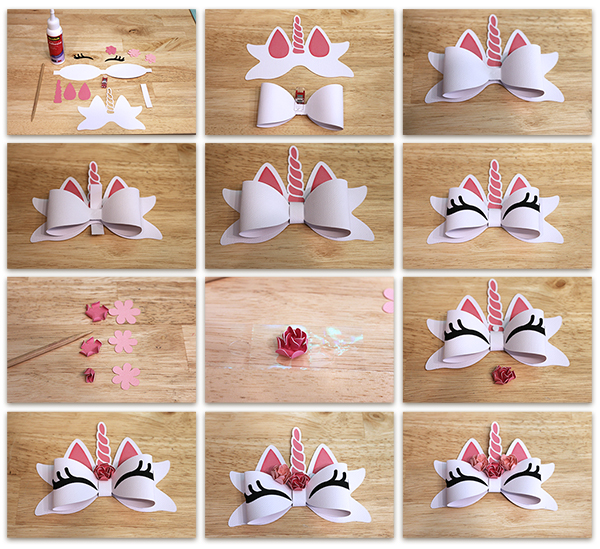
1. Cut out your pieces.
2. Adhere the inside ears and the color of the horn in place (leave the bottom base unglued for now). Adhere each bow piece to the back, forming the bow loop.
3. Using a foam adhesive, adhere the center of the bow to the tails piece.
2. Adhere the inside ears and the color of the horn in place (leave the bottom base unglued for now). Adhere each bow piece to the back, forming the bow loop.
3. Using a foam adhesive, adhere the center of the bow to the tails piece.
4. Grab your center piece, string through your bottom horn piece.
5. Wrap around the center of the bow then adhere in place. Adhere horn piece down fully now.
6. Adhere the eyelashes in place.
7. Next, form your flowers. Use a small skewer (or pencil tip) to curl the petals in then really squish the center, pinching it to hold it in place.
8. Adhere the small center in the other small flower form. Squeeze the pieces together to form a shape similar to this.
9. Adhere the flower form inside the largest flower piece. Again, squish together to get the desired shape.
10. Using a foam adhesive, adhere the flower to the center of the bow/horn as shown.
11-12. Repeat for the remaining flowers.


This bow is perfect for gift wrapping, cutting with felt for a hairbow, or even for the front of a card! The bow can be sized to fit your needs and is compatible with both the 8x12 and 12x12 mats! See my blog for a photo tutorial! As sized, this bow is approximately 3-1/2" wide.


This bow is perfect for gift wrapping, placing on vases, or even for the front of a card! The bow can be sized to fit your needs and is compatible with both the 8x12 and 12x12 mats!
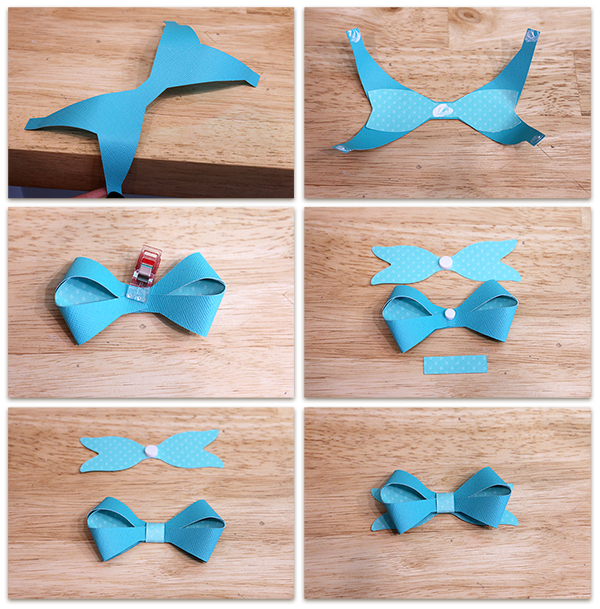
1. Cut out all your pieces. With the fold over bow piece, run the edges over the side of your desk to help round out each of the four sections. This just helps when folding it later.
2. Flip this cut over and adhere the inside mat then place adhesive on the four tabs and in the center.
3. Fold each of the tabs in, lining up the curves. Use a strong adhesive!
4. Place a foam adhesive in the center of the bow and on the center of the tails.
5. Wrap the bow center around the bow and adhere in the back.
6. Adhere the bow to the tails!

This bow is perfect for gift wrapping, placing on vases, or even for the front of a card! The bow can be sized to fit your needs and is compatible with both the 8x12 and 12x12 mats!


This bow is perfect for gift wrapping, placing on vases, or even for the front of a card! The bow can be sized to fit your needs and is compatible with both the 8x12 and 12x12 mats! The file comes with two cuts for the main bow, a separate cut for the inside of the bow, the bow base tails and the center wrap so that you can create unique versions to customize and personalize each bow!

2. Flip this cut over and adhere the two together in the center.
3. Adhere the inside mat then place adhesive on the four tabs and in the center.
4-5. Fold each of the tabs in, lining up the curves. Use a strong adhesive!
6. Place a foam adhesive in the center of the bow and on the center of the tails.
7. Wrap the bow center around the bow and adhere in the back.
8. Adhere the bow to the tails!

This mermaid bow is perfect for gift wrapping, placing on vases, or even for the front of a card! The bow can be sized to fit your needs and is compatible with both the 8x12 and 12x12 mats! This bow comes with two tail covers, one with scored "fish scales" (shown) and one that is plain. You can use the bow with or without the bow base:

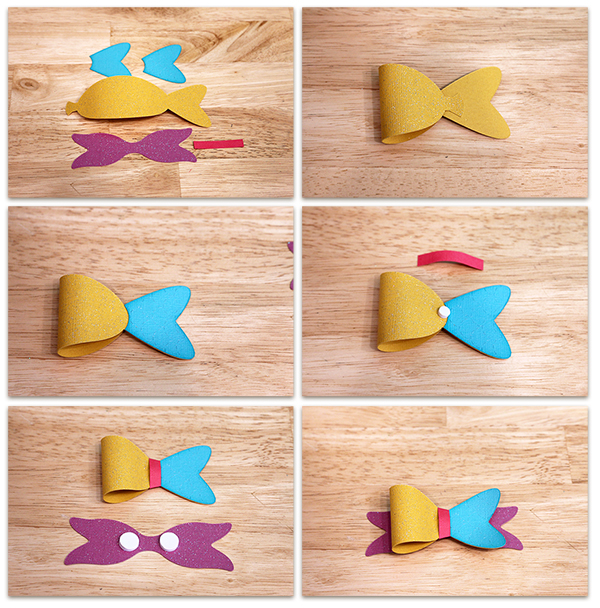
1. Cut out all your pieces. Note, there are two different tail covers, you only need to cut the one you want to use. One is plain and one has scored "fish scale" details.
2. Place a strong adhesive on the bow tab and adhere it to the back of the piece.
3. Adhere on the select bow tail cover.
4. Place a foam adhesive on the center of the bow
5. Adhere the center tab to the foam adhesive then fold the ends around the back, angling in the back. Adhere in place. Put foam adhesive on the base tails (if using).
6. Adhere the bow to the base tails.

This bow is perfect for gift wrapping, cutting with felt for a hairbow, or even for the front of a card! The bow can be sized to fit your needs and is compatible with both the 8x12 and 12x12 mats!


This bow is perfect for gift wrapping, cutting with felt for a hairbow, or even for the front of a card! The bow can be sized to fit your needs and is compatible with both the 8x12 and 12x12 mats!

Tags:
3D Paper Bow
Bits of Paper
Bow
Decorative bow
Jamie Cripps
Jamie Lane Designs
JamieandJenn.com
SVG
SVG Cuts
Unicorn


0 comments