3D Peony, Ranunculus, & Cone Shaped Paper Flowers!
Ahh, we made it to the end of the week! Only three more flowers left to go...for this week anyways! Yes, I have MORE flowers coming next week! Just when I think I am done I receive another request! I have really enjoyed trying to fill them all! If you have a flower you'd like me to try, feel free to email me: jamielanedesigns@gmail.com
This next one is my second most requested - a Peony!

Here is the tutorial:

1. Cut all the pieces and curl the petals with a skewer or pencil. Adhere the center pieces together and pull up the ends.
2-7. Adhere the center in to the next size flower shape and scrunch it up...continue doing this until all flower pieces are in place.
8. Fluff out the layers a little to get your desired shape. Ink the edges as desired
9. Adhere the leaf pieces to the bottom to finish.
...and this is my Ranunculus.
This has been my most difficult flower I have made. I must have cut at least 8 different versions of this flower before I finally ended up with this design. Though I really like it, I am still not 100% satisfied, so you may see another one of these in the future...
but for now here it is!


1. Cut two of each of the flower pieces.
2. Curl up the ends of each petal with a skewer.
3. Your flowers should look like this now. Yes, that is a lot of flower shapes! :)
4. Adhere your center pieces together and bend up the ends as shown. Adhere it into the smallest of the flower shapes.
5. Adhere it in the next size flower shape and scrunch it up, staggering the petals...
6-20. Continue doing this until all flower pieces are in place.

22. Fluff out the petals until you get your desired shape!
Okay, so I know Spring isn't here yet - but I am convinced that the more I talk about it, the faster it will get to me! Today I am sharing a fun cone shaped flower!

Here's what you will need to get started:


Scissors
Tape
Paper Trimmer
Skewer (or pencil)
Twine (optional)
-or-
Follow these manual instructions:
For each flower you will need the following:
- 4-1/2" x 4-1/2" Square in Green for the Stem
- Two oval pieces approximately 3-1/4" x 1/2" for the leaves
- 1-3/4" x 10-1/4" strip of colored paper for the flower (this folds (lightly) in half longways and will then need 24 slices placed in it along the fold)
Here is the tutorial:

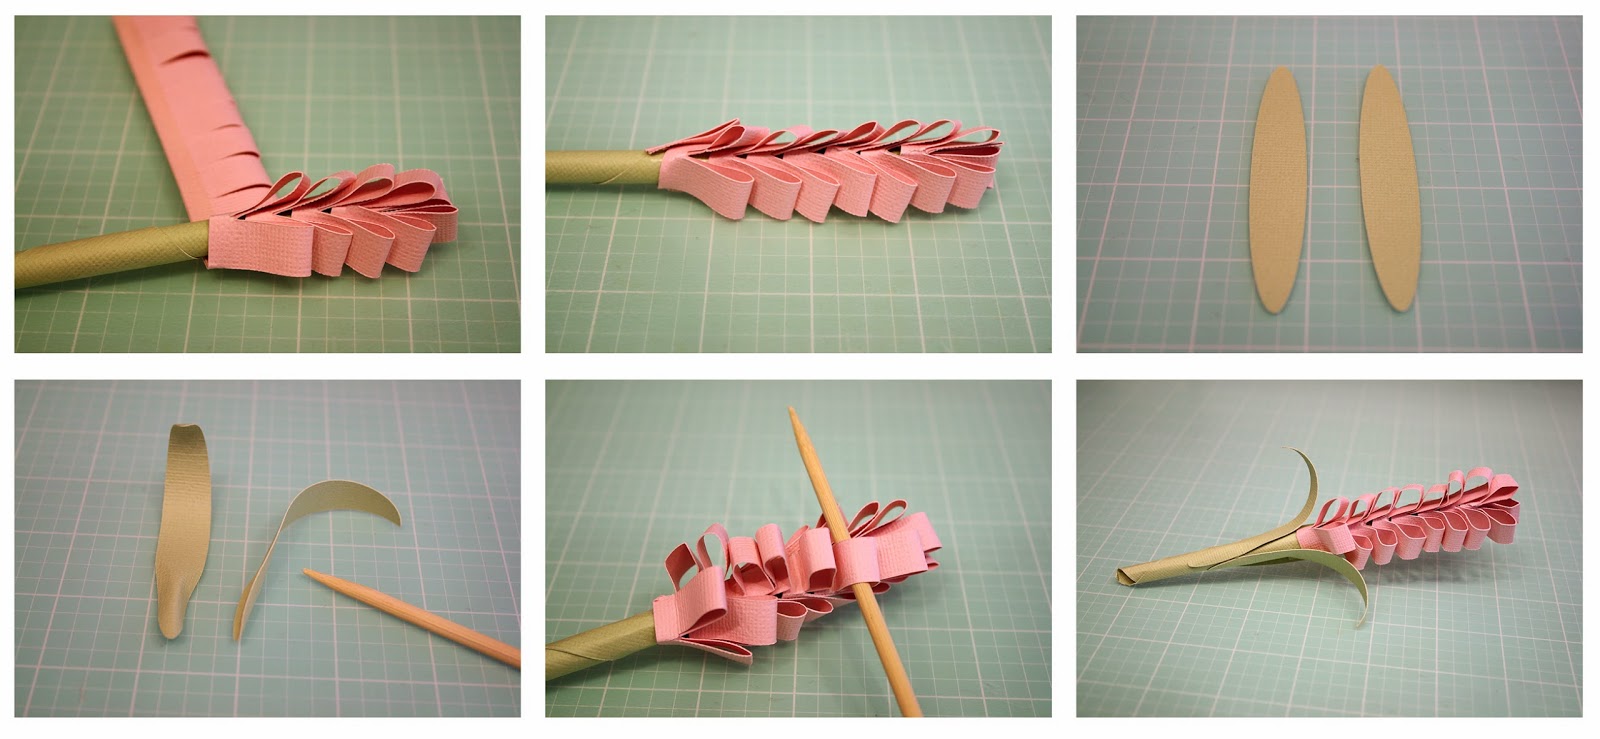
1. Begin with your stem. Grab you square piece of paper , place a glue dot in one corner and in the opposite corner, place your skewer in and begin rolling tightly.
2. Your stem piece should look like this now. Secure the stem corner with a small piece of tape and remove your skewer.
3. Next grab your flower cut. Place a long strip of adhesive along the inside bottom (straight) edge.
4. Bend the paper over to match the straight edges and begin adhering the pieces together as shown.
5. Press firmly on the adhesive to secure the pieces.
6. Place another long strip of adhesive along the straight edge (this will adhere to our stem).
7. Cut off one end of the stem so that it is even.
8. Place your stem one tab in and adhere in place.
9. Begin rolling your paper around your stem.
11. Your finished flower should look similar to this!
12. Next grab oval pieces.
13. Curve them around the skewer as shown. I place my thumb on the leaf piece and then pull the skewer under it (like you curl ribbon).
14. With your skewer, go back in to each loop and fluff it out and down.
15. Adhere your leaf pieces on the stem.
These flowers would be great in a mixed bouquet and they look fabulous with a variety of colors and heights of the same flower! To get different heights, you can make your squares larger for the stem pieces or just trim some of them shorter!
Here is my finished bouquet!

Can you see that shimmer on the Curious Metallic Card Stock?
It is so gorgeous!

All the Curious Metallic Card Stocks are on Sale at CutCardStock.com during March 2014!
No Coupon Necessary - Just click on the image below to start shopping!

Thanks so much for stopping by today!
You can find all of these files HERE!
Tags:
3D Flower
3D Paper Flowers
Bits of Paper
Coned Shaped Flower
Jamie Cripps
Jamie Lane Designs
Paper Flowers
Peony
Ranunculus
Ranunculus Tutorial
Silhouette
Tutorial


1 comments