This file comes with the wreath base, the pine tree needle pieces, and the pieces to build the bow. It is compatible with both the 8x12 and 12x12 mats. Note: The file comes sized to fit the 8x12 mat but can be enlarged (make sure you leave it all grouped) to have the wreath base fit the full 12x12 mat.
This coffin wreath project comes with the wreath base, the coffin boxes, the layered skull, and the layered bones! The coffin boxes can also open to place treats inside! The file is compatible with both the 8x12 and 12x12 mats. Cut as sized, the assembled wreath is approximately 8-1/2" round. This can be made larger with a 12x12 mat.
Here is the tutorial:
1. Cut out the wreath base. I cut this piece twice, once with chipboard and the second with a light gray card stock.
2. Adhere the two wreath bases together.
3. Cut the layered skull piece. Ink around edges if desired and then adhere in place.
4. Cut out enough coffin pieces to build 4 in total. Fold on the score lines and add adhesive to the tabs.
5. Adhere the tabs to the coffin box.
6. Repeat for the second piece of the coffin so you have a lid and a base.
7. Layer your coffin mats and ink if desired. Place the lid (larger) over the bottom of the coffin to complete the box.
8. Adhere the coffin mats on to the lid of the box.
9. Repeat this for all four coffins.
10. Cut out the bone pieces and ink if desired.
11. Use foam adhesive to put under the single bones. Adhere them on the double bones.
12. Use foam adhesive (or hot glue) to adhere the pieces to the wreath base placing the bones between the coffin boxes.
This Pumpkin Wreath is compatible with both the 8x12 and 12x12 mats. This file comes with the wreath base (I cut this twice, once with chipboard and once with card stock and adhere the two together), six pumpkin petal boxes, stems for each side of the pumpkins, leaf pieces, and pieces to create the twists. Cut as sized, the assembled wreath is approximately 8-1/2" round. This can be made larger with a 12x12 mat.
Here is the tutorial:
1. Cut out the wreath base. I cut one with chipboard and one with coordinating card stock.
2. Adhere the wreath base pieces together.
3. Cut out all the pieces from the file. I cut four pumpkins from a 12x12 card stock piece and the other two from a coordinating color of card stock. To assemble the pumpkins, pull up the two pumpkin stems and line the stems up. Then push down on the stems to set them through the slots. (Note: It is easier to put the stem pieces on first).
4. Ink the edges of the stem pieces and curl the twists on a skewer or pencil.
5. This is what all my twists look like together.
6. Adhere the stems on and then assemble the pumpkin boxes. To put the twists on simply wrap them once around the pumpkin stem. You can add a touch of adhesive if you want to secure it but mine are staying fine just wrapped once!
7. Repeat step 6 for all your pumpkins!
8. Use a strong foam adhesive or hot glue to adhere your pumpkins where you want them on your wreath.
9. Adhere the leaf pieces in between the pumpkins putting some flat and others raised with foam adhesive.
10. Your wreath should look similar to this now.
11. Cut a piece of ribbon and tie a knot then place a strong adhesive (such as hot glue) on the tails of the ribbon and adhere it to your wreath backing.
This file comes with the wreath base and the snowflake pieces. It is compatible with both the 8x12 and 12x12 mats. Note: The file comes sized to fit the 8x12 mat but can be enlarged (make sure you leave it all grouped) to have the wreath base fit the full 12x12 mat.
**My tutorial photos are reversed in order, so sorry! Please start with the bottom center photo**
1. Cut out all your pieces. For each snowflake you will have three parts. Fold the scored snowflakes on the score line.
2. Place adhesive on the two scored circles on that snowflake then adhere it to the coordinating snowflake using just those two circles.
3. Place foam adhesive squares on the smallest snowflake piece (placing one on each end towards a tip). Adhere one side to the scored snowflake then bring the other side of the scored snowflake up just a bit and adhere the other side in place. This helps hold the "popped-up" form.
4. Place your ribbon/twine through the holes of the wreath base and tie.
5. Repeat steps 1-3 until you have 8 snowflakes completed. If you do not want to tie a bow around the edge of your wreath, you can cut 9 snowflakes. I adhere my snowflakes on with large foam adhesive.
This 3D Hanging snowman is approximately 9" tall! The file is compatible with both the 8x12 and 12x12 mats.
Here is the tutorial:
1. Cut out all the pieces, keeping them in their corresponding sizes. Adhere two together to for a "+" then adhere the other two together in a separate "+" shape. Stager the pieces together so they look like those in the image above. Do this for all three.
2. Cut a piece of ribbon (24" or so) and push through the bottom hole of the largest set. Tie a knot in the bottom.
3. Pull the other side of the ribbon up through each of the holes.
4. Your large shape should look like this now.
5. Slide the next sized shape (the medium) on to the top of the large shape.
6. Pull the other side of the ribbon up through each of the holes.
7. Your shape should look like this now.
8. Slide the next sized shape (the smallest) on to the top of the medium shape.
9. Pull the other side of the ribbon up through each of the holes. Your finished shape should look like this now. Tie the ribbon around itself to form a loop. Trim the end.
10. Cut out the hat pieces. Place the hat strip on as shown then place two small foam adhesives at the top of the hat.
11. Adhere the two hat pieces together.
12. Slide the hat on to the ribbon loop and push down over the snowman's head. Cut out the face pieces and adhere in place. Tie a ribbon around the next for a scarf. To finish, cut the arm piece out and push through the middle ball and slide to the top area to secure in place.
This file comes with all the pieces you need to create this Poinsettia flower. The pieces are sizeable to fit your needs and are compatible with both the 8x12 and 12x12 mats.
1. Cut out your flower pieces and use a pencil/skewer to bend the petals. I place my skewer in the center of each petal and pull the sides up around the skewer. Curl the leaf pieces and then combine the centers together, pulling up the points.
2. Line your flowers up in size order and start with the largest on the bottom. Adhere the next largest inside the bottom.
3-4. Continue adhering the flowers in size order.
5. Adhere your centers in the middle.
6. Adhere the flower on the leaf cut. Fluff as desired!
This file comes with the wreath base, the leaf pieces, and the pieces to build the flowers. It is compatible with both the 8x12 and 12x12 mats. Note: The file comes sized to fit the 8x12 mat but can be enlarged (make sure you leave it all grouped) to have the wreath base fit the full 12x12 mat.
For this wreath, you can follow the flower tutorial above as the flowers are similar.
Once you have the six flowers built, tie ribbon through the wreath base then adhere your poinsettia flowers on the wreath base.
I enlarged my wreath to have the wreath base fit the 12x12 mat.
Good Morning! Today I am sharing two new wreaths for Fall! These files can be sized to fit your needs so you could use these as wreaths for your front door or walls, or shrink them down and put them around the base of a candle. Tomorrow I have a Poinsettia wreath so be sure to come back to check it out too!
This file comes with the wreath base, the leaf pieces, and the pieces to build the flowers. It is compatible with both the 8x12 and 12x12 mats. Note: The file comes sized to fit the 8x12 mat but can be enlarged (make sure you leave it all grouped) to have the wreath base fit the full 12x12 mat.
Here is the tutorial:
1. Cut out your flower pieces (you will have eight sets). Begin by using a skewer or pencil to curl the petals up for each piece.
2. Your flower pieces should look similar to this now. Adhere the two centers together, lifting the points up.
3-5. Begin adhering the flower pieces together from smallest to largest.
6. Adhere the center in place and fluff the flower (see video for how I do mine). Don't be afraid to get a little rough with them!
7. Repeat steps 1-6 for all 8 flowers. Once completed you will have the 8 flowers, the wreath base, and leaf pieces.
8. Tie ribbon though the wreath base.
9. Begin adhering your flowers to the wreath base. I use strong foam adhesive &/or hot glue.
10. Continue adding flowers until they are all in place.
11. Adhere your leaf pieces in to fill in areas!
Note: I ended up cutting another wreath base in chipboard to adhere behind my card stock base shown.
Here is a quick video that show how I "fluff" out the flowers once they are assembled.
(sorry for the quality - my first attempt on my phone and lighting wasn't great)
This file comes with the wreath base, the leaf pieces, and the pieces to build the 3d Bow. It is compatible with both the 8x12 and 12x12 mats. Note: The file comes sized to fit the 8x12 mat but can be enlarged (make sure you leave it all grouped) to have the wreath base fit the full 12x12 mat.
Here is the tutorial:
1. Cut out all your pieces.
2. Adhere the pieces on to the wreath base.
3. Continue adding the leaf cuts until they are all in place.
Good Morning! I am starting today off with my new Paper Egg Wreath! This file is a lot of fun and it can be sized smaller to fit around a base of a vase or candle or larger to fit on your doors or walls! The file comes with the 3D paper eggs and their mats, five flowers, the wreath base, and the leaf branches! The file is compatible with both the 8x12 and 12x12 mats.
Here's mine hanging on my front door!
Isn't it fun? You can make these in any colors to coordinate with your decor!
Here is the tutorial:
1. Cut out your egg pieces. Place adhesive on three of the four tabs.
2. Adhere two tabs together.
3. Adhere the third tab to the center.
4. Bring up the last tab.
5. Turn the egg over so the circle side is up.
6. Adhere the mat pieces on the egg.
7. Repeat for the other four eggs.
8. Adhere the center of the flowers in the middle of each flower. Pull up the centers and curl the petals.
9. Cut the leaf branches and curl the leaf pieces with a skewer/pencil.
10. Cut the wreath base.
11. Begin adhering the leaf branches on the wreath base.
12-13. Continue adhering the leaf branches on, overlapping some.
14. Adhere the flowers on, leaving enough space for eggs in between.
15. Adhere your eggs on.
16. Attach a ribbon loop to the back of the wreath base in the top center.
You can also find my Paper Eggs and Holder in the store this week! The file comes with the 3D paper eggs and their mats, the holder base, the insert, handle pieces, and the holder base mats! The holder is approximately 3-1/2" x 6-3/4" x 3-1/4" and is compatible with both the 8x12 and 12x12 mats. The eggs can be filled with candy or money before you finish assembly then the recipient can simply press pinch the middle and bottom of the egg together to remove the items from the egg sides! As sized for the box, each egg is approximately 3" x 1-1/2" x 1-1/2" when assembled.
Here is the tutorial:
Follow the paper egg tutorial from above for the egg pieces.
1. Cut out the box pieces and fold on the score lines.
2. Place adhesive on the four tabs of the base box. Adhere the sides to the box sides.
3. Place adhesive on the bottom of the handle pieces.
4. Adhere the handle pieces in the inside of the box as shown.
5. Your box should look like this.
6. Place adhesive on the tabs then adhere the tabs to the box sides.
7. Place the insert into the box.
8. Adhere the mats in place and fill your box with your eggs.
9. Wrap twine or ribbon around the box and embellish as desired.
This
file is perfect for creating a wreath for your house or it can be scaled down
to use on a layout, card, or project!
The file comes with the wreath base and shamrocks in different sizes,
each with their own score lines to give the leaf dimension.
Tutorial:
1. Cut out the wreath base and the shamrocks. I cut five strips of shamrocks in the same color as my wreath base and the other three strips in a lighter shade of green. 2. Bend each petal on the score lines provided then use glue dots to adhere the shamrocks to the wreath base. 3. Continue adding on the shamrocks until you get your desired look. Tie a ribbon to embellish or add on the Stitched Layered Shamrock from below!
This file comes with a top layer that has holes for stitching and a bottom layer for the mat. This one can be sized to fit your needs and work perfectly with my 3D Shamrock Wreath!
Tutorial:
1. Cut out the two shamrock shapes. Thread your needle with twine and push it through the back of the top layer with holes near the stem. Tape the twine in place. Continue going in and out of the holes.2. You can single stitch so your shamrock looks similar to this image...3. ...or go back through the holes that weren't stitched for a double-stitch look.4. When finished, tape of your twine behind the top layer.5. Add small foam adhesives as shown.6. Adhere the top layer on the larger mat piece. You can use this on a card, layout, or project...and it works perfectly with the 3D Shamrock Wreath...
When you put the two together
You get this...
Isn't it adorable!? I have this hanging on my front door!
This box is perfect for baked goods or small gifts|treats! It is approximately 4-3/4" x 3-3/4" x 1-3/4" and is compatible with both the 8x12 and 12x12 mats. The file comes with the box and two shamrock shapes!
Tutorial:
1. Cut out the box base. Fold on all the score lines and place adhesive on the two side tabs.
2. Adhere the side tabs to the box side.
3. Pop up the box, push in the two bottom tabs then insert the tab into the slot to close the bottom.
4. Sit the box up and pinch in the sides. Tuck the small top tab into the slot. Note: I use a removable adhesive once my box is filled to keep the box top secure. The removable adhesive allows the gift to be open and closed again and again.
5. Your box should look like this now. Cut out your shamrock shapes, adhere the centers together and then attach them to your box. Embellish as desired!
This wreath
is perfect for cards, layouts, and even home decor such as for your front door
or around a candle base! As it comes in the file, the finished wreath is
approximately 4-3/4" x 4-3/4" but it can be resized depending on your
needs and machine. It is compatible with both the 12x12 and 8x12 mats.
The file comes with the wreath base, leaf pieces, evergreen sprigs, bow
pieces, and stickpins with changeable ball tips. Each of the leaf cuts has
score lines to help give the wreath texture.
Here is the tutorial:
1. Cut out all your pieces.
2. Add adhesive to the center of the wreath base all the way around.
3. Fold your leaf pieces on the score marks.
4. Adhere the leaf pieces randomly around the wreath base.
5. Adhere your evergreen sprigs in place.
6. Fold and adhere your second round of leaf pieces in place.
7. Form a loop with the rectangle piece and adhere it to the center of the bow. Adhere your color circle on the pins.
8. Adhere your bow on the wreath with foam adhesive.
Good Morning! Today with a fun Home Decor wreath using the beautiful Flavours Gourmet Sample Pack! Yes, CutCardStock.com has sample packs of many of their gorgeous papers so that you can a variety of them before you begin purchasing in bulk!
The Flavours Gourmet Sample Pack that I am using today comes with 16 sheets of 92# card stock, one of each color and it is on sale for $8.87 right now! I love the weight of this card stock and the colors are so vibrant and bold.
Just have a look...
This card stock is 92# weight so it really cuts well with both my manual and digital die cutting machines and it embosses really well too! Do you see those gorgeous leaf shapes? Those are Momenta's new Cut & Emboss Leaf Set and they have the leaf shape along with two different choices for embossing; a swirls inset and a stem inset!
Here is a close up of the embossing...
Here is a tutorial for how I created this project:
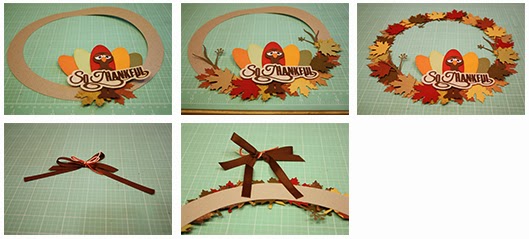
1. To create this project, I used my Silhouette to cut a 11" circle with a 8-3/4" circle inside from chipboard to create the wreath shape. Then I cut the Turkey using my Thanksgiving Door Hanger Box and So Thankful sentiment files from Silhouette. I assembles those pieces then adhered them at the bottom right of my wreath. Next I cut 40 leaf shapes and embossed them using my Cuttlebug. Then I began adhering the leaf pieces on the bottom of the wreath.
I use amazon links on my blog that allow me to earn from qualifying purchases. These affiliate links may be used at no cost to you which help keep this blog going!
As an agreement with the companies and teams that I design for and work with, I often receive product &/or compensation for my work. The thoughts and opinions in my blog posts are mine and I only promote the items and companies that I use myself and feel strongly about.
As always, thank you for supporting my blog!