Welcome to the Samantha Walker November Creative Team Blog Hop!
This month our Blog Hop theme is all about Thankful!
Samantha is giving away this free SVG and Silhouette Studio file this month!
Pennant Card with Options
This free file will only go out to those who sign up for the newsletter by Sunday night
(November 16, 2014). After that, you can find the design in the Silhouette store.
If you are already subscribed to our newsletter, be sure to leave your name in the Rafflecopter field.
You can also access this free file through the new
Haven't heard about Digi Playground yet? Digiplayground.com was created and is owned by Samantha Walker! This is a fun place to shop for SVG cutting files, digital stamps, printables and more. In addition to Samantha's designs, it will include designs from some other fantastic designers in the craft industry including myself, Jennifer Wambach Tranchita, and Rivka Wilkins! Be sure to visit the store each week for FREE SVG's, and to shop!
You can click HERE to access the free file for the hop!
We also have a fabulous giveaway!
Giveaway Info:
Sale Info:
As always, these deals vanish Wednesday at midnight
Eastern time so hurry to get yours!
This box opens up on both ends to reveal a box inside,
which is perfect for stashing candies in!
Here is the tutorial:
1. Cut the boxes and mats then fold the boxes on the score lines.
2. With the smaller box, place adhesive on the four side tabs and adhere them to the box sides to form its shape. With the large box, place adhesive on the four tabs then adhere the long sides to them as shown.
3. Adhere the smaller box inside the center of the larger.
4. Place adhesive on the sides and the coordinating tabs then adhere those sides to the box and fold that tab over within the smaller box. Do this for both sides. This will hold the center box in place.
5. Adhere the mats in place and place your goodies in the box.
6. Once mats are in place, I punched a small hole in each side so that I could run my ribbon through.
7. I push the ribbon up through the holes and pull the ribbon tight as I close the box.
8. Cut out the Thank You sentiment and adhere to a tag. Note: I cut my Thank and You apart so that I could move them to fit my tag better. Tie a bow on the box and then tie the tag to the bow.
These accordion cards comes with the accordion base
containing four sections, mats, and all the paper elements shown. The file is compatible with both the 8x12 and
12x12 mats and it is sizable to fit your needs. As it comes sized, it is
approximately 7-3/4” tall and each section approximately 2-3/4”. These can be used as cards that are easily displayed
or you could even use them on a desk/table to display small photos!
This envelope fits my Accordion Stand Cards. It is approximately 8” x 2-7/8”.
We have a fabulous giveaway for our hop!
All you need to do is enter below using the Rafflecopter widget! You can earn multiple entries by following us on Facebook, commenting below, tweeting about the giveaway, and signing up for the email updates. This giveaway is open to US customers only.
a Rafflecopter giveaway
These go together easily and they are just gorgeous!
Here is a quick tutorial:
1. Cut out the napkin ring pieces and adhere the smaller wrap in the center of the larger as
shown.
2. Adhere the "give thanks" sentiment to the center.
3. Cut the smaller leaf piece in a different color and adhere to the sentiment leaf.
4. Cut out larger leaf pieces in different colors to match the table!
Supplies:
Don't forget to sign up for Samantha's Newsletter
through the Rafflecopter widget to receive your
FREE SVG and Silhouette Studio file!
This will only go out to those who sign up for the newsletter by Sunday night (November 17,
2013) After that, you can find the design in the Silhouette store.
Thanks so much for stopping by!
Click on the image below to head over to
Happy Hopping!
Remember Samantha is also have a Creative Team call for the 2014 term!
Just click HERE for more information on how you can apply!
The Flavours Gourmet Sample Pack that I am using today comes with 16 sheets of 92# card stock, one of each color and it is on sale for $8.87 right now! I love the weight of this card stock and the colors are so vibrant and bold.
Just have a look...
This card stock is 92# weight so it really cuts well with both my manual and digital die cutting machines and it embosses really well too! Do you see those gorgeous leaf shapes? Those are Momenta's new Cut & Emboss Leaf Set and they have the leaf shape along with two different choices for embossing; a swirls inset and a stem inset!
Here is a close up of the embossing...
Here is a tutorial for how I created this project:
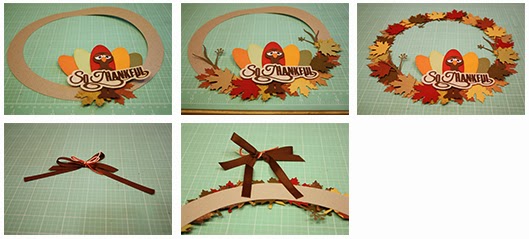
1. To create this project, I used my Silhouette to cut a 11" circle with a 8-3/4" circle inside from chipboard to create the wreath shape. Then I cut the Turkey using my Thanksgiving Door Hanger Box and So Thankful sentiment files from Silhouette. I assembles those pieces then adhered them at the bottom right of my wreath. Next I cut 40 leaf shapes and embossed them using my Cuttlebug. Then I began adhering the leaf pieces on the bottom of the wreath.
3. Once you have all 40 leaf pieces in place, your wreath will look similar to this!
4. Tie a bow with brown ribbon then tie coordinating twine around the bow.
5. Attach the ribbon to the back of the wreath and you are ready to hang it!
Aren't the colors and textures stunning?
As soon as Halloween is over, this one will be on my front door!
that will be in the store later this week. These cards are about 4" x 5-3/4" when folded and each one has includes the tri-fold card base, three mat pieces, and the sentiment with a mat. You can write in between the mat areas or on the large back mat and then they stand when folded to be displayed. All of these cards are compatible with both the 8x12 and 12x12 mats.
Here is an image of the cards unfolded:
Have a Scary Halloween:
So Thankful For You:
Happy Hanukkah:
Be Merry and Bright:
These cards all assemble similarly. Here are the steps:
1. Cut out all the pieces of the file in your desired colors. Fold the card base on the score lines making peaks and valleys as shown.
2. Adhere your mats on the cardbase as displayed in this image.
3. When you fold your card and sit it up, it should look like this now.
4. Adhere your sentiments on to the matching sentiment mats.
5. Flip your sentiments over and add foam squares to the bottom area of each.
6. Adhere them on to your card so the tops of the sentiments are off the cardbase slightly.
7. Tie in a ribbon to the backing piece.
8. This is a side view so you can see the folds better.
Here is a peak at what else you will find in my Silhouette Store later this week!