I had a request come in for inside card sentiments that could be used with sketch pens along with a couple others for birthday sketch sentiments, so I decided I would give this a try. This week in my Silhouette store you will find two files that coordinate together:
This A2 (4-1/4" x 5-1/2") card comes with the card base, a card base mat, a decorative mat, and the cupcake pieces shown. This file is compatible with the 8x12 and 12x12 mats and the pieces can be used separate from the card if you like!
and...
With this file you will receive four sketch files and four cut frames.
These inserts will fit any A2 card.
Here is a tutorial for how to use the sketch file:
(and don't worry it isn't as complicated as it looks, I just tried to step it out to make it more clear!)
1. Bring in the files to your Silhouette Studio software so it looks similar to this. Load your paper and place a sketch pen in and then select the silhouette sketch pen setting and then press cut. This will draw the sentiments on your paper. DO NOT UNLOAD YOUR PAPER YET.
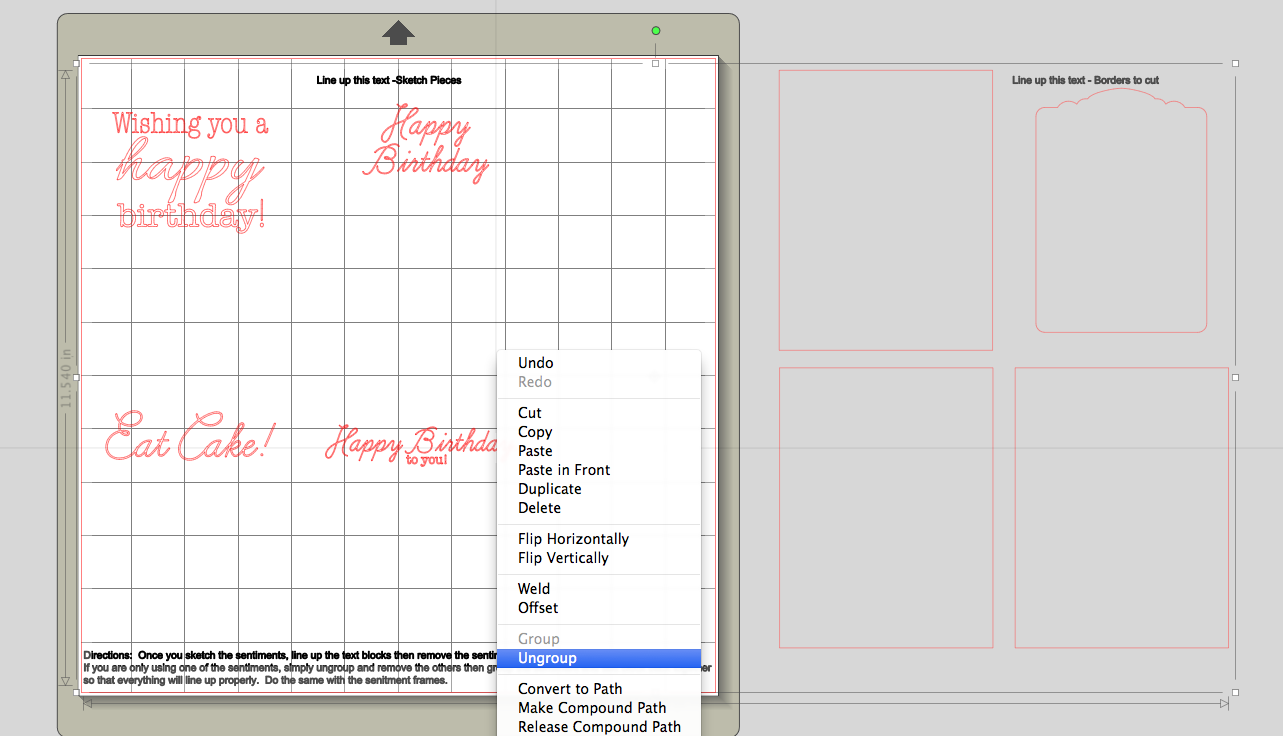
2. Once the file is done, DO NOT UNLOAD YOUR PAPER. Place your blade back in the machine. Ungroup the file once so the sentiments and frames are separate groupings.
3. Drag your frames over on top of the sentiments, lining up the "Line Up this Text". You may need to zoom in to make sure you have them lined up.
4. Click on one of the sentiments to select that grouping. Then delete the sentiments.
5. All you will have is the frames like this image. Change your settings to match your paper and cut.
Your cuts should look like this now!
The final project:
You can find both of these files HERE.
I love this file (and yes I know I will say it at least once more before this week is up!)! This box holds 24 Silhouette Sketch Pens all perfectly in three rows (and will also hold 24 Cricut Pens/Markers too)! It is only 6-5/8" x 1-3/8" x 3-1/8" in size so it will fit on your desk nicely! This file will cut with the 12x12 and 8-1/2x12 mats.
Tutorial:
1. Cut out the pieces in your desired papers.
2. Starting with the base box, fold on all the score lines then place adhesive on the four tabs.
3. Adhere the tabs to the box sides.
4. Grab the top piece and fold on all the score lines. Place adhesive on the four tabs as shown.
5. Adhere the tabs to the box sides.
6. Place adhesive around all of the top box edges as shown.
7. Place the top piece in the base box.
8. Push all the way down then adhere the sides together to secure in place.
9-10. Place you sketch pens (or Cricut pens) in the holes!
I am determined to get you all organized! This (so far) is one of my MOST favorite organizers I have released...
This box has 20 1" compartments which are perfect for storing your Silhouette Sketch Pens, Stickles (right side up or upside down!), Distress Paints, Ink Sprays, well basically anything you can fit in a 1" square area!
Here is the tutorial:
Please note: I changed all divider pieces to have tabs after these photos were taken to make the box stronger.
1. Cut out the pieces of the 1" Divider Box. Starting with the box, fold on all the score lines then add a strong adhesive to the tabs. Adhere the tabs to the sides.
2. Fold the tabs on the divider pieces so they are all pointing up. Place adhesive on the tabs.
3. I like to assemble my grid before inserting into the box so everything lines up properly. Place your four smaller divider pieces so the slots are up then slide in one of the longer pieces pushing the slots into place.
4. Put in the second longer piece, again pushing the slots into place as you go.
5. Finally place the third (and last) long piece lining up the slots.
6. Next, drop your grid into your box. The side tabs will be loose to provide you wiggle room before you adhere them. Move your pieces around to get straight lines.
7. When you are happy with the shape, press the tabs against the box sides to adhere them into place.
Pretty easy, right!?
Happy organizing!
Here is a sneak of what is coming this week...
Be sure to check back later this afternoon for the Elegant Favor Box tutorial!


