Good morning! Today I am sharing a quick and easy Thank You Envelope which is perfect for gifting smaller gifts or even placing a card within!
Here's the tutorial:
1. Cut out all the pieces for the Thank You Flower Sentiment.
2. Use your skewer or pencil to curl the petals. Adhere the two center pieces together and push the points up.
3. Adhere the center into the middle of the smallest flower.
4-7. Push the petals up toward the center then adhere the flower into the next sized flower form staggering the petals slightly. Continue adding flowers and pushing the petals up toward the center until they are all in place.
8. Place a foam adhesive in the center of the sentiment.
9. Adhere the flower.
10. Size your envelope to fit your 12x12 mat and assemble. Tie the Pink/White dotted ribbon in a knot around the center of the bag. Place the Kiwi Velvet Ribbon around the bag above the dotted ribbon and tie with twine.
11. Tie the metal grey double faced satin ribbon around the dotted ribbon. Tie off in a bow to the side.
12. Adhere the flower sentiment in the center of the ribbons with foam adhesives.
Thanks so much for stopping by today!
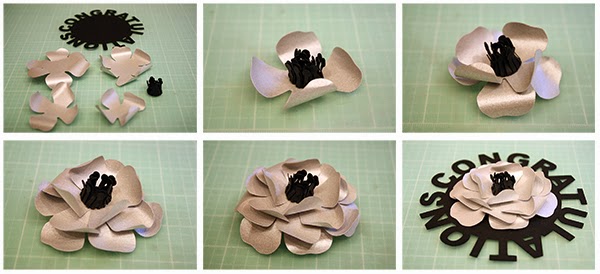
These sentiment flowers are perfect for gift bags and wrapped gifts, you could even use them for tags or cards! The files come with the sentiment backing and all the pieces you need to build the flowers. You can use the pieces on their own or together as shown.
Here's the tutorial:
1. Cut out all your pieces. Adhere the centers together and pull up the points toward the center.
2. Curl the petals with your skewer/pencil.
3. Adhere the center to the middle of the smallest flower form.
4-7. Continue adhering the flower forms on, staggering the petals until all flowers pieces are in place.
8. Adhere your flower on to the sentiment circle with a foam adhesive and manipulate the petals to get your desired shape.
Here's the tutorial:
1. Cut out all your pieces. Adhere the centers together and pull up the points toward the center. Curl the petals with your skewer/pencil.
2. Adhere the center to the middle of the smallest flower form.
3-5. Continue adhering the flower forms on, staggering the petals until all flowers pieces are in place.
6. Adhere your flower on to the sentiment circle with a foam adhesive and manipulate the petals to get your desired shape.
Here's the tutorial:
1. Cut out all your pieces. Curl the petals with your skewer/pencil. Roll the smallest petal and then bend at the bottom as shown. This will be your center.
2. Adhere the center to the middle of the smallest flower form.
3-7. Continue adhering the flower forms on, staggering the petals until all flowers pieces are in place.
8. Adhere your flower on to the sentiment circle with a foam adhesive and manipulate the petals to get your desired shape.
Here's the tutorial:
1. Cut out all your pieces. Adhere the centers together and pull up the points toward the center. Curl the petals with your skewer/pencil.
2. Adhere the center to the middle of the smallest flower form.
3-8. Continue adhering the flower forms on, staggering the petals until all flowers pieces are in place.
9. Adhere your flower on to the sentiment circle with a foam adhesive and manipulate the petals to get your desired shape.
Here's the tutorial:
1. Cut out all your pieces. Adhere the centers together and pull up the points toward the center. Curl the petals with your skewer/pencil.
2. Adhere the center to the middle of the smallest flower form.
3-5. Continue adhering the flower forms on, staggering the petals until all flowers pieces are in place.
6. Adhere your flower on to the sentiment circle with a foam adhesive and manipulate the petals to get your desired shape.