We have a fabulous giveaway for our hop!
All you need to do is enter below using the Rafflecopter widget! You can earn multiple entries by following us on Facebook, commenting below, tweeting about the giveaway, and signing up for the email updates. This giveaway is open to US customers only.
...Candy Corn and Peanuts! YUM!
If you haven't mixed it yet, it is a must...trust me!
Supplies:
Patterned Paper: Little Black Dress (Basic Grey) & Homestead 6x6 (SEI)
Punch: Circle Squeeze (Fiskars)
Adhesive: Zapdots and Adhesive Runner (Helmar)
Ribbon: Orange (May Arts)
Ink: Charcoal (Cat's Eye Chalk Ink) and Black (PSA)
Stamps: Happy Halloween u.b.u (PSA)
I used the Release Compound Path to remove the windows and added a circle cut on each side so the recipient could see what was inside!
Don't forget to sign up for Samantha's Newsletter
through the Rafflecopter widget to receive your
FREE SVG and Silhouette Studio file!

This will only go out to those who sign up for the newsletter by Sunday night (October 13, 2013) After that, you can find the design in the Silhouette store.
Thanks so much for stopping by!
Click on the image below to head over to
Happy Hopping!
Good morning! Today I am sharing three Father's Day cards I
Good morning! Today I am sharing something a little different...hybrid cards. I actually love creating digitally and making hybrid cards are among my favorite as you can use the base over and over for quick cards that you can customize to be different!
I am also using a couple of my favorite PSA Stamps too!
I created my background and added digital elements then printed them out and added them to a white cardbase. Once I had that done, I embellished them with the stamps, ribbon, twine, metal rimmed tags, and even some extra paper pieces!
The next time I need quick Teacher cards, all I have to do is pull up my file and print them then add embellishments to change them up!
It's fun and you should try it :)
I love the bright cheery colors and of course
the sentiment stamp for this card!
I used PSA's Oh Happy Day sentiment and inked the edges of the circles. I used foam adhesive to provide the dimension!
Supplies:
Cardstock: White (Recollection)
Patterned Paper: Life of the Party 6x6 (My Mind's Eye)
Punch: Medium Circle Punch (Fiskars)
Ink: Black (PSA) and Charcoal Cat's Eye Chalk Ink (ClearSnap)
Stamp: Sentiments (PSA)
Twine: Charcoal (The Twinery)
Ribbon: Black Spots (Misc.)
I don't know about you...but I am ready for a little warmth and sunshine!
This little card brings me a little glimpse of just that!
Supplies:
Stamps: Life's A Beach (PSA Essentials)
Cardstock: White (The Paper Studio)
Patterned Paper: Sunny Side 6x6 (Pebbles)
Ink: Tuxedo Black, Cantaloupe, Rose Bud,
Nautical Blue, and Bahama Blue (Momento)
Punch: Large Squeeze Circle (Fiskars)
Adhesive: Foam Tabs (American Crafts)
Twine: Pink Sorbet (The Twinery)
Jewels: Clear Gradient (Creative Charms)
Do you ever create something and you just love how it turned out? This is one of mine...I just love this card.
I used a lot of fabulous Silhouette cuts from Samantha Walker and used foam adhesive to add dimension. I tied a cream grosgrain ribbon around the center circle and added buttercream twine around the bow.
Supplies:
Twine: Buttercream (The Twinery)
Ink: Dark Brown Chalk Ink (ClearSnap) and Royal Blue (PSA)
Stamp: Sentiments (PSA)
Patterned Paper: Curiosity 6x6 (Authentique)
Cardstock: Blue (Creative Memories)
Flowers: Yellow (Prima)
Today I am working with the Lyon French Wired ribbon! The French Wired ribbon is a dream to work with and one of Ribbon Unlimited's best sellers! Although it is named after Lyon, one of France's well known textile centers, it is actually made in Germany. Most of the colors have two shades of thread sewn together to give the ribbon an iridescent quality. It is bio-degradable (except for the wire) and comes in over 100 colors with available widths up to 2 3/8". Click HEREto see it all and shop!
Supplies:
Cardstock: Kraft (The Paper Studio)
Ink: Black (PSA) and Warm Red Cat's Eye Chalk Ink (ClearSnap)
Gems: Clear (Hero Arts)
I just love how the ribbon stays where you put it!
Now that Christmas has passed, I have a few New Year's cards to share!
Do you create New Year cards?
And of course, have a safe and HAPPY NEW YEAR!
Good Morning! Today I am sharing one of my most favorite Christmas Cards! This one went together really quickly and I just love the colors!
Cardstock: Core'dinations
Stamps: Treeo, PSA Essentials
Ink: Turquoise, PSA Essentials and Tuxedo Black (ME-900), Momento
Die Cuts: Twisted Metal Tags & Accents by Samantha Walker, Spellbinders
Embossing: Polka Dots Cuttlebug Folder, Provo Craft
Adhesive: Foam Squares, Kanban Crafts
Twine: Blossom, The Twinery
Ribbon: RIbbon FX #202713, Hobby Lobby
Punch: Dotted Scallop Edger, EK Success and 1/2" Corner Rounder, Zutter
Jewels: Clear Gradient Jewels, Creative Charms
What are your favorite colors to use on Christmas Cards?
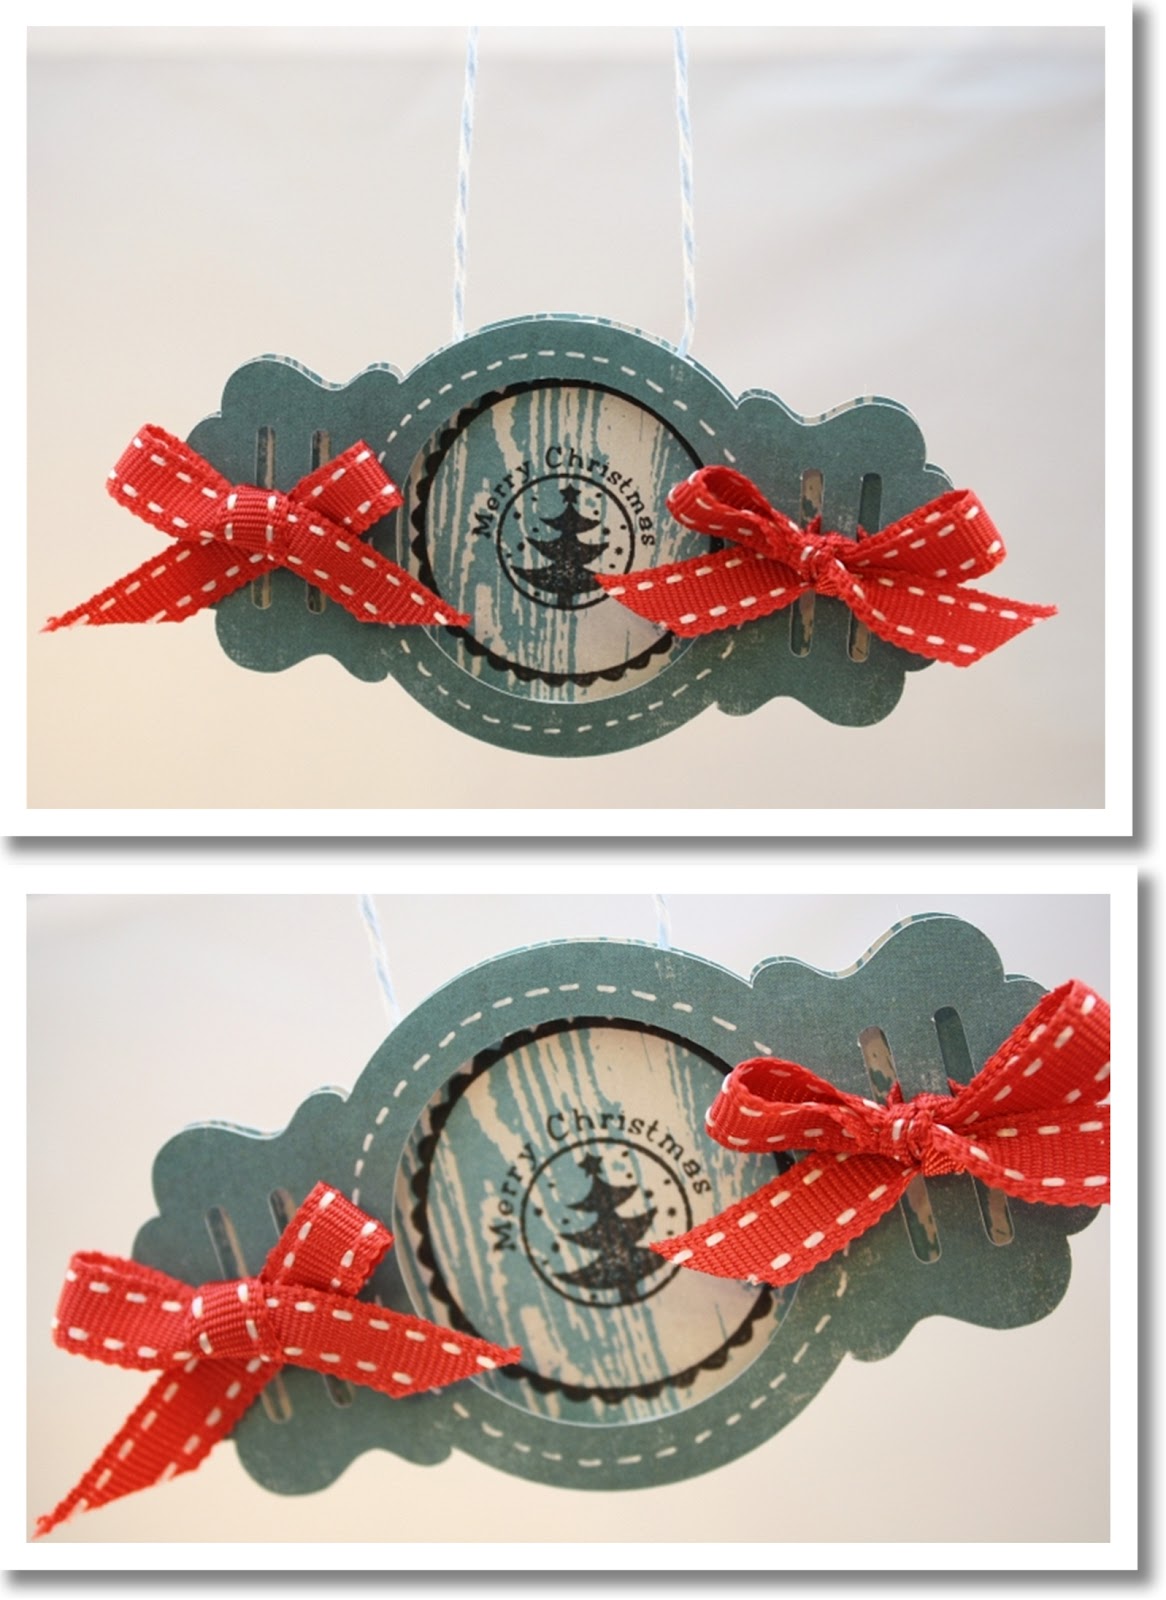
Hi guys! I am sharing a couple little tags that I have created for gifts!
I love how a little tag can dress up an entire gift package so quickly!
Supplies:
Embossing Powder: Opaque Bright White (WOW Embossing Powders)
Cardstock: Loyal 6x6 Bundle (Authentique)
Brads: Light Green Gem Brads (Creative Charms)
Die Cut Machine: Cameo (Silhouette America)
Die Cut Info: Cut at 4.620 x 2.855.
Adhesive: 1/4" Square Zapdots (Helmar)
Pen: White Gel (Sakura)
Tools: Score Board (Scor-Pal)
Adhesive: 450 Quick Dry and 1/4" Square Zapdots (Helmar)
Supplies:
Cardstock: Celebrate 6x6 Bundle (Authentique)
Die Cut Machine: Cameo (Silhouette America)
Die Cut Info: Cut at 3.990 x 2.280
Adhesive: 1/4" Square Zapdots (Helmar)
Ribbon: Red - Elements (American Crafts)
Supplies:
Patterned Paper: Loyal 6x6 Bundle (Authentique)
Cardstock: White (Recollections)
Stamps: Treeo (PSA) and Timeless Textures (Skipping Stones Designs)
Stickers: Christmas Traditions by Samantha Walker (Creative Imaginations)
Ink: Black (PSA), Antique Linen and Embossing Distress by Tim Holtz (Ranger)
Embossing Powder: Opaque Bright White (WOW Embossing Powders)
Punches: 1/2" Corner Rounder (Zutter) and
Intertwined Arches Edger Punch (EK Success)
Ribbon: May Arts
Twine: Cappuccino (The Twinery)
Tutorial:
- Cut cream patterned paper down to 4.5" x 5.5" and adhere on to card base.
- Stamp music pattern with Antique Linen ink and let dry.
- Stamp snowflakes with embossing ink then add white embossing powder and apply heat to set.
- Punch the top right corner with 1/2" corner rounder.
- Apply red cardstock sticker frame then stamp in sentiment.
- Punch border with green paper, using the punch on both 5.5" edges. Adhere to the bottom of card as shown.
- Tie ribbon around the front of the card just above the border then apply chipboard Christmas sticker.
- Tie a piece of twine around the ribbon.
Hi! Today I am sharing one of my most favorite cards! It has so much texture and who wouldn't love those little shark and fish...and crab!? I used PSA's Anchor's Away stamp set for the animals and sand castle and Sweet Stamp Shop's Dream Ocean for the beautiful sentiment!
I often forget how much I love to rip paper and the look it gives! :)
Supplies:
Cardstock: White (The Paper Studio)
Patterned Paper: Plumeria 6x6 (Basic Grey)
Punch: Large Radiant Circle (EK Success)
Adhesive: Foam Tabs (American Crafts)
Good morning! I am sooo feeling this card today!
Supplies:
Ribbon: 350-58-03 (May Arts)
Marker: E44 (Copic)
Pen: White Gel (Sakura)
Punches: 1/4" Corner Rounder (Zutter) and Double Embossed Dotted Lace (EK Success)
Can you believe we are in December? I just can't believe it. Christmas will be here before we know it...and the snow too!
Today I am sharing a bright and fun Christmas Card!
Ink: Black, PSA Essentials and Watermark, Versamark
Punch: 1/4" Corner Rounder, Zutter
Hello! I have been playing with
and I am super excited to share my creation with you today!
I just adore this card! I love how it looks folded and
love even more how it displays (and did you see the matching envelope?)!
Supplies:
Stamps: Holiday Sentiments (Sweet Stamp Shop)
Custom Stamp (PSA Essentials)
Inks: Warm Red and Olive Green Chalk Inks (Clearsnap)
Kettle Colorbos (Clearsnap)
Ribbon: Red (Misc)
Twine: (The Twinery)
Gem: Red Gradient (Creative Charms)
Pen: White Gel (Sakura)
Other: Twinkling H2O (Creative Imaginations)
Here is a quick tutorial:
1. Cut the card out twice, we are going to use the center piece of the red cut out.
2. Cut on the score marks of the red die cut to separate out the middle.
3. Ink around the edges of the center piece.
4. Adhere the red die cut on the center of the green die cut.
5. Ink around the edges of the green die with a deeper green shade. Cut the Artisan Tag with the red cardstock as the larger and the green cardstock as the smaller as shown. Adhere the red tag to the front of the card then stamp a sentiment on to the green then adhere with foam adhesive.
6. Use Twinkling H2O to add shimmer to the reindeer and around the edges of the green tag piece.
7. Cut a slice on each side of the center piece of the card large enough to run ribbon through.
8. Tie a ribbon in the inside center area and then tie a piece of twine around the ribbon. Use a white gel pen to create faux stitching around the green edges. Stamp or write in your greeting on the bottom right side of the card.
9. Punch a circle in the same red cardstock used above and stamp or write the word 'love'. Ink around the edges and adhere to the center of the greeting with foam adhesive.


