This gift box is approximately 4-1/4" x 3-1/2" x 1-1/8" and comes with the base box and lid. The bow also comes with this file and comes with the base layers, mats for the bow, the tail, and center ring. The box and bow can be used together as shown or individually. The file comes sized to fit the 8x12 mat and can be made larger.
Here is the tutorial:
This bows comes with all the pieces shown and is compatible with both the 8x12 and 12x12 mats. You can also size the bow to fit your needs! These would be so cute on top of gifts or even to go on tags!
Here is the tutorial:
This layered bow comes with all the pieces shown and are compatible with both the 8x12 and 12x12 mats. You can also size the bows to fit your needs! This bow would be so cute on top of gifts or with your gift bags!
Here's the tutorial:
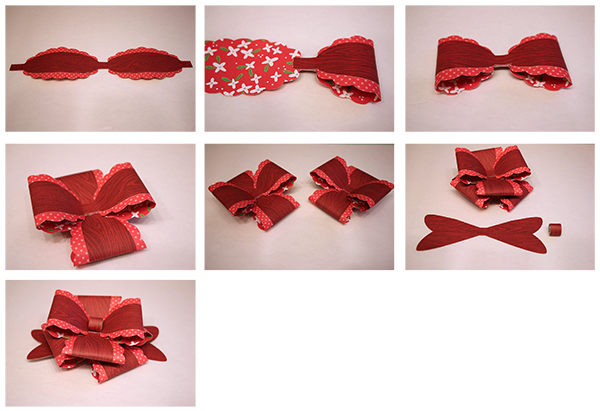
1. Cut out the bow pieces. Layer the oval bow strips on top of the ruffled bow strips.
2. Flip the bow strip so the back is facing up. Place adhesive in the back center. Bring over one side and line up the edges.
3. Place adhesive on the center again and bring over the remaining side.
4. Do this for all four bow strips. Adhere two together as shown.
5. You should have two combined pieces now.
6. Adhere the two bow pieces together, staggering the bows. With the small rectangle piece, place adhesive on one end and form a loop and adhere in place.
7. Adhere the bow on to the bow base and adhere the loop in the bow center!
You can find the Silhouette files here
This
layered bow is perfect for cards, boxes, and gifts! It compatible with the 8x12
and 12x12 mats and can be sized to fit your needs!
Here is the tutorial:
1. Cut out all the pieces.
2. Adhere your smaller bow pieces in the center of the larger.
3. For the bows, turn the piece over and apply adhesive to the center and each of the tabs.
4. Bring the tabs into the center, line up the bow edges and adhere each in place.
5. Adhere the bows on the center of the mats.
6. Adhere the smaller bow grouping in the center of the larger.
7. Fold the center cover on the score lines and then place adhesive on the back side.
8. Wrap the center cover around all of the bows and adhere in place.
This
bow is perfect for Holiday gift wrapping, placing on vases, or even for the
front of a card! This bow has a second layer built in with the file and can
be sized to fit your needs and is compatible with both the 8x12 and 12x12 mats!
Here is the tutorial:
1. Cut out the bow pieces.
2. Adhere the layer pieces on the main pieces. For the bow pieces, you can use the centers to match up the layers.
3. Your pieces should look similar to this.
4. Adhere the tabs to the center of the bow and form the loop as shown.
5. Adhere the bows together in the center, staggering.
6. Adhere the bow base to the back of the bows and then turn the bow over (right side up) and adhere the loop to the center of the bow.
Today I am sharing more bows! These have decorative layers built in with the files. If you do not like the leaf or snowflakes within the layers, you can use the "releases compound path" within the software to remove them. These bows can be sized to fit your needs and they are all compatible with the 8x12 and 12x12 mats.
Here is the tutorial:
1. Cut out the bow pieces. Adhere the mat pieces in the center of the larger bow pieces as shown. (Do not place adhesive on the bottoms of the bow pieces, make sure you have enough to curl up).
2. Turn the main bow piece over and place adhesive on each of the four tabs. Adhere one of the tabs to the center, lining up the bow curve. Continue adhering the tabs pieces to the center.
3. Turn the box back over, it will look like this now.
4. Create a bow shape using the smaller bow piece.
5. Turn it over and it will look like this now.
6. Adhere the smaller bow to the center of the larger bow.
7. Adhere the bow base to the back of the bows.
8. Turn the bow over (right side up). Curl your center piece to form a loop and adhere the ends to secure in place and adhere the loop to the center of the bow. Curl the ends of the bow base up slightly to finish.
Here is the tutorial:
1. Cut out the bow pieces. Adhere the mat pieces in the center of the larger bow pieces as shown. (Do not place adhesive on the bottoms of the bow pieces, make sure you have enough to curl up).
2. Turn the main bow piece over and place adhesive on each of the four tabs. Adhere one of the tabs to the center, lining up the bow curve. Continue adhering the tabs pieces to the center.
3. Turn the box back over, it will look like this now.
4. Curl your center piece and adhere the ends to secure in place.
5. Adhere the small loop in the center of the bow
6. Adhere the bow base in place on the backside of the bow.
7. Curl the ends of the bow base up slightly to finish.
Today is part two of my large bows! You can find the other bows in the posts below.
These next two bows are made for packages, bags, or even wreaths as they are bulkier than my other bows. Both of these bows can be sized to
fit your needs and is compatible with both the 8x12 and 12x12 mats!
Tutorial:
1. Cut out the bow pieces. Starting with the largest, turn the piece over and place adhesive on each tab.
2. Adhere one of the tabs to the center, lining up the bow curve the adhere the opposite side.
3-5. Continue adhering the tabs pieces to the center until all are in.
6. Repeat steps 1-5 for the remaining two bow pieces.
7. Adhere the middle bow on top of the largest bow.
8. Then adhere the smallest bow in the center of the middle bow.
9. Bend all the little pieces of the circle center up and adhere it to the center of the bows as shown.
10. Place a small foam square on the bottom center of the largest bow.
11. Adhere the bow base in place on the backside of the bow.
12. Turn your bow back over (right side up) and place a twine bow in the center to embellish!
Tutorial:
1. Cut out the bow pieces.
2. For each bow piece, turn the piece over and place adhesive on each tab. Adhere the tabs in toward the center. With the small center piece, form a loop and place adhesive to hold its shape.
3. Starting with the large pieces, adhere two in a cross form as shown.
4. Adhere a third on staggering.
5. Then add the fourth as shown to complete.
6-8. Do the smaller pieces as you did the larger.
9. Place a small foam square in the center of the larger bow
10. Then attach the smaller bow to the center of the larger.
11. Adhere the loop in the center of the bows.
12. Attach the bow base to the back of the bow as shown.
13. Your bow will look like this now!
Are you ready for my large bows? I am absolutely in love with each and every one of these…and I can't wait to start my Holiday gift wrapping with them! These bows can be sized to fit your needs and they are all compatible with the 8x12 and 12x12 mats.
Tutorial:
1. Cut out the bow pieces.
2. Turn the main bow piece over and place adhesive on each of the four tabs. Adhere one of the tabs to the center, lining up the bow curve.
3-5. Continue adhering the tabs pieces to the center.
6. Adhere the bow base in place on the backside of the bow.
7. Form a loop and adhere the ends of the small piece as shown.
8. Turn your bow back over (right side up) and adhere the small loop in the center of the bow to finish!
Tutorial:
1. Cut out the bow pieces. Adhere the tabs to the center of the bow and form the loop as shown in the first tutorial.
2. Adhere the smaller bow to the center of the larger bow.
3. Adhere the bow base to the back of the bows.
4. Turn the bow over (right side up) and adhere the loop to the center of the bow.
Tutorial:
1. Cut out the bow pieces. Adhere the tabs to the center of the bow and form the loop as shown in the first tutorial.
2. Adhere the bows together in the center, staggering as shown.
3. Adhere the bow base to the back of the bows.
4. Turn the bow over (right side up) and adhere the loop to the center of the bow.