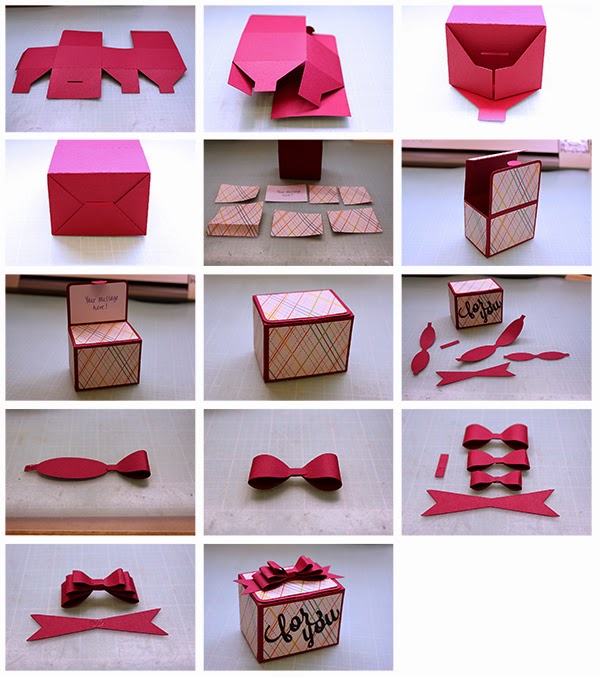
I am so in love with these boxes! The box is approximately 3" x 2-1/2" x 2" and it is compatible with both the 8x12 and 12x12 mats. The file comes with the box, the coordinating mats, and the paper elements shown. The box closes in toward the hidden card area and then the hidden card folds down and has a flap that tucks into a slot. When the recipient opens the box, the first thing they will see is your message and then they open the second area to expose the goodies!
For You Box with Hidden Card
Here is the tutorial:
1. Cut out the box base and fold on the score lines. Place adhesive on the side tab.
2. Adhere the side tab to the other box side.
3. For the bottom, push down the slot piece and fold in the two sides.
4. Tuck the flap into the slot to close the bottom.
5. Cut out your mats.
6. Adhere your mats on the box.
7. Close the box lid then adhere your message under the area with the tab as shown.
8. Tuck the tab into the slot to hide your message.
9. Adhere the sentiment on the box.
10. Cut your bow pieces.
11-14: Assemble your bow as shown.
15. Adhere the bow to the top of the box!
Holly Box with Hidden Card
Snowflake Box with Hidden Card
Snowman Box with Hidden Card
This card is approximately 4-1/4" x 5-1/2"
when finished and features a tie closure design. The file comes with all
the paper elements shown and is compatible with both the 8x12 and 12x12 mats.
This card is approximately 4-1/4” x 5-1/2” (A2) and works like a lever action when open and closing. The card has an inset area creating a pop-up frame. The file comes with all the pieces shown and is compatible with both 8x12 and 12x12 mats.
Happy Monday!
Today is new release day at Silhouette and I have some fun new Envelope Bags to share with you. I really love the versatility of these bags. You can size them to fit your needs so they can hold greeting cards, tickets, gifts, even silverware for parties! You could even cut these in vellum to create your own glassine-like bags! All of these are compatible with both the 8x12 and 12x12 bags and follow the same tutorial.
This bag comes sized at approximately 6-3/4" x 3-1/2" but can be sized to fit your needs.
Here is the tutorial:
1. Cut your pieces out and fold on the score lines.
2. Place adhesive on the side tab as well as along your bottom tab.
3. Adhere your side tab to the other side of the bag and adhere the bottom shut.
4. Next adhere your main scallop circle cut with foam adhesive and tie a ribbon around the center as shown.
5. Adhere your bunny on the circle in the center and then adhere the circle shape to the scallop circle with foam adhesive.
6. Your finished bag should look like this now.
This bag comes sized at approximately 6-3/4" x 3-1/2" but can be sized to fit your needs.
This bag comes sized at approximately 6-3/4" x 3-1/2" but can be sized to fit your needs.
This bag comes sized at approximately 6-3/4" x 3-1/2" but can be sized to fit your needs.
This file comes with both the Mom and Mum sentiment cuts.
This bag comes sized at approximately 5-1/4" x 2-3/4" but can be sized to fit your needs.
This envelope bag holds silverware perfectly (including room for a knife, I just didn't have one!) :)
This bag comes sized at approximately 6" x 2-3/4" but can be sized to fit your needs.
This envelope bag holds silverware perfectly (including room for a knife, I just didn't have one!) :)
This bag comes sized at approximately 6-3/4" x 3-1/2" but can be sized to fit your needs.
This bag comes sized at approximately 6-3/4" x 3-1/2" but can be sized to fit your needs.