New Rolled Flowers!
These files comes with the rolled flower design shown in the image as well as the leaf set. The designs can be sized to fit your needs and are compatible with the 8x12 and 12x12 mats. These are perfect for adding to cards, layouts, bags, boxes, creating wreaths, and more! The leaf is sized at approximately 4-1/2" x 1" to give you an idea of the size. Be sure to check out the entire collection!
See more rolled flowers HERE!

Tips
For my flowers I am using a variety of cardstock weights, mostly 60# and 80# and I cut them at a slower speed (I am using 5 on my machine but if they aren't cutting well, slow it down more) as some of them are detailed in shape. Before you "unload" your mat, lift up the paper a bit to see if it has cut well...if not, push paper back down and cut again! Hot glue is my preference for flowers, it just seems to hold the best over time. I use a wide slot quilling tool, the slot is a bit wider than most which I think is easier to work with. Before I found this tool, I used tweezers to start my rolls and finished with my fingers - I often still use my fingers to roll after I get them started. Don't be afraid to roll tight and you can let loose before adhering together to achieve the look you want. And...make sure you curve the leaf pieces some too, I use a skewer to do mine but a pencil works great too!
Rolled Flower 1

Here is the tutorial:
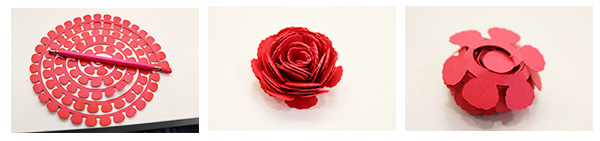
1. Cut out your form and using a quilling tool or tweezers (or fingers!), begin rolling the form from the outer edge as shown in the image.
2. Continue to roll until you reach the center. Add a strong adhesive (like hot glue or a quick drying liquid) and press the round center to the middle.
3. This image is just showing the bottom of the flower. Cut and adhere your leaf pieces together then add adhesive to the center of the leaf and press the flower to the center to attach!
* * * * *
Rolled Flower 2

1. Cut out your form and using a quilling tool or tweezers (or fingers!), begin rolling the form from the outer edge as shown in the image.
2. Continue to roll until you reach the center. Add a strong adhesive (like hot glue or a quick drying liquid) and press the round center to the middle.
3. This image is just showing the bottom of the flower. Cut and adhere your leaf pieces together then add adhesive to the center of the leaf and press the flower to the center to attach!
* * * * *
Rolled Flower 3
1. Cut out your form and using a quilling tool or tweezers (or fingers!), begin rolling the form from the outer edge as shown in the image.
2. Continue to roll until you reach the center. Add a strong adhesive (like hot glue or a quick drying liquid) and press the round center to the middle.
3. This image is just showing the bottom of the flower. Cut and adhere your leaf pieces together then add adhesive to the center of the leaf and press the flower to the center to attach!
* * * * *
Rolled Flower 4
1. Cut out your form and using a quilling tool or tweezers (or fingers!), begin rolling the form from the outer edge as shown in the image.
2. Continue to roll until you reach the center. Add a strong adhesive (like hot glue or a quick drying liquid) and press the round center to the middle.
3. This image is just showing the bottom of the flower. Cut and adhere your leaf pieces together then add adhesive to the center of the leaf and press the flower to the center to attach!
* * * * *
Rolled Flower 5
1. Cut out your form and using a quilling tool or tweezers (or fingers!), begin rolling the form from the outer edge as shown in the image.
2. Continue to roll until you reach the center. Add a strong adhesive (like hot glue or a quick drying liquid) and press the round center to the middle.
3. This image is just showing the bottom of the flower. Cut and adhere your leaf pieces together then add adhesive to the center of the leaf and press the flower to the center to attach!
* * * * *
Rolled Flower 6
1. Cut out your form and using a quilling tool or tweezers (or fingers!), begin rolling the form from the outer edge as shown in the image.
2. Continue to roll until you reach the center. Add a strong adhesive (like hot glue or a quick drying liquid) and press the round center to the middle.
3. This image is just showing the bottom of the flower. Cut and adhere your leaf pieces together then add adhesive to the center of the leaf and press the flower to the center to attach!
* * * * *
Rolled Flower 7
1. Cut out your form and using a quilling tool or tweezers (or fingers!), begin rolling the form from the outer edge as shown in the image.
2. Continue to roll until you reach the center. Add a strong adhesive (like hot glue or a quick drying liquid) and press the round center to the middle.
3. This image is just showing the bottom of the flower. Cut and adhere your leaf pieces together then add adhesive to the center of the leaf and press the flower to the center to attach!
* * * * *
Rolled Flower 8
1. Cut out your form and using a quilling tool or tweezers (or fingers!), begin rolling the form from the outer edge as shown in the image.
2. Continue to roll until you reach the center. Add a strong adhesive (like hot glue or a quick drying liquid) and press the round center to the middle.
3. This image is just showing the bottom of the flower. Cut and adhere your leaf pieces together then add adhesive to the center of the leaf and press the flower to the center to attach!
* * * * *
Rolled Flower 9


1. Cut out your form and using a quilling tool or tweezers (or fingers!), begin rolling the form from the outer edge as shown in the image.
2. Continue to roll until you reach the center. Add a strong adhesive (like hot glue or a quick drying liquid) and press the round center to the middle.
3. This image is just showing the bottom of the flower. Cut and adhere your leaf pieces together then add adhesive to the center of the leaf and press the flower to the center to attach!
* * * * *
Rolled Flower 10


1. Cut out your form and using a quilling tool or tweezers (or fingers!), begin rolling the form from the outer edge as shown in the image.
2. Continue to roll until you reach the center. Add a strong adhesive (like hot glue or a quick drying liquid) and press the round center to the middle.
3. This image is just showing the bottom of the flower. Cut and adhere your leaf pieces together then add adhesive to the center of the leaf and press the flower to the center to attach!
* * * * *
Rolled Flower 11


1. Cut out your form and using a quilling tool or tweezers (or fingers!), begin rolling the form from the outer edge as shown in the image.
2. Continue to roll until you reach the center. Add a strong adhesive (like hot glue or a quick drying liquid) and press the round center to the middle.
3. This image is just showing the bottom of the flower. Cut and adhere your leaf pieces together then add adhesive to the center of the leaf and press the flower to the center to attach!
* * * * *
Rolled Flower 12


1. Cut out your form and using a quilling tool or tweezers (or fingers!), begin rolling the form from the outer edge as shown in the image.
2. Continue to roll until you reach the center. Add a strong adhesive (like hot glue or a quick drying liquid) and press the round center to the middle.
3. This image is just showing the bottom of the flower. Cut and adhere your leaf pieces together then add adhesive to the center of the leaf and press the flower to the center to attach!
* * * * *
Rolled Flower 13
1. Cut out your form and using a quilling tool or tweezers (or fingers!), begin rolling the form from the outer edge as shown in the image.
2. Continue to roll until you reach the center. Add a strong adhesive (like hot glue or a quick drying liquid) and press the round center to the middle.
3. This image is just showing the bottom of the flower. Cut and adhere your leaf pieces together then add adhesive to the center of the leaf and press the flower to the center to attach!
* * * * *
Rolled Flower 14


1. Cut out your form and using a quilling tool or tweezers (or fingers!), begin rolling the form from the outer edge as shown in the image.
2. Continue to roll until you reach the center. Add a strong adhesive (like hot glue or a quick drying liquid) and press the round center to the middle.
3. This image is just showing the bottom of the flower. Cut and adhere your leaf pieces together then add adhesive to the center of the leaf and press the flower to the center to attach!
1. Cut out your form and using a quilling tool or tweezers (or fingers!), begin rolling the form from the outer edge as shown in the image.
2. Continue to roll until you reach the center. Add a strong adhesive (like hot glue or a quick drying liquid) and press the round center to the middle.
3. This image is just showing the bottom of the flower. Cut and adhere your leaf pieces together then add adhesive to the center of the leaf and press the flower to the center to attach!
Rolled Flower 17
1. Cut out your form and the layering piece. Adhere the layer to the form, matching up the end of the spirals. Using a quilling tool or tweezers (or fingers!), begin rolling the form from the outer edge as shown in the image.
2. Continue to roll until you reach the center. Add a strong adhesive (like hot glue or a quick drying liquid) and press the round center to the middle.
3. This image is just showing the bottom of the flower. Cut and adhere your leaf pieces together then add adhesive to the center of the leaf and press the flower to the center to attach!
* * * * *
-or-
in Cricut Design Space Friendly files on
These boxes are approximately 5” x 4” (widest area) x 1-1/2” and comes with the paper elements shown. The boxes are compatible with both the 8x12 and 12x12 mats.
Here's the tutorial:
1. Cut out all your pieces and fold on the score lines.
2. Adhere the mats on the box.
3. Place adhesive on the box sides and adhere them to the other sides to form its shape.
4. Your box should look like this now.
5. Ink around the edges of your flower pieces.
6. Curl the petals using your skewer/pencil. Fold up the points on the center piece.
7-12. Adhere the flower pieces together going from smallest to largest.
13. Adhere the leaf pieces and flower to the center of your box!
Good Morning! Today I am sharing my newest 3D Flowers and
this time they come with a place for small candies!
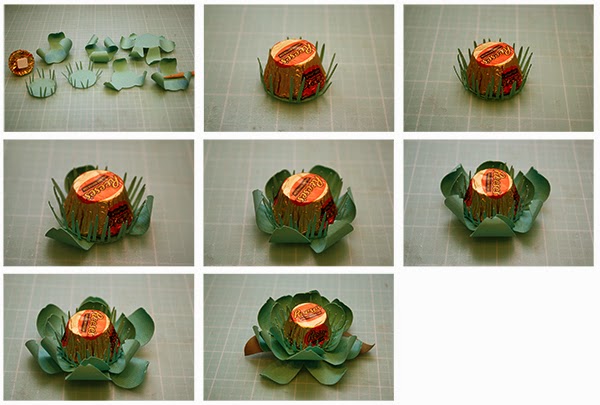
This file comes with all the pieces you need to create this candy flower. The pieces are sizeable to fit your needs and are compatible with both the 8x12 and 12x12 mats.
I have the photo tutorials under each flower.