Good morning and welcome to The Twinery's It's A Banner Day Challenge! Today I am sharing a fun little banner that is perfect to embellishing your cards or layouts and it is fast and easy!
The Twinery Supplies:
Tutorial:
1. Punch or cut out your banner shape then cut four strands of The Twinery Twine, each about 8" in length.
2. Adhere the twine strands on the the back of the banner shape.
3. Wrap the twine around the banner pieces in different directions.
4. Use a piece of tape or adhesive to adhere the end of the twine to the back of the banner shape.
5. Use a marker to color the top of the banner.
6. Place foam adhesive on the back of the banner shape then adhere to your project.
I love all the texture and dimension the twine provides!
Do you want to play along with us!?
Here is what you can win.....
Four bottles of Heidi Swapp Color Shine
You can enter yours by heading over to The Twinery blog!
Just click on the link below:
Good morning! Did you see? The Twinery is now holding monthly themed challenges and this months theme is Chevron and Green! You can see all the details over on The Twinery Blog!
Supplies:
Cardstock: White (Recollections)
Patterned Papers: Lost & Found Sunshine 6x6 (My Mind's Eye)
The Good Life 6x6 (Fancy Pants)
Misc: Green Sequins
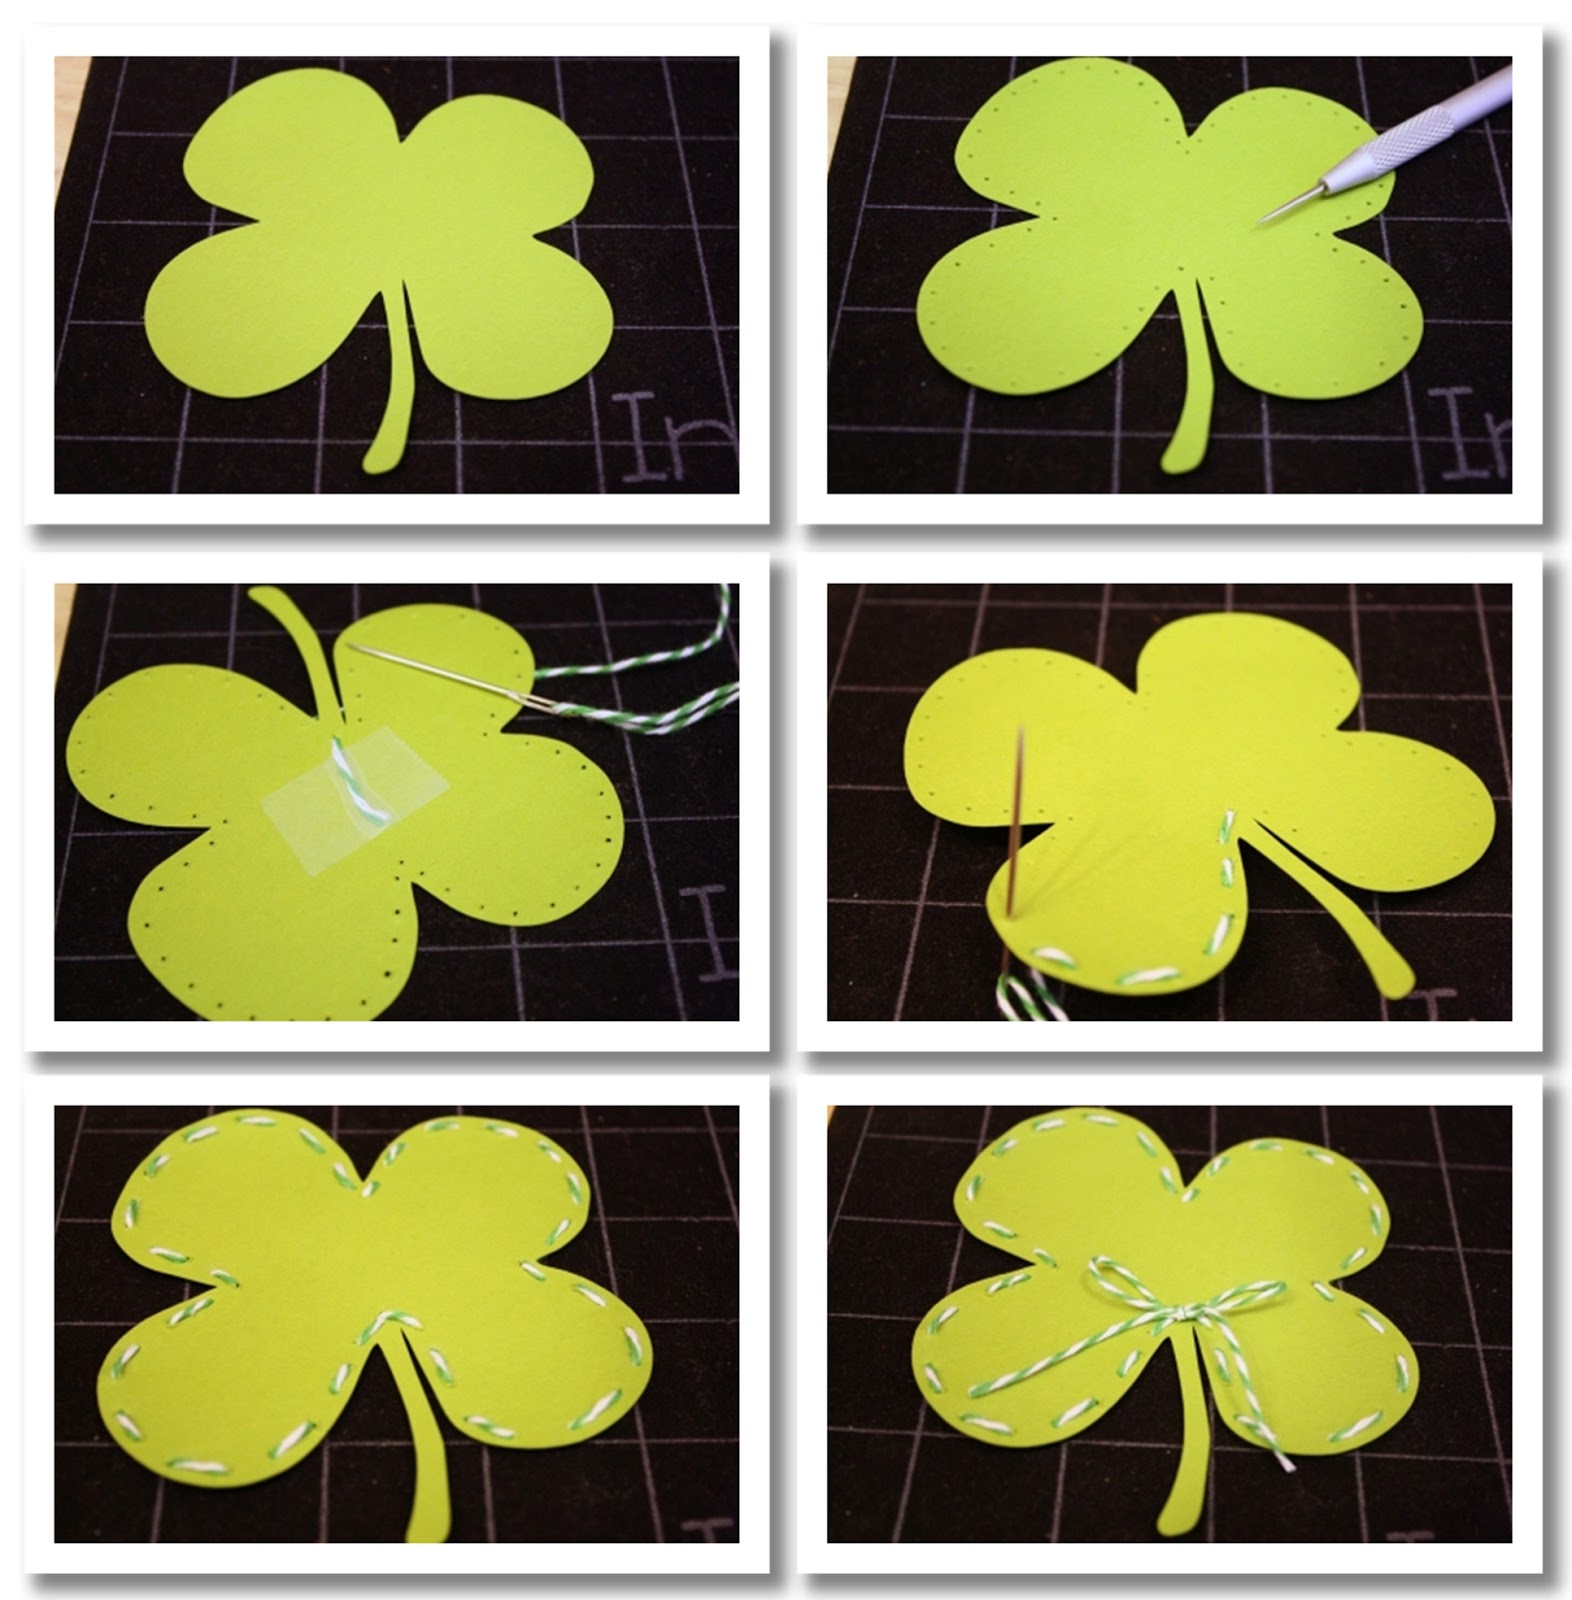
Clover Tutorial:
2. Using a paper piercer or needle, punch holes along the edges as shown.
3. Thread a needle with the Peapod Twine and push it through the back near the stem of the clover. Place a piece of tape on the backside to hold the twine.
4. Continue threading, going in and out of the holes as shown.
5. Your stitched clover should look like this.
6. With a separate piece of twine, tie a bow then adhere it to the center above the stem.
the design team and learn how you can enter yours!
Good morning! I am so excited to share that The Twinery is now holding monthly themed challenges and I just cannot wait to see what you all come up with! You can see all the details over on The Twinery Blog!
This months theme is Polka Dots!
For my take on the Polka Dot challenge, I decided to take things BIG and go with large polka dots! I created five different sized spots using an adhesive backed paper and different colors of twine!
Here is a quick tutorial:
1. Punch out five circles using a adhesive backed
paper and cut a 20" piece of twine.
2. Remove the adhesive back and place a small
circle of twine in the middle of the circle.
3. Continue wrapping your twine
around itself as shown.
4. When you get the twine circle to the size
you want, simply trim any excess adhesive
paper away. Press firmly down on the
twine and you are good to go!
Supplies:
Cardstock: White and Black (Recollections)
Patterned Paper: 2wenty Thr3e 6x6 (Cosmo Cricket)
Punches: Circle Maker (Creative Memories)
and Corner Punch (EK Success)
Embellishments: Woodchip Speech Bubble (Freckled Fawn)
and Misc. Black Sequins
Be sure to head over to the The Twinery Blog to see more takes on the challenge and learn how you could enter to WIN!
This week the challenge is all about embossing...fun, right!?
For this challenge, I am using the It's Raining stamp set from Sweet Stamp Shop and I paper pieced the umbrella then used an embossing folder to embossing the polka dots.
Supplies:
Cardstock: White (Recollections)
Patterned Paper: Sugar Chic 6x6 (Heidi Swapp)
Ink: Kettle Colorbox (Clearsnap)
Adhesives: Runner and Zapdots (Helmar)
Just click HERE to head over to the Sweet Stamp Shop Blog and
to learn how to join in all the fun!
This week the challenge is Album Inspiration!
and Nicole is giving away a FREE digital stamp on the
Sweet Stamp Shop blog so you can participate with us!
Total cuteness, right!?
Here is my take on the Album Inspiration:
Supplies:
Stamps: Across the Miles (Sweet Stamp Shop)
Dies: Snapshot Fun (Sweet Stamp Shop) and Lacy Squares (Spellbinders)
Patterned Paper: Plumeria 6x6 (Basic Grey)
Cardstock: White (The Paper Studio)
Adhesive: Runner and 1/2" Zapdots (Helmar)
Ribbon: Grey (May Arts)
Just click HERE to head over to get your FREE digital stamp and
to learn how to enter yours!
This week the challenge is paper piecing and we hope you enjoy it as much as we do!
I used the new digital stamp to create my card below:
Supplies:
Stamps: Sweet Tart Digital Stamp (Sweet Stamp Shop)
Cardstock: White and Black (Recollections)
Patterned Paper: Kaleidoscope 6x6 Pyramid Pad (Momenta)
Ribbon: Green (May Arts)
Punch: Border (EK Success)
Pen: Black Dual-Tip (Creative Memories)
Adhesive: Runner and Zapdots (Helmar)
Isn't it so much fun!? Just click HERE to head over to
Have you seen the challenge over at StampTV? Tami Mayberry has a Chat and a Challenge today! The challenge is to use bright pink...no baby pink, cotton candy, or pastel colors allowed! Click here for all the details: June 20 Live Chat & Challenge--Tickled pink
This is my take on the challenge!
The background stamp looks a little 'pastel' in this photo...but I promise it isn't! :)
I used Tami's Live Life Loud for the background circles, the grungy border, the image on the ticket, and the "You Rock!" sentiment on the tag! I also used Tami's Ticket Trio for the ticket image and the 'celebrate' and 'you' that I combined for the other sentiment!
Supplies:
Stamps: Ticket Trio and Live Life Loud by Tami Mayberry (Gina K)
Cardstock: White and Black (The Paper Studio)
Blue - Doodle Floral 6x6 Pad (Momenta)
Pattern Paper: Doodle Floral 6x6 Pad (Momenta)
Ink: Tuxedo Black and Rosebud (Momento)
Twine: Charcoal (The Twinery)
Gems: Blue Gradient (Creative Charms)
Adhesive: Runner and 1/2" Black Zapdots (Helmar)
Here is how I made my card!
I hope you have time to join in for this challenge! I always enjoy color challenges and this one really made me step outside my comfort zone! Don't have time to play? Well, be sure to stop by to see what everyone else has created! I know that there will be some amazing cards and loads of inspiration!
The deadline for this challenge is Tuesday, June 26, at 8:00 pm CT