
Have you ever wanted to put text within a shape on your projects? Well, today I am going to show you how to do it using a Cricut image as shown in my card!


To do this with a Cricut image you will need:
Paint
Inkscape
Open Design Studio and select the image you want to work with. Make sure you have the proper size already designed. Once you have the image, go to 100% view and then click preview so that it will show in color:

Take a screen print of this image (Alt+Prt Sc or Fn+Prt Sc)
Open Paint and choose paste then crop around the shape and choose copy:

Open Inkscape and paste image.

Select the image and from the Path menu, choose Trace Bitmap. Choose to trace by Color and take the Scan down to 2. Make sure to remove the background as well.

Click update and then okay then close the trace box. Separate the two images and remove the original.
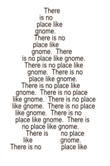
Next, choose the text option and type your text, grabbing the font and size that you would like. If you are repeating your text, you will need to type the text over several times. In this example I am using the sentence “There is no place like gnome.”.
Once you have your text typed, go back to your Select and Transform arrow (F1) and select your text box and then while holding the shift key, select your shape.

Go to the Text menu and choose Flow into Frame.

If you aren’t happy with the text, click undo (Ctrl+Z) and edit your text (center/change font/add more, etc). Once you have modified, select both the shape and text again and use the Flow into Frame option again.

Once you have the text as you would like it, you can change or remove the image color. Select the image (in my example, I am currently a purple shade) and then choose a color from the color bar. You can also change the color of your text by selecting the text and then choosing a color from the color bar.
Here I have change my image to white and my text to brown.
You can select both items again and move them around on the page, and then print!
What a cool way to add text! Thanks for the info....definitely bookmarking this!
ReplyDeleteThis is awesome!! I love this idea
ReplyDeleteOhhhhhhhhhhhhhhhhhhhhhh wow wow wow!!! AWESOME idea!! And you card is ADORABLE!! I loveeeeeeeeeeeeeee gnomes! :):):):):):):):):):):):):):):):):):)
ReplyDeleteWow genius!! What a great idea I will have to try this! Thanks for the great tutorial!
ReplyDeleteJuliex
Julie stold my Oh Wooow!! lol
ReplyDeleteThat is EXACTLY what I thought when I saw this!! I can't wait to do this also! What a ubber delish blog post today!
Cheers!
Great tut!!! TFS, cannot wait to try it:-)
ReplyDeleteOMG, Jamie, I love this! How cute and just like you to come up with something so clever! I'm really going to have to try this!!! Thanks so much for sharing all your wonderful ideas!
ReplyDeleteThis is awesome!!! TFS!
ReplyDeleteOH wow...thanks for sharing tips on how to do this. :)
ReplyDeleteHow neat is this?
ReplyDeleteThanks for sharing such a neat idea.I got you bookmarked.
This is a great idea, but I am unable to get it to work. I have tried at least three times, and fail at the Flow into Frame .... it won't move. Worked a couple times but did not like it all bunched to the left or a white section down the middle. cmsmith46580@gmail.com
ReplyDeleteI have successfully finished a file using your idea. I now have to print it out. Thank you.
ReplyDeleteJamie that is awesome. Thanks so much for the tutorial.
ReplyDeleteHugs
What a great tutorial. I tried to print words and cut out on my cricut yesterday and it was not easy, so this came as a great idea for next time.
ReplyDeleteThanks for letting us feature this on Fantabulous Cricut. This is an awesome tutorial :)
ReplyDeleteThis is just the coolest thing I have ever seen. I am going to try this over the weekend
ReplyDelete