

This box isn't what I was going for when I first started my design process, but as it started taking shape, I started really liking it so I ran with it and I have to admit that I am extremely pleased with the outcome! This box is sized for the Cameo, requiring the 12x12 mat to get the 7-3/4" x 2-5/8" size. However, you can scale this box down to fit on the Portrait and get a 6" x 2" box (both shown together below)! The cut file comes with the box base, four decorative panels, and one clear piece for window.
Tutorial: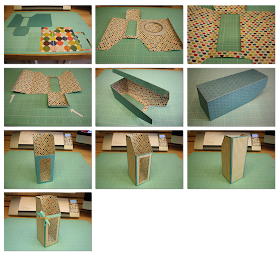

1. Cut out the pieces in your desired papers.
2. Fold the box piece on all the score lines then add 1/4" adhesive around the window edges.
3. Adhere the clear cut into the inside of your box as shown.
4. Add adhesive to the long tab along the left side and the three small tabs around the box base as shown.
5. Adhere the small tabs to the side of the boxes then bring the large tab over and adhere to the side.
6. Your box should look like this now.
7. Stand your box up.
8-9. Apply adhesive to your decorative pieces and adhere them to the corresponding areas of your box.
10. Embellish as desired!
This image shows both the Cameo and Portrait versions!

Click HERE to get yours!
Wow! Those are stunning boxes! I love its design. It's actually very unique and I was thinking of what gift to put on that box. I think a perfume or cologne is nice for that box. Anyhow, I will definitely give this a try. Thank you for sharing this. -www.paperboxco.com
ReplyDelete