Welcome to the Samantha Walker Creative Crafters Team Blog Hop!
You should have arrived here from Samantha Walker's blog!
This month one lucky winner will receive the fabulous
AND be sure to look extra closely at Step #4 to learn how you can get this FREE SVG and Silhouette Studio file:
To enter, just leave a comment on Samantha's blog during February 13th through February 17th. The winner will be announced on Samantha's Facebook page on Monday, February 18th.
For additional entries:
1. Receive an additional entry for commenting on each of the other blogs in the blog hop.
2. Go here and follow Samantha Walker's blog
3. Follow her on Facebook
4. Sign up for an e-mail subscription to Samantha's blog and you will automatically receive a link to a free SVG cutting file that you can download and use on your personal electronic cutter. If you are already a subscriber, just enter in your information in the secure form on Samantha's blog! The free files will be e-mailed early next week!
To receive the additional entries and get the free files, mention in your comment on Samantha's blog that you have done so!
WOW, that is 15 chances to win!
*******
For this month's Blog Hop the new Creative Team is working with a LOVE theme and you are going to love the projects from the team! They are all so amazing!
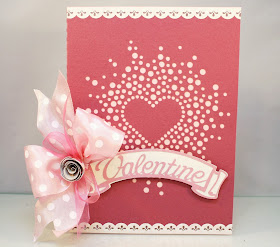
I created a Valentine card using lots of Samantha goodies:

Samantha Walker Supplies:
Silhouette Cuts: Be Mine Card, Valentine Banner,
Heart Inverted Rhinestones shape, Spiral Flower Peony Bud
Papers and Stickers: Paris Girl Collection (Carta Bella)
Other supplies:
Cardstock, Prism and Creative Memories
Ribbon: Ribbons Unlimited
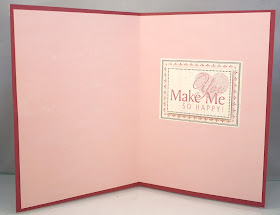
Inside of card:

Tutorial:
For the base of the card, I used Samantha's Be Mine card and modified it.
Click on the card to select it then right click and select ungroup.
Once the items are ungrouped, click off of the mat then click on the Be Mine heart and then right-click and choose "Cut".
Select everything on the mat again (CTRL+A or draw a box around it) and then right-click and choose group to group all the items back together.
Bring in the Heart Inverted Rhinestones shape and resize it to the sizes shown below and place it on the card where you want it to cut.
Click the Send to Silhouette button then verify your cut settings and press cut.
Remove the cut from your physical mat then in your software, highlight the banner shape then click the Open the Trace Window button shown in the red circle below.
Click the Select Trace Area and then choose the Trace Outer Edge option. Change your Trace Settings if necessary to match mine.
This creates a background for the banner we cut earlier. Move the Valentine banner down and then right-click and choose "Cut" to remove it. Cut the background banner.
Clear your software mat again and import in the Spiral Flower Peony Bud cut. My mat shows three, but you only need the one highlighted. Size to 2.195" and cut.
Once you have all your pieces cut out, trim a piece of light pink cardstock and create a mat for the inside of the card.
I created a Valentine card using lots of Samantha goodies:

Samantha Walker Supplies:
Silhouette Cuts: Be Mine Card, Valentine Banner,
Heart Inverted Rhinestones shape, Spiral Flower Peony Bud
Papers and Stickers: Paris Girl Collection (Carta Bella)
Other supplies:
Cardstock, Prism and Creative Memories
Ribbon: Ribbons Unlimited
Inside of card:

Tutorial:
For the base of the card, I used Samantha's Be Mine card and modified it.
Once the items are ungrouped, click off of the mat then click on the Be Mine heart and then right-click and choose "Cut".
Select everything on the mat again (CTRL+A or draw a box around it) and then right-click and choose group to group all the items back together.
Bring in the Heart Inverted Rhinestones shape and resize it to the sizes shown below and place it on the card where you want it to cut.
Click the Send to Silhouette button then verify your cut settings and press cut.
Your cut should look similar to this:
Clear your screen in the Silhouette software and then import the Valentine Banner cut and size it to 4.745" in width. Press the Send to Silhouette button, verify your cut settings and press cut.Remove the cut from your physical mat then in your software, highlight the banner shape then click the Open the Trace Window button shown in the red circle below.
Click the Select Trace Area and then choose the Trace Outer Edge option. Change your Trace Settings if necessary to match mine.
This creates a background for the banner we cut earlier. Move the Valentine banner down and then right-click and choose "Cut" to remove it. Cut the background banner.
Clear your software mat again and import in the Spiral Flower Peony Bud cut. My mat shows three, but you only need the one highlighted. Size to 2.195" and cut.
Once you have all your pieces cut out, trim a piece of light pink cardstock and create a mat for the inside of the card.
Then decorate as desired!


I love how you took the rhinestone pattern and cut it!
ReplyDeleteThis is so pretty! I've already pinned it.:D
ReplyDeletebeautiful!!! love it!
ReplyDeleteGorgeous! I'm a new follower and subscriber!
ReplyDeleteMiranda :)
www.nanasscrapspot.com
Very pretty Jamie! Never thought about using the rhinestone cut for a card...duh!
ReplyDeleteSuch a cute card!
ReplyDeleteJamie...this card is absolutely gorgeous! I love it!
ReplyDeleteThanks for the awesome tutorial!
ReplyDeleteI love this card! I will have to try the rhinestone cut now.
ReplyDeleteChristina
hermonscrappin@aol.com
What a beautiful card and great instructions. I am definitley going to try the rhinestone feature.
ReplyDeleteWhat a cute card. Thanks for the instructions
ReplyDeleteWow, what a fantastic card!! I love the way you used the background cut!! Thanks for the screen shots. It was fun seeing how you did it! Great blog hop!
ReplyDeletexoxo, Christine
This is so pretty! Love the attention to detail!
ReplyDeleteWhat a gorgeous card! That cut is AMAZING!!! Wow!
ReplyDeleteVery pretty--I like the polka dot ribbon to go with this pattern.
ReplyDeleteWhat a super fun card and really pretty easy to make. TFS
ReplyDeleteThat is one intricate card! I love it.
ReplyDeleteWhat a great idea!
ReplyDeleteWhat a beautiful card! Absolutely stunning!
ReplyDeleteJamie that is stunning! What a beautiful card...I love the details and the colors so very much! <3
ReplyDeleteThanks for showing the finnished inside of the card - for me that's always the hardest part! Love your design. Leslie
ReplyDeleteBeautiful card!
ReplyDeleteJamie this is gorgeous!!!
ReplyDeleteI like this (here from SSS blog). I have this diecut image but always planned to use it with rhinestones. It really does look fantastic as just a cut.
ReplyDeleteJamie, thanks for the tutorial and I love your card.
ReplyDeleteTotally great Jamie love.this cut.
ReplyDeleteThanks for sharing your lovely card! I have that rhinestone file so it was nice to see how it can be used!
ReplyDeleteThis is so pretty!
ReplyDelete