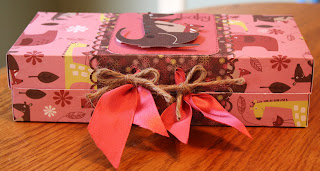
I love the adorable little animals and all the coordinating prints.
Today I am going to share with you how to create a gift box using this line! To begin, you will need one 12"x12" sheet of paper for the main box and a 4"x12" coordinating sheet of paper for the wrap.
With the 12"x12" paper, score at 1", 5", 6", 7", and 11"
Turn your paper and score again at 1", 2", 10", and 11"
With the score marks you just made, cut up to the 2nd score mark (as shown below) on both sides. These will be the flaps.
Next, fold the center score marks to form a peak. You will have two sides of the box, a top and a bottom:
Place adhesive on all of the flap areas:
Pull in the side flaps on the top part of the box and then fold the side flap down. You will do this twice on the top and then twice on the bottom.
Your box should now look like this:
Next we are going to make a wrapper with the 4"x12" coordinating paper. I used a border punch on the two long sides of the paper. You will need to score the wrapper at 1", 5", 7", and 11". Again, the center score marks will need to be folded to form a peak. This will adhere to the peak of the box.
Punch two holes on each side flap and insert ribbon as shown in the photo above.
Place adhesive throughout the back of the wrapper and adhere to the box, centering.
I cut two pieces of twine and then gather the ribbon (a piece from the bottom and a piece from the top) then tied a bow in the twine to close the box. All that is left is to decorate the top of the box! I used a kangaroo from the paper and placed foam squares underneath him then adhered him to a coordinating cardstock piece!
This box is great for a tiny outfit, some onesies, or even a receiving blanket!
Be sure to stop by tomorrow for a layout using the Monsterville collection!
keep creating...Jamie


adore this project...i added it to the writeclickscrapbook.com Tumblr and I might try to recreate this myself at home!
ReplyDeletevery cute, that score pal looks like a must have....
ReplyDeleteYou are SERIOUSLY amazing!! I loveeeeeeeeeeeeeeeeeeeeeeeeeee that gift box!! I love love love love the papers you used too!!! ADORABLE! TFS! :):):):):):):):):):):):):):):):):):):):):):):):):):):):):)
ReplyDeleteSuch a cute box! TFS. Love the paper too, I'm gonna have to search some out :)
ReplyDeleteThat is adorable! A couple of years ago, i made so many little nugget (as in Hershey's) boxes, I could probably make this one pretty easily!!! Yours is too cute for words!
ReplyDeleteThis is adorable!! I love this idea. TFS!
ReplyDeleteI am with the "adorable, cute, and amazing" crowd. Love this!
ReplyDeleteWhat an awesome project. I need to give this one a try for sure.
ReplyDeleteOh, Jamie, what a really cute project and I love the paper!!! As you know I adore boxes and bags!!!
ReplyDeleteI just wanted to stop in and tell you that I've visited your blog and want to tell you about a great new place to enter your crafty projects! If you haven't already heard of Papercraft Star or joined in the challenges there yet, you may want to consider entering some of the exciting and varied challenges. The challenges are posted way in advance so you have plenty of time to enter and the public/participants also vote for thier favorites...not to mention there are great prizes to be won! http://www.papercraftstar.blogspot.com
ReplyDeleteThis is so neat. Love the box thanks for sharing.
ReplyDeleteLove the box. I think I will use different paper though to make it look like an old time suitcase with travel stickers on it. Great going away gift idea!
ReplyDeleteI love this box! Thank you so much for sharing!
ReplyDelete