Supplies:
Paper: Scrap Within Reach, Industrial Park
Ribbon: Scrap Within Reach, Industrial Park
Rub-On: Scrap Within Reach, Industrial Park
Chipboard Letters: Scrap Within Reach, Industrial Park
Ritzy Ditzy Glitz: Bronze, P K Glitz
Dew Drops: The Robin's Nest
Punch: EK Success
For this card, I used the Prickley Pear Daisy Heads stamp to create a pattern on the background paper. I lightly inked the stamp and pressed it to my paper with different pressures to give it more of a distressed look. I added in a glue dot and added glitter to both it and my accordion flower using Lemonade Glitter Glitz!
Supplies:
Glitter: Glitz in Lemonade (P K Glitz)
Adhesive: 1/2" Sticky Tape (P K Glitz) and Large Glue Dots
Stamp: Daisy Heads (Prickley Pear)
Cardstock: The Paper Studio
Scrapbook Paper: Paper Boy (Scrap Within Reach)
Ink: Blue Iris (Cat's Eye Chalk Ink)
Punch: EK Success
Pen: Signo Broad White (Uni-Ball)
Button: Autumn Leaves
Misc: Twine
Be sure to come back next Tuesday and I will show you how to create the accordion flower!
Yesterday I was in my art room playing with paper (and glitter, and glue, and scissors, and ribbon, and...well you get the picture). I suppose I was in my room longer than I had thought I had been...I swear there is a time warp upon entering that room! :)
Gannon had been outside with a buddy playing hockey and ball. He came in and asked me to come out and this is what I walked out to! The boys had a bucket, three sticks and pond water and they went frog hunting in the woods next to our home! Gannon says "Meet Sparky our frog"! He was attempting to talk me into keeping him, but lucky for me it was a warm day and I talked the kids into putting "Sparky" back in his home in trade for popsicles!
Note to self: Keep popsicles on hand at all times!
For my birthday I asked for the Zutter Distrezz-It-All (and thanks to my SIL/BIL I received it!). I hadn't heard much about it, but I found it on the Zutter site with a video of it from Winter CHA and thought it was a super idea! Now that I have had a chance to play with it, I am wondering why people aren't talking about this product!? I am very happy with the tool and the look it gives my paper (and photos) so quickly! I have spent a lot of time in the past sanding and using edgers to tear/distress and this does it in a snap! The only negative I have found is that you have to hold the little white button on the side to use it. I totally get why they made it this way (definitely for safety), but when working with 12x12 paper edges, it would be easier not to hold it! :)
To see more about it, click on the photo!
I am am obviously a fan (and this is not endorsed (lol))! I think we should be talking about this one - it's one of those that is good enough to share! Way to go Zutter!
Remember my Father's Day Basket? It is back, but this time with school supplies and a big layered accordion flower! I will have to admit, this design is one of my favorites that I have created for my Cricut. It is so easily put together and I love the size on the 12x12 mat! And I am loving the colors and brightness of those Bo Bunny papers from the Sun Kissed line!
What do you think about that flower. I had originally created two separate flowers for this basket, but only had room for one so I layered them, making the smaller the center! I love the look. The first flower is a 1" strip of paper scored at every 1/2" and the small (orange) is 1/2" strip of paper, still scored at every 1/2". I put the folds of the large flower within the folds of the small flower and glued them together using Helmar's 450 Quick Dry glue. Just think of the possibilities with layering these cuties!
Journaling:
This was your very first look a homemade ice cream! Papa Moore brought out his ice cream maker for our Fourth of July celebration and we made ice cream from scratch! You guys sat and watched Papa add in salt and ice and waited patiently before trying it. Yummy vanilla ice cream – just another Kansas memory in the making! July 4 2010
Supplies:
Scrapbook Paper: Block Party (Bo Bunny)
Punch: EK Success
Cricut-Plantin Schoolbook Cartridge
SCAL-Corinthia Font
Supplies:
Scrapbook Paper: Block Party (Bo Bunny)
Cardstock: White (The Paper Studio)
Sticker: Red Metallic Letters (Momenta)
Misc: Glitter gems
When I was working on this layout the other day, it seemed to just be missing something. I pulled out my sticky tape and my glitter and began adding in coordinating strips of color!
I used 1/4" and 1/2" Sticky Tape and several colors of Glitter Glitz to cover them! 
Supplies:
Glitter: Glitz in Celery, Mint Green, Tudor Rose, Gold, and Squash Blossom (P K Glitz)
Adhesives: Sticky Tape in 1/4" and 1/2" (P K Glitz)
Cardstock: Primary Textured (Momenta)
Pattern Paper: My Mind's Eye
Ribbon: Making Memories
Misc: Chipboard Letters
I love all the texture and shine it gave to my layout!
Scrap Within Reach is previewing their new collections and having a giveaway! Be sure to click HERE to check it out! Check in tomorrow for another Sneak Peek!!
Today is goodbye to Kansas and all the amazing family and friends here. We are heading back to Michigan, back to reality! It has been such a wonderful trip and we have had lots of fun and captured a lot of memories, such as this little turtle that Papa found roaming the roads of Kansas. He brought it home for the kids to play with and feed and of course mark before returning him to the wild! Wonder if he will beat us home...
The Cricut Mini Monsters cartridge comes with some cute little bags that you can customize! I love how their eyes are different sizes...just adorable!
Supplies:
Cardstock: Momenta Textured
I cut the Frog Card Base, Regular Cut (for eyelids), Layer 1, Layer 2, and Layer 2-Shift at 5 1/2". I used Design Studio to cut Layer 1 again in White at 4.75" x 4.75", hiding the contours to create the white inside area.
Supplies:
Cardstock: Momenta Textured
Markers: Copic Sketch, C1
Click on the sentiment below to download the Word Art:
Today is the sketch challenge at P K Glitz! This month we are using these two sketches:
Card Layout
Supplies:
Glitter: Glitz in Black (P K Glitz)
Sticky Paper: P K Glitz
Paper/Embellishments: Meadowlark (My Mind's Eye)
Buttons: Black (American Crafts)
Punch: EK Success
Misc: Jewels and Fibers
Supplies:
Glitter: Glitz in Lemonade, Sea Mist, Pine Forest, Violet, Chocolate, Turdor Rose, Peach, and Silver (P K Glitz)
Art Acetate: P K Glitz
Adhesive: 3D Crystal Lacquer and Zapdots (Helmar)
Paper: Momenta
Ribbon: American Crafts
Font: CK Ali
Embossing: Cuttlebug Embossing Strip (Provo Craft)
Ink: Cat's Eye Chalk Ink
Be sure to head over to the Blog to check out the sketches and enter in yours for the chance at the prize!!
Isn't he just the cutest? I love the different layers that allow you to change his look! ScrapbookPal.com has this cartridge on sale for $39.99 along with many others, so be sure to head over to check them out! I put the cuts of this card in a design studio cut file which you can grab HERE. It even includes the hills which I created!
The card base (yellow) is 5 1/2" x 8 1/2"
The mat (white) is 5" x 8"
I cut the Beware monster and his pieces at 4 1/2"
The inside card (white monster head) was cut at 4 3/8", and I hide all the contours on the cut. If you use the cut file, you will have to hide these each time you open the cut file.
Supplies:
Cardstock: White - The Paper Studio, Colored - Momenta Textured
Markers: Copic Sketch, C1 and 100
Font: Tia Moxie
Punch: Corner Rounder, Zutter
Pen: Uni-ball Signo Broad
Just a quick card of Hi! This paper is from Momenta's Relaxed Textured Cardstock Pad. I love all the pre-embossed papers that are in this pad!
Today is July 13th.
Today is my brother's birthday.
Today is Gannon's 8th birthday!
It definitely wasn't a plan to have them share the same birthday, Gannon decided to head into this world a week early! It is hard to believe that he is eight and going to be heading into third grade this coming school year. It just goes by to quickly.
HAPPY BIRTHDAY BOYS!
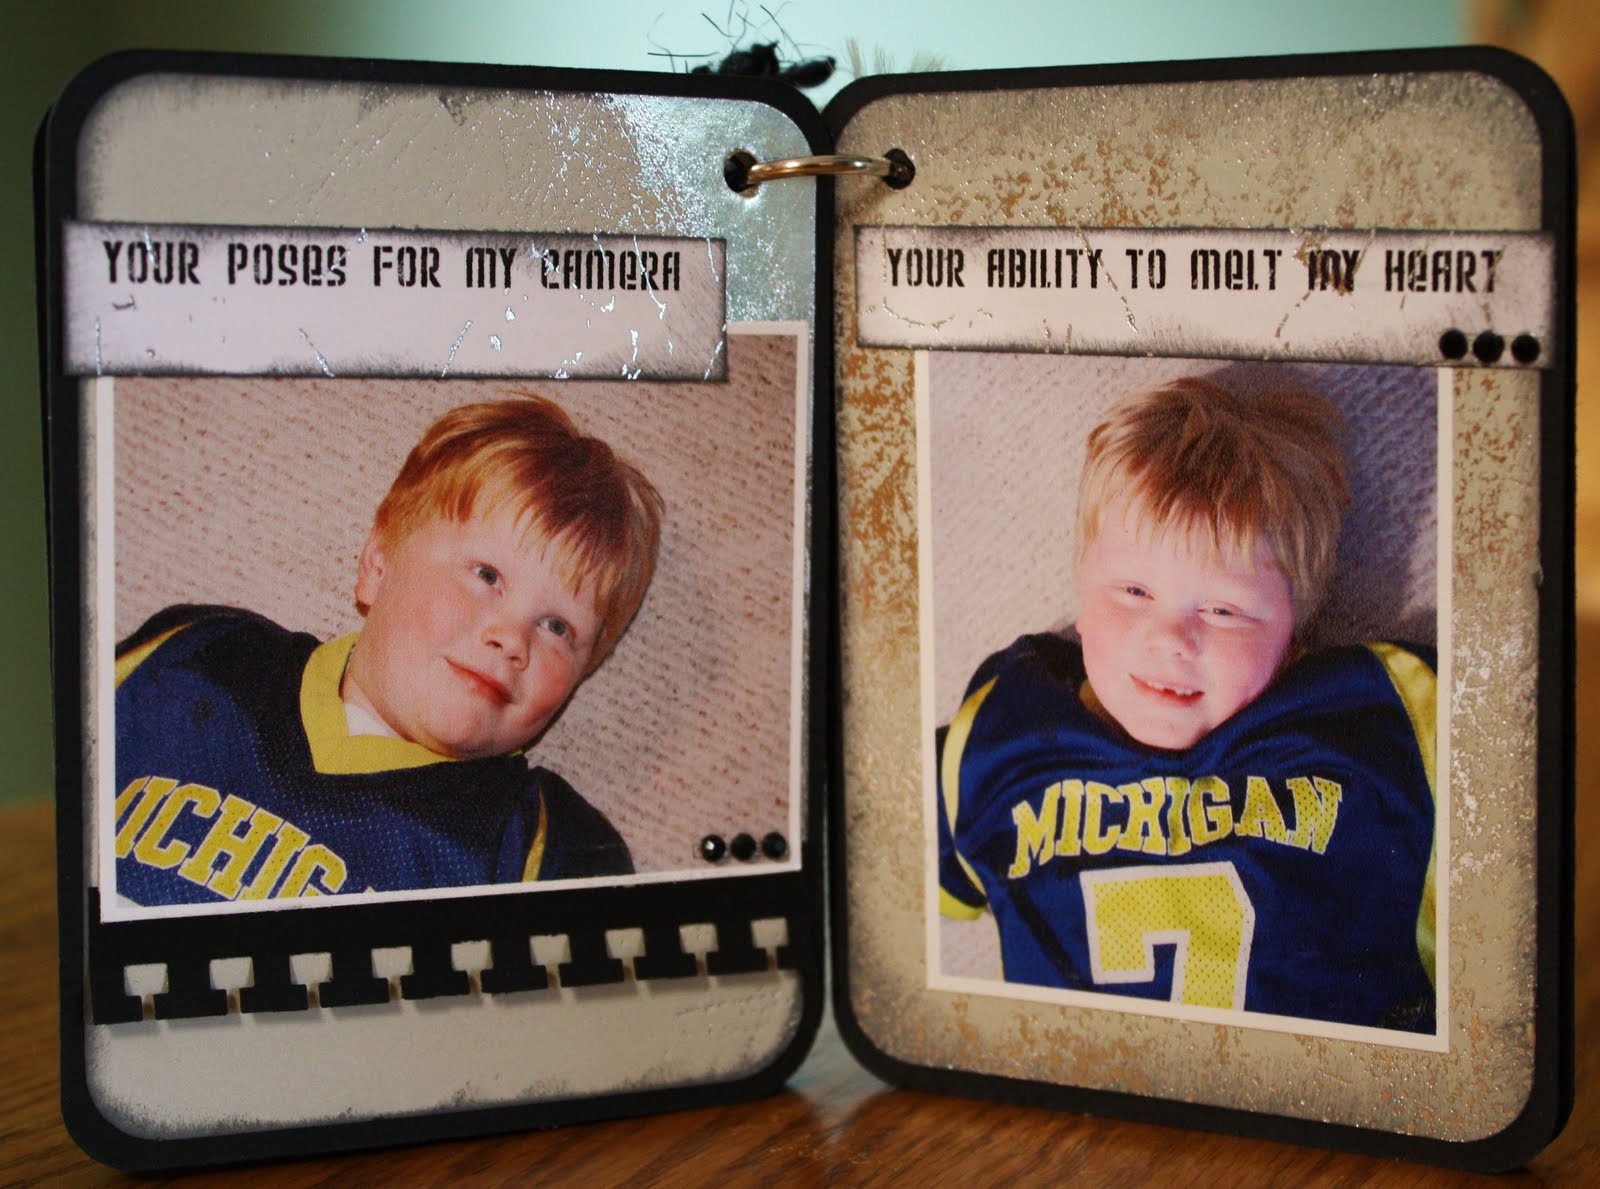
Supplies:
Paper: Scrap Within Reach (Cambridge and Paper Boy)
Stickers: Scrap Within Reach
Dew Drops: The Robin's Nest
Punch: EK Success
I have the most difficult time scrapbooking my favorite photos. I want to keep them the center of attention yet add enough complimenting papers and embellishments to make them attractive. I love how glitters add just enough sparkle to help me achieve the results I want!
For this layout, I sprayed each of the flowers with Bronze Ritzy Ditzy Glitz before attaching them to the layout. I also added Crystal Glitter Glitz to the strip on the top photo!
Supplies:
Glitter: Glitz in Crystal (P K Glitz)
Glitter Spray: Ritzy Ditzy Glitz in Bronze (P K Glitz)
Sticky Tape: 1/4" (P K Glitz)
Adhesive: White Zapdots (Helmar)
Cardstock: Earthtones Textured Cardstock (Momenta)
Pattern Paper: Family Ties Collection (Momenta)
Lace Paper: Butterflies (Momenta)
Ribbon: Making Memories
Cricut: Plantin Schoolbook (Provo Craft)
Metal Embellishment: Making Memories
 P K Glitz is having a Flip Flop Challenge! I just can't wait to see what all the designers and participants do with this one! This is my take on the challenge...
Supplies:
Glitter: Glitz in Lemonade (P K Glitz)
Adhesive: V2 Vellum Adhesive (Helmar)
Cardstock: Primary Textured (Momenta)
Punches: Water Threading (Fiskars) and
Large Scalloped Squares(Spellbinders)
Ribbon: Emery (Making Memories)
Stickers: Endless Summer (Momenta)
Be sure to head over to the blog to see all the other creations and enter YOURS!
Did you know that you can change the colors of my word art using Microsoft Word? If you open Word and then insert the Word Art as a picture. While you have the image selected, from the Picture toolbar, click Recolor Picture. Now you can change it from the colors you see below to match your project!
Click on the sentiment below to download:
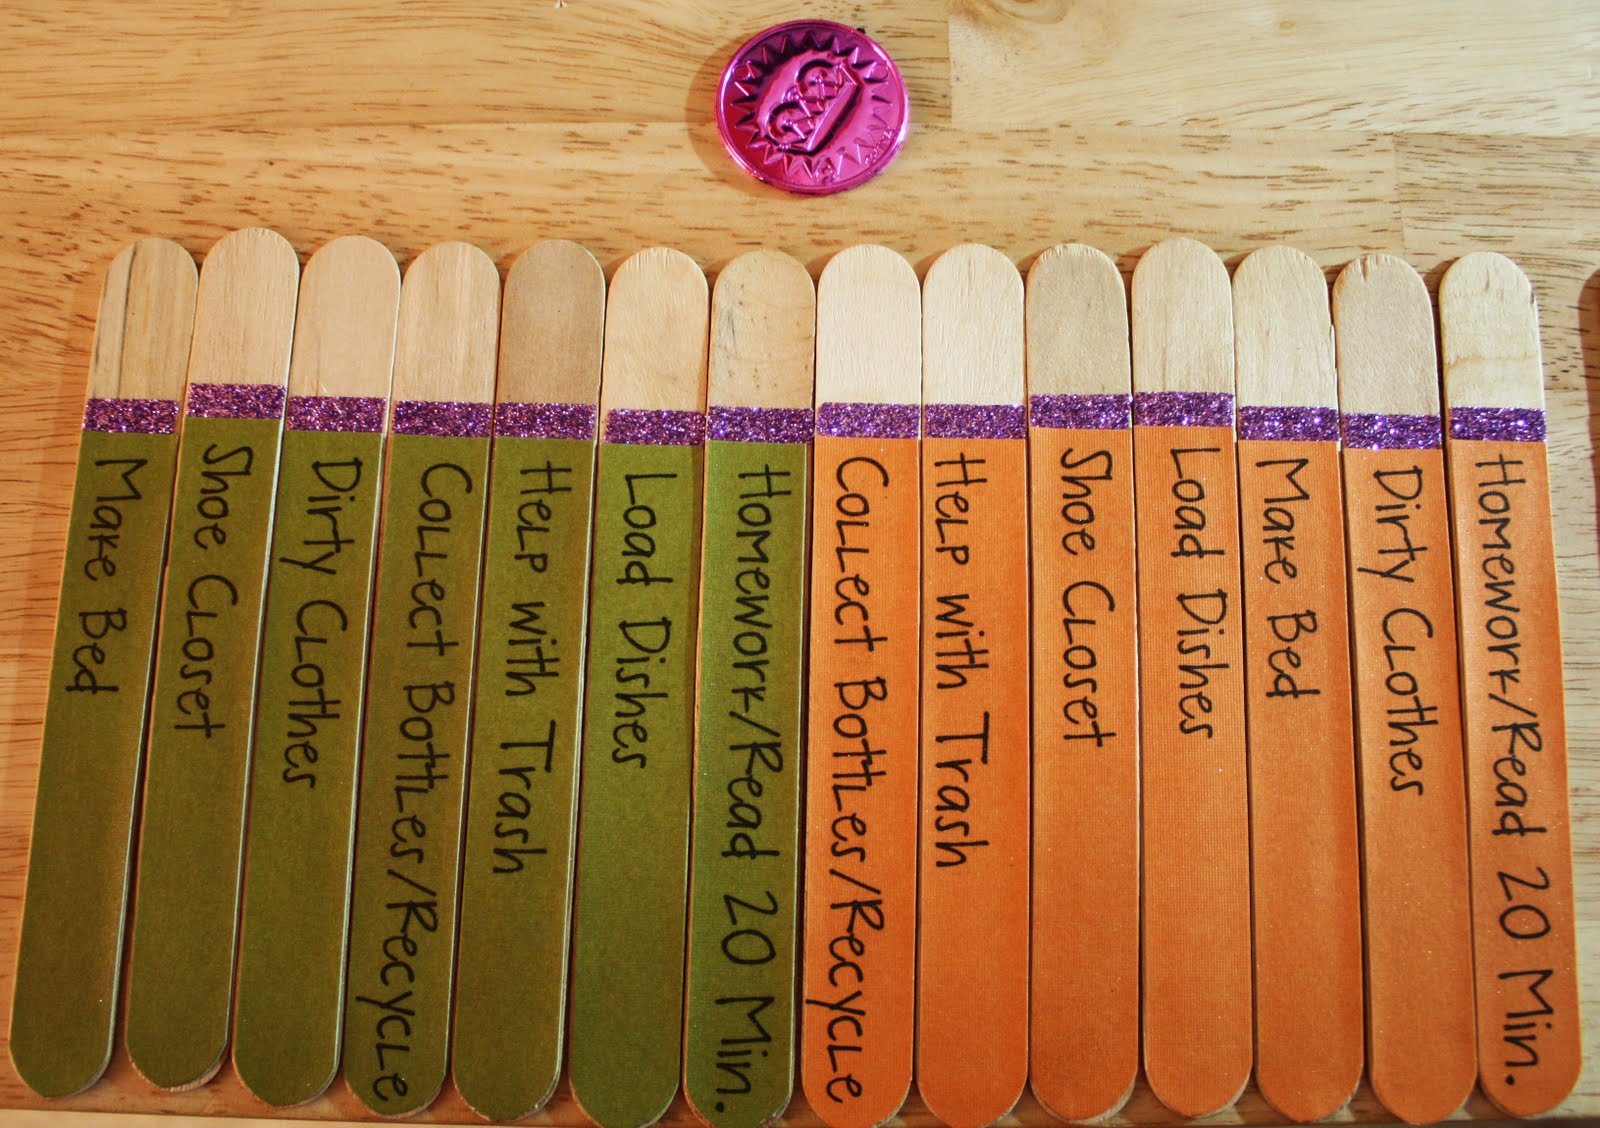
We have had chore charts for some time and they have worked wonderfully, however I was manually writing out chores in different colors each calendar month and it was very time consuming so you can imagine my excitement when I ran across this post from Crafty Mummy! I immediately began typing out our chores to create our own!
I already had Jumbo Craft Sticks that I had purchased some time ago and I created a Word document using font Pea Bandit at 36 point and spaced at 36 pt between the chores. You can download my Word document HERE if you want to use it for a template. Once I had my chores typed up, I cut two of each color cardstock to 8.5" x 11" to fit in my printer and then printed out the chores. I cut the chores into strips of 4.5" x a little less than 3/4". Once I had all the pieces cut I used a 1/2" corner rounder punch on one end of the cardstock (at the end of the writing). I used 1/2" Sticky Tape to adhere the cardstock to the popsicle sticks then sprayed Bronze Ritzy Ditzy Glitz on each.
We have coins that amount to different rewards, so I wanted to mark each chore with the corresponding coin color. To add the colors I used 1/4" Sticky Tape on each stick and added P K Glitter Glitz in the three colors; Orchid, Sea Mist, and Honey.
This is how our chores work:
The sticks will be placed in the jar so that colors are up. Once the chore is completed the stick will be flipped over so that the popsicle end will show, which will allow me to easily identify which ones are complete. Our purple coins are our "easy" chores and they are turned in for family time, each one is 10 minutes. This allows the kids to pick a special game for all of us to play, go on a walk/bike ride, basically any family oriented activity of their choice. The green coins are a little more detailed chore so they are worth more. For 5 coins, the kids get to pick out one Red Box Rental on the weekend or 8 coins they get to make a dessert of their choice. The gold coins are the toughest of our chores, for 3 coins they get to help make a dinner and for 5 coins they can have a friend stay the evening or a trip to the book store! Each evening I put coins they earned in their jars and turn the sticks back over. The coins expire each week, we start over each Sunday morning. We try to change up the rewards from time to time and occasionally we will get a bargainer that will strike up a deal!
Supplies:
Glitter: Glitz in Orchid, Sea Mist, and Honey (P K Glitz)
Glitter Spray: Ritzy Ditzy Glitz in Bronze(P K Glitz)
Sticky Tape: 1/2" and 1/4" (P K Glitz)
Scrapbook Paper: Textured Cardstock (Momenta)
Font: Pea Bandit, 36 pt.
Popsicle Sticks: Jumbo Craft Sticks (Tree House Studios)
Punch: 1/2" Corner Rounder (Zutter)
I love-love-love this paper!
This is Scrap Within Reach, Industrial Park and the colors are just me. My problem is that I have such a hard time using it because I don't want it to ever go away! :) Do you ever have this problem? I am telling you, I would wall paper my art room with this line if I could!
So - about the layout...
I am a Kansas girl and I have always enjoyed fishing, camping, and hanging out at the lake. Now you have to keep in mind that I grew up in an area where you could camp at the lake alone, without facilities or people around! However, being in the area of Michigan I am now, I just haven't found a lake or camping spot that doesn't include HUNDREDS of people (and bathroom and showers...really people we are suppose to be camping here)! So, we have our own version of camping right here in our back yard. We pull out our tent and fire pit and rough it for an evening. It is the closet to Kansas camping as I can get, for now! The kids love cooking their own hot dogs and s'mores and we have a great time!
You can get the SCAL file here -or- the SVG file here.
Supplies:
Paper: Scrap Within Reach, Industrial Park
Ribbon: Scrap Within Reach, Industrial Park
Ink: Cat's Eye Chalk Ink
Chipboard Letters: Scrap Within Reach, Paper Boy
Sticker: Scrap Witin Reach, Paper Boy
Dew Drops: The Robin's Nest
One of my most favorite things to use with glitter is Sticky Paper! For today's tip I am going to show you how easy Sticky Paper makes background glittering! For this project I am using a frame from the Cricut Stand and Salute cartridge which I cut out at 4 3/4". I cut my sticky paper just smaller than the frame. 
Remove the adhesive covering and apply the sticky paper to the frame, with the sticky side facing up through the frame.
Next, we add our glitter! Don't be shy, sprinkle on a lot to ensure you have full coverage and shake off the excess to return to the container.
I finished the frame by tracing the detail with the Quickie Glue pen and adding Crystal Glitter Glitz! Now we just need to add our glittery frame to our card and embellish!
Supplies:
Glitter: Glitz in Chinese Firecraker and Crystal (P K Glitz)
Adhesive: Sticky Paper (P K Glitz) and 1/4" Square Zapdots (Helmar)
Glue Pen: Quickie Glue Pen (Sakura)
Cardstock: Primary Textured Cardstock (Momenta)
Die Cut: Shootstr-S Frame, Stand and Salute (Provo Craft)
Sticker: The Freedom Collection (Reminisce)
Misc Fibers
How quick was that for a glittered background!?


