3D Calendula, Camellia, and Sweet Pea Paper Flowers!
...and we are back to flowers!
These were requests I received and I really love how they turned out!
This
file comes with all the pieces you need to create this Calendula flower. The
pieces are sizeable to fit your needs and are compatible with both the 8x12 and
12x12 mats!

Here is the tutorial:

1. Cut out all the pieces. I cut my three smallest flowers in a darker shade.
2. Roll the stem diagonally with your skewer/pencil. If you need help with the stem tutorial, click HERE.
3. Place adhesive on the odd circle piece, covering the circle area only. Place the stem to one side as shown.
4. Wrap the piece around the stem then use your skewer/pencil to curve the pieces.
5. Adhere your leaf pieces on as shown.
6. Begin with the smallest flower piece and squish it in toward the center as shown. Adhere it to the center of the next sized flower.
7. Bend up the petals and adhere in the center of the next flower.
8-15. Continue pushing the petals up and adhering the piece into the next size flower until all pieces are in place.
16. Adhere the flower on the stem
17. Your flower should look similar to this now.
This file comes with all the pieces you need to create this Camellia flower. The pieces are sizeable to fit your needs and are compatible with both the 8x12 and 12x12 mats!

Here is the tutorial:

1. Cut out all your pieces.
2. Use a pencil or skewer to curve the petals.
3. Beginning with the smallest, push up the petals to the center. Pinch the piece together so it holds it shape.
4. Adhere this piece in the center of the next sized piece.
5-8. Continue building your flower, bending the petals up as you go.
9. Adhere the leaf piece to the bottom of the flower.
This file comes with all the pieces you need to create this Sweet Pea flower. The pieces are sizeable to fit your needs and are compatible with both the 8x12 and 12x12 mats!

Here is the tutorial:
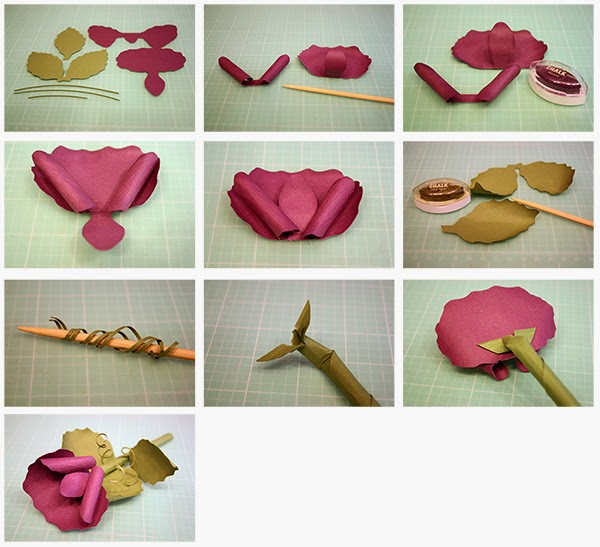
1. Cut out all your pieces.
2. Use a pencil or skewer to curve the petals as shown.
3. Ink around the edges of the flower pieces.
4. Bend the skinny piece on the large flower and then adhere the rolled piece as shown.
5. Push the skinny piece back under the roll pieces.
6. Curl the leaf pieces and ink around the edges.
7. Grab the three skinny cuts and group them together. Wrap them around your skewer/pencil as shown.
8. Roll the square/stem diagonally with your skewer/pencil. If you need help with the stem tutorial, click HERE.
9. Adhere the stem to the bottom of your flower.
10. Adhere your spirally cuts near the leaf pieces to finish!
Tags:
3D Flower
3D Paper Flowers
3D Tutorial
Bits of Paper
Calendula
Camellia
Jamie Cripps
Jamie Lane Designs
Silhouette
Sweet Pea
Tutorial


0 comments