Card Organizer Display Box
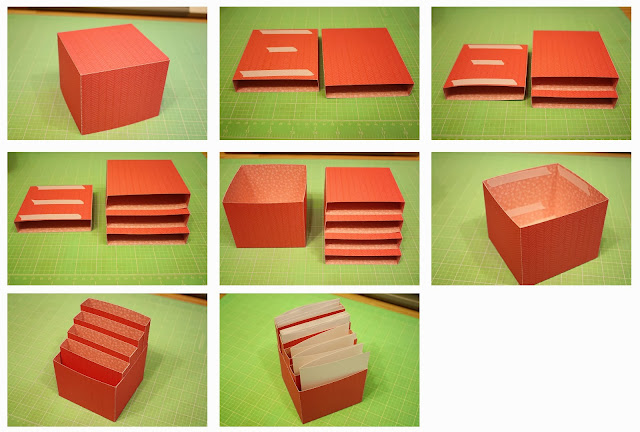
This is my new Card Organizer Display Box and the thought behind this box was for it to be able to sit out for others to thumb through to select cards, wether it be in your craft space or for an art fair. The box is designed so that the cards can be stair-stepped for easier viewing and it can be expanded upon by cutting multiples and adhering them to the sides to create a larger storage unit! The finished project measures about 5-1/2" x 4-1/4" x 4" and it holds A2 sized cards/envelopes (note: some envelopes I had were a bit tight others fit very well though both were "A2" size). This file is compatible with both the 12x12 and 8x12 mats.
Here is the tutorial:
1. Cut your four boxes, fold on the score lines, and then place adhesive on each as shown.2. Adhere the small tabs to the right side of the box.
3. Then bring the side over and adhere the left bottom tab inside and the long side tab on the outer edge of the box as shown.
4. Do this for all four boxes - they should look like this now.
5. Next cut out your large box pieces and place adhesive as shown.
6. Line the pieces up and adhere the center together.
7. Adhere the bottom right tab to the box side so it looks like this.
8. Adhere the center tab to the box then place adhesive on the box as shown.
9. Adhere the side tab then adhere the bottom together.
10. Your box will look like this now.
11-13. Place adhesive on the top of the boxes and adhere it to the next sized box so the largest is on the bottom and the smallest on top.
14. You should have a large box now and a set of boxes that look like this.
15. Place adhesive inside your large box where the other boxes will touch.
16. Adhere your set of boxes inside your large box, pushing it all the way to the back so the front of the box forms another "bin" area. It should look like this now.
17. Fill your box with cards and envelopes!
Tags:
3D Tutorial
A2
Card Storage
Cards
Jamie Cripps
Jamie Lane Designs
Organization
Silhouette
Storage
Tutorial


6 comments