Disney Pixar Blog Hop - Day One!
Welcome day one of the Disney/Pixar Blog Hop!
If you are just learning of our blog hop, you will want to head back to Shawn's blog
to start at the beginning because we have lots of fun projects and prizes along the way!
If you are already on the hop, you should be arriving here from Ellen's blog!
Today I am sharing a tutorial as well as a FREE file for a print and cut for your Silhouette!

Supplies:
Twine: Honeydew, The Twinery
I found him on a website as a free personal use download and turned him into a print and cut file for your Silhouette that you can download HERE!
Print and Cut Tutorial:

1. Open the file in your Silhouette Software. Open the Registration Mark Window and click the Show Reg Marks box.


Card Instructions:
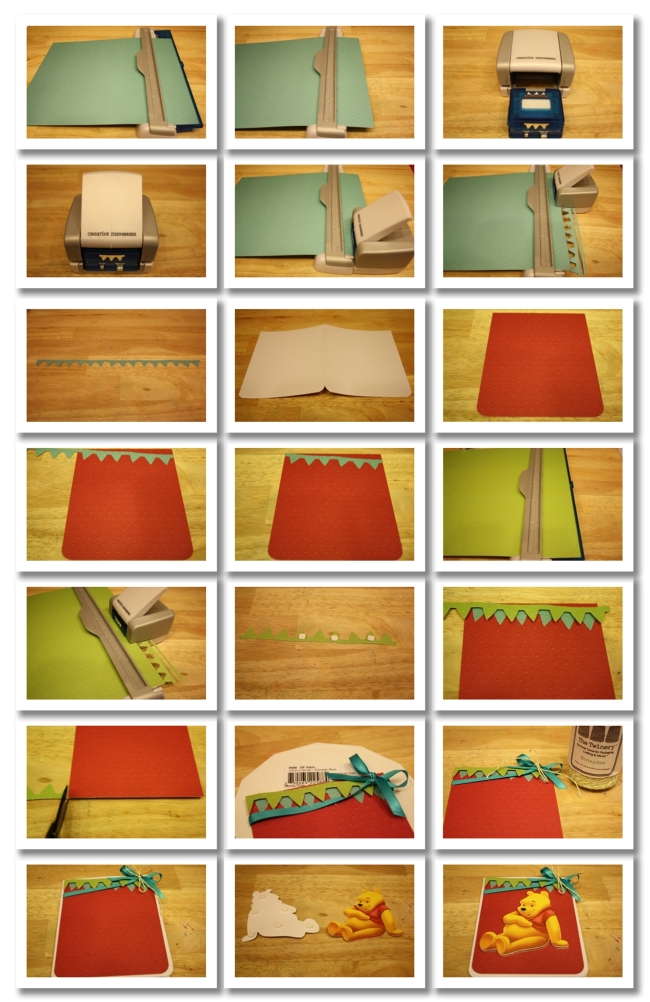
1. Using the Creative Memories Border Maker System, pull out the blue tray and place a piece of the teal colored embossed dots paper from the Creative Memories Enchanted paper pack, lining up the edge in the blue tray.
2. Fold the blue tray back under the Border Maker System.
3. Place the Banner Cartridge in the Border Maker.
4. Push the cartridge until you hear a click.
5. Line the cartridge holder up with the Border Maker, placing the pieces in the slots.
6. Push the handle down to punch. Continue sliding the cartridge holder along the Border Maker punches to the desired length.
7. Your border should look like this!
8. Cut a piece of white cardstock to 5-1/2" x 8-1/2" then fold in half to create a 5-1/2" x 4-1/4" card base. Round the two bottom corners.
9. Cut the red embossed dot from the CM Enchanted paper pack to 4" x 5-1/4" then round the two bottom corners.
10. Adhere the teal banner on the red cardstock as shown/
11. Trim the banner to fit the red cardstock.
12. Place a piece of the green colored embossed dots paper from the Creative Memories Enchanted paper pack, lining up the edge in the blue tray.
13. Fold the blue tray back under the Border Maker System then line up the cartridge holder and punch as you did before.
14. Place small foam squares as shown.
15. Adhere the green banner over the teal banner.
16. Trim the teal banner to fit the red cardstock.
17. Tie a piece of Tornado Blue satin ribbon around the red cardstock as shown.
18. Tie a piece of Honeydew twine around the Tornado Blue ribbon.
19. Adhere the red cardstock on to the card base.
20. Grab your Winnie the Pooh cuts and place foam adhesive on the back of one of them.
21. Adhere the image to the center of the cardstock and decorate as desired. I added a metal sentiment to finish my card!
---------------------------------------------------------------
I have three amazing sponsors with three amazing prizes that I know you are just going to love! And to be eligible, all you have to do is head over to their Facebook pages and tell them that I sent you and then leave me a comment letting me know you did!
It's that easy!
All of their Facebook links are below.
It's that easy!
All of their Facebook links are below.


*****

ScrapbookPal.com is sponsoring a

*****

The Twinery is sponsoring a
Be sure to stop back by here on Monday, 01/21 to see if you were one
of the three lucky winners from my blog!
Note: Winners will be chosen using random.org and I will verify eligibility before announcing winners.
of the three lucky winners from my blog!
Note: Winners will be chosen using random.org and I will verify eligibility before announcing winners.
Happy Hopping!
Tags:
Blog Hop
Creative Memories
Disney
Disney Blog Hop
Free
Giveaway
Ribbons Unlimited
ScrapbookPal.com
The Twinery
Tutorial


29 comments