The Country Life Cartridge has these adorable little banners that you can do many things with, including using with the alphabet or shadowing plain or with different shapes! I have the scallop shadow layer below my alphas for this card!
I have a Design Studio file together for this cut. The alphas are separated to cut with different color cardstock. You can click HERE to download the Cricut Design Studio File
My eight year old son, Gannon, found a card in a store that he has been asking me to make since the beginning of December. The saying is all he was after, so we decided that it would be great for my nephew which just turned TWELVE!
No worries, the "blob" is made from adhesive tape, mixed with a couple Copic colors! I created all of the card with the Creative Memories Storybook Creator and then printed it out and added it to cardstock. To bring more life to the card, I tied some twine and of course added in glitter to the candles!
Supplies:
Glitter: Glitz in Blue, Indigo, Gold, Spring Green, China Red, and Black (P K Glitz)
Creative Charms is doing another giveaway. They are giving away a free January Kit of the Month. All you have to do is leave a comment on the Creative Charms Blog post, become a follower of the Creative Charms site, and then you will be entered to win. How easy is that?!? Contest ends on Sunday, January 30.
I have been offered a chance again to do a couple reviews for CSN! I think most everyone in the blog land has heard of CSN by now but they have an excellent selection of everything from Laptop messenger bag to home decor! I recently had to work with their cutsomer service to return an order (as we had the wrong size) it took a couple days, but they were very kind and understanding and they got everything worked out for me quickly and the new order is on its way! I love when a company stands behind their products and policies! :)
We have been redoing Gannon's room in Univeristy of Michigan colors and would you believe that CSN Stores even has UofM bedding sets!? Now, if we can only get him to pick one! I will have to add in photos of his new room soon, it is turning out super cute!
And have you heard that ScrapbookPal.com is hosting another Blog Hop? This one is for Valentine's and I can't wait to see what the other DT members have been working on! The blog hop starts Friday, January 28th and you have a chance to win a Cricut Cartridge of your choice from the in stock cartridges! Be sure to stop by!
These are some of my favorite photos of Gannon when he was playing the violin. I have been sitting on these photos for a while now, but when I ran across this paper, I immediately thought of them...even in all their pink! :)
Supplies:
Paper and Embellishments: Cupcake Love Collection (Little Yellow Bicycle)
This month Scrap Tales gave me the Little Yellow Bicycle Cupcake Love Collection to work with! This is such a cute line! They have a 12x12 sheet of cut-outs and adorable chipboard epoxy buttons!
Which make cards like this so much fun!
Supplies:
Paper and Embellishments: Cupcake Love Collection (Little Yellow Bicycle)
With so many glittered papers and embellishments on the market I thought it would be a good time to show you that you can still change the color or add more in with your glitters! This cupcake has multiple layers of clear glitter on the frosting and wrapper, but the candy on top was a plain red paper that didn't really coordinate with my text or the flag banner. I pulled out my Quickie Glue Pen and covered the red then added Poppy Jasper Glitter Glitz. Once I dusted that off, I went back in with the glue pen in the white area and added Crystal Glitter! Now the cupcake matches what I need it to and it became a focus point for the layout!
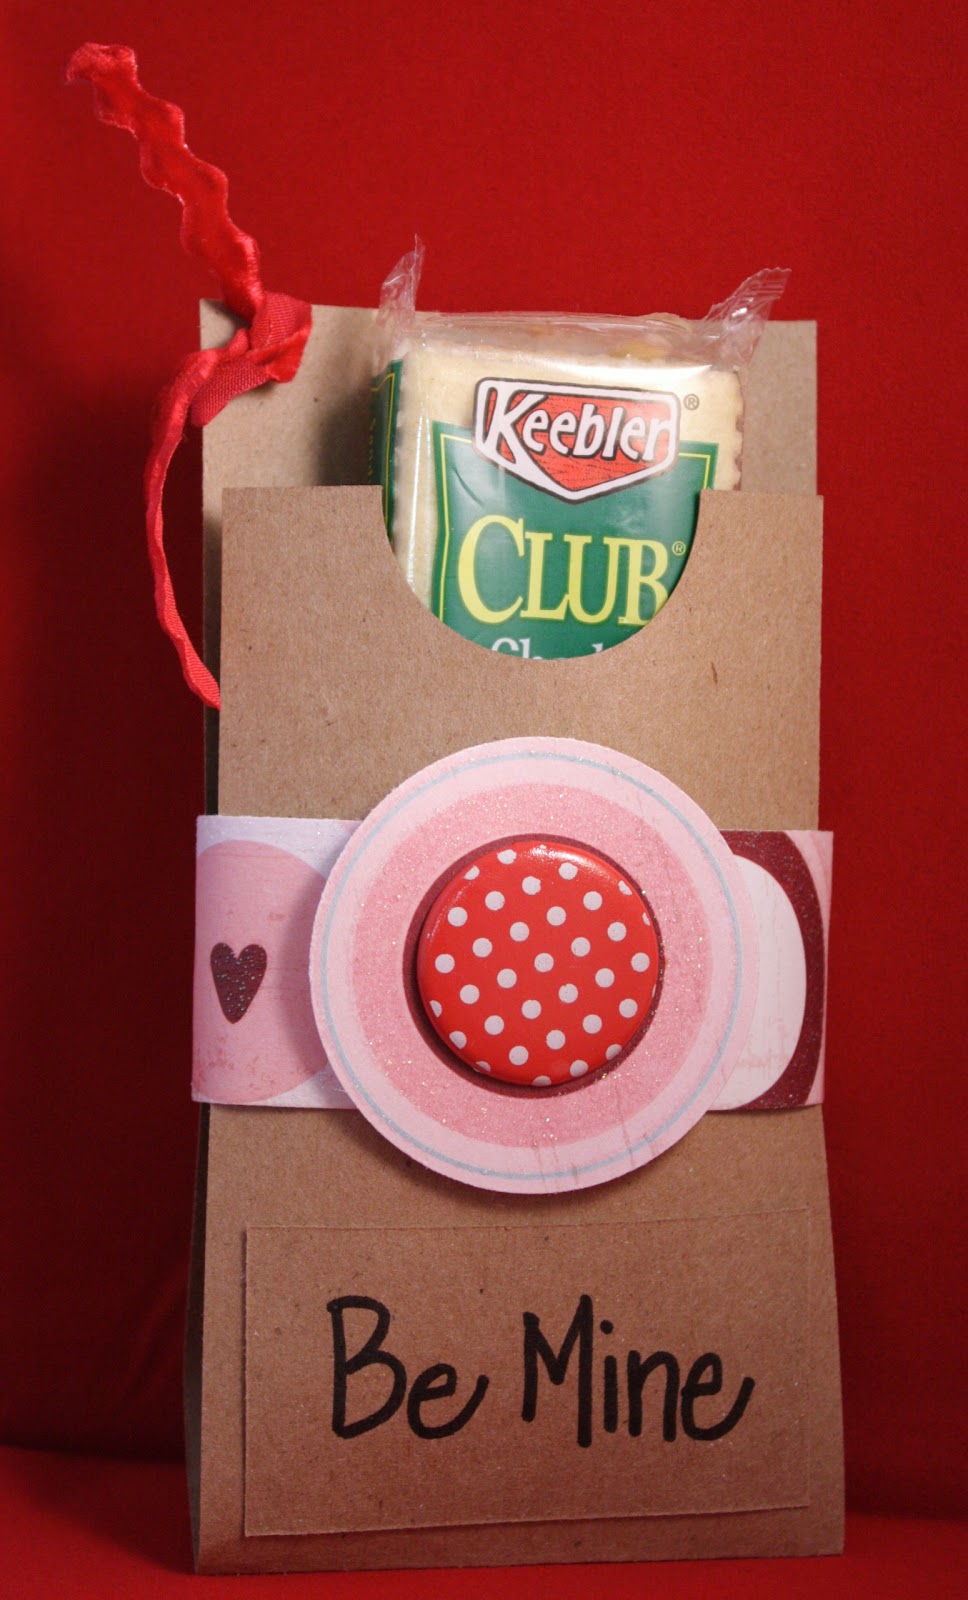
I have received many emails asking for instructions for my previous post of this Valentine Wrapper so I thought I would add it in a post for all of you.
This is a super easy project which makes it perfect for bulk creation!
The kraft paper is 3" x 11". Fold at 5" and then punch a 1/2 circle from the top flap.
Note: I added my sentiment before folding. I have the sentiment in Word Art below for download.
Place a pack of crackers or a Hershey bar inside the kraft paper.
Cut pattern paper to 3 1/2" x 7 1/2", punch the bottom edge with a border punch.
Wrap around the kraft paper (with the item in it) and adhere in the back.
Punch a hole in the top left corner, cut a small piece of ribbon or twine then fold it in half. Push the loop end through the hole then pull the ends through the loop and tug tightly.
I am back today with more Wonderfilm but this time I am using it with punches and paper! I simply punched three areas of Wonderfilm, adhered them to my card then peeled off the large heart to cover it with Purple Iris Glitter Glitz and then peeled the smaller hearts to cover with Wine Glitter Glitz!
I have been planning and creating teacher gifts for Valentine's Day and January's Kit of the Month, My Heart's Desire, is perfect for the occassion! These simple goodie pouches can hold cracker packs or candy bars!
And for those a little more close, I have been creating cards!
I have completed my week long redo of my art room! I have more extra storage than what I thought I would end up with and everything is easy to get to, so I am very happy with the end results!
Do you remember my post from September where I used SEI's My Own Monster Iron-on Art to make t-shirts? Well, today I am offering up a brand new kit for one of you to create with!
All you have to do is leave a comment on this post and I will randomly select a winner on Saturday, 01/22/11!
I created a shaped card using the pea cut. You can download the Design Studio Cut file HERE. The cardbase is the shadow option on the pea cut at 5-1/2". The layer is the pea and the pea with the Layer1 option cut at 5-1/2".
After creating Hannah's school bag, she decided that she wanted to create personalized bags for her friends as all of them have commented on how much they like hers! I am just so thankful that Wonderfilm makes this so super easy!
We found the bags at Joann's in a three pack and used our coupon to bring the price down even more! The Wonderfilm comes in a 4 pack of 8"x10" pieces, we used one sheet. With the glitter included the bags cost about $4.50!
For all of you who have written to ask how to make these, here are the steps!
We always start by ironing the bag so that it lays flat. It adds a little extra time, but it makes it so much easier!
We have been using our Cricut for the cutting, but you can use punches and die cuts as well. If using the Circut, tape the Wonderfilm to the Cricut Mat, it is thick and will slide around if you don't. I cut it at High Pressure and Speed with my blade on 5. If you use Design Studio or Gypsy, you can see where you need to place your Wonderfilm, so you can use it wisely! :)
Once you get your cuts, simply peel off the back side of the Wonderfilm and then adhere it to your project.
Next remove the front side of the Wonderfilm and add glitter. Shake off the excess glitter and return it to the container before going on to another color! For the peace sign, we peeled the Wonderfilm back in three sections to add the different colors.
You know that time of reorganizing where you pull EVERYTHING out and then you realize that you have MUCH more than you care to admit that you have!? Well, I have reached that point. I have a cabinet and a craft armoire both of which held an impressive amount of product. Mix that with many other hiding spots and you end up with a crazy mess that I am really starting to worry won't fit back in! Luckily, my local scrapbook store, Scrap Tales, is having a garage sale in February as I already have FOUR rubbermaid bins stuffed with product and I still have much more to dig through!
Here is where I am at:
I have moved the cabinet and armoire and they are now where they will stay! Right now I have 12x12 paper trays in between the two cabinets, but those may move. Across from these cabinets I have my kitchen island (where I work)...you just can't see it because there is soooo much stuff on it!
By the way, if ever you are rearranging large furniture by yourself, you must invest in the furniture mover disks. I use Moving Men but there are several out on the market. They are low cost and if you can nudge the furniture up to get the pads under the item, you can move it anywhere (on the same level, of course)! Both of these cabinets are SUPER heavy and I moved them without much issue.
And this is the wall that will be changing. This is where my kitchen island was and where the slat wall is now!
Today I am working on getting the paper trays, spinner rack, and shelves on the slat wall. Then hopefully I can get some of my desk cleared off as I have assignments that I need to start and one I have to have out today! :)
For Christmas I received the Zutter Kutter and I just have to tell you that this thing is AMAZING! It cuts through all sorts of chipboard, cardboard, stacks of cardstock...well everything I have tried! It is rather large and quite heavy but sooo worth those types of issues :)
Here is a video from You Tube if you are interested!
Can you imagine the possibilities!? I am just super excited!
My tiny little room has finally outgrown itself. It became cluttered and chaotic so I made the decision that it was time to clean out and reorganize! One of our local scrapbook stores has decided to close its doors, which I always hate to see! They are selling fixtures and their slat wall so I have purchased some of both for my new room design! I can't pick it up until they close, so in the meantime I am cleaning and rearranging to make room! I may be a bit slow with crafty posts while I am reorganizing but I will try to keep you updated with room photos to fill in! I am hoping to have all this complete within a week or two! "Hoping" :)
My sister and her family went to California last March and I hijacked her photos to create them a surprise 6x12 mini album (I love this size!)!
I left journaling blocks and empty spaces where they could add their memories and used the Hummingbird collection from Creative Memories and of course, my Bind-it-All to hold it all together :) I also added a DVD of all their photos from the trip, so even the memories that I didn't print will be in the book if they should ever want them!
I use amazon links on my blog that allow me to earn from qualifying purchases. These affiliate links may be used at no cost to you which help keep this blog going!
As an agreement with the companies and teams that I design for and work with, I often receive product &/or compensation for my work. The thoughts and opinions in my blog posts are mine and I only promote the items and companies that I use myself and feel strongly about.
As always, thank you for supporting my blog!


